If you are looking for a fun, rewarding, and highly customizable craft project, a crochet hair clip – tutorial is the perfect place to start. Making your own hair accessories has become incredibly popular lately, combining the cozy charm of traditional fiber arts with modern fashion trends. Whether you want to create a sweet gift for a child, a stylish statement piece for yourself, or even build a small inventory for a handmade business, learning how to crochet hair clips is a fantastic skill to master.
This comprehensive crochet hair clip – tutorial will guide you through the entire process, from choosing the right materials to mastering the essential stitches. The beauty of this project lies in its simplicity and versatility, as it requires very little yarn and can be completed in just one short sitting. Even if you are a complete beginner who has never held a crochet hook before, this step-by-step approach will give you the confidence to create gorgeous, boutique-quality accessories right at home.
By following this crochet hair clip – tutorial, you will not only learn a new craft but also discover how to play with different textures, colors, and embellishments to match any outfit. Handmade hair clips are wonderful because they are gentle on the hair, infinitely customizable, and carry a unique personal touch that store-bought items simply cannot replicate. Let’s dive into the essential terms, materials, and techniques you need to know to create your very own stunning crochet hair accessories.
1. Essential Materials for Making Your Crochet Hair Clip
Before you begin working on your crochet hair clip – tutorial, gathering the right high-quality materials is the first step toward achieving a professional finish. The type of yarn you choose plays a massive role in how neat and defined your stitches will look on the final piece. For hair accessories, a 100% cotton yarn or a high-quality acrylic yarn in a lightweight or sport weight category is highly recommended.
The next vital tool is the crochet hook, which must be appropriately sized for your chosen yarn to ensure tight, neat stitches. Generally, a 2.5mm to 3.5mm crochet hook works best for small, detailed projects like hair clips because it prevents the fabric from becoming too loose or floppy. If your stitches are too loose, the metal clip underneath might show through, which can ruin the overall aesthetic of your handmade accessory.
You will also need the actual metal bases, commonly known as snap clips or alligator clips, which come in various sizes like 4cm, 5cm, or 6cm. These metal bases serve as the sturdy foundation for your beautiful yarn work, allowing the finished clip to hold onto hair securely. Choosing a strong, rust-resistant metal base ensures that your handmade creations will last for a very long time through daily wear and tear.
To assemble everything seamlessly, a few extra crafting tools are absolutely necessary for a polished look. You will need a sharp pair of craft scissors to snip your yarn and a sturdy tapestry needle to weave in any loose ends securely. Additionally, a reliable adhesive like hot glue or a specialized fabric glue is essential for bonding your finished crochet piece firmly onto the metal clip base.
Understanding how these materials interact is a fundamental part of this crochet hair clip – tutorial. For instance, cotton yarn provides excellent stitch definition and holds its shape incredibly well over time without piling. On the other hand, acrylic yarn offers a wider variety of vibrant, bright colors and a slightly softer texture if you prefer a cozier, fuzzy look for winter accessories.
Ultimately, investing a little time in selecting complementary colors and the right tools makes the crafting process much more enjoyable and successful. Having everything organized on your workspace before you start ensures a smooth, relaxing crafting experience from the very first stitch. Now that your supplies are ready, you can move forward with confidence to learn the foundational stitches required for this delightful project.
2. Step-by-Step Stitches and Techniques for Beginners
Mastering a few basic stitches is the core foundation of this crochet hair clip – tutorial, making it accessible even for those new to the craft. The journey begins with creating a slip knot and working a chain stitch, which forms the initial foundation line for your project. From this basic chain, you can build various shapes, such as simple rectangles, ovals, or even delicate little flowers to decorate your metal clips.
The most common stitch used for covering the metal base or creating a solid backing is the single crochet. This stitch is compact, tight, and provides excellent coverage, ensuring that the metal of the clip remains completely hidden underneath the yarn. Learning how to maintain consistent tension while working your single crochets is key to achieving a smooth, uniform surface that looks professional.
If you want to add a bit more height, texture, or a scalloped edge to your design, the half double crochet and double crochet stitches are excellent options. These stitches allow you to create beautiful, wavy borders or leafy patterns that give your hair clips a distinctly vintage or bohemian flair. Combining different stitch heights within the same row is a clever way to shape petals or curved leaves easily.
Another essential technique you will practice in this crochet hair clip – tutorial is the slip stitch, which is primarily used to join rows or finish off edges smoothly. The slip stitch creates a flat, clean border that binds the project together without adding unwanted bulk to the delicate accessory. It is also the perfect stitch for moving your yarn across a piece without creating a visible line of fabric.
To make your hair clips truly unique, you can explore advanced techniques like working in the magic ring to create perfect, gapless circular flowers. Alternatively, learning to crochet directly around the metal snap clip itself is a fantastic technique that eliminates the need for gluing a separate backing piece later. This direct-crochet method wraps the metal bar securely in yarn, creating a built-in cushion that is incredibly soft against the scalp.
Practice makes perfect, so do not worry if your first few stitches look a bit uneven or if your tension feels a little tight. Take your time to get comfortable with how the yarn slides over your hook, and enjoy the rhythmic, calming motion of crafting. Once you have practiced these core stitches, you are fully prepared to assemble your pieces and bring your gorgeous hair clips to life.
3. Assembling and Securing Your Finished Hair Clip
Once you have completed the yarn portion of your crochet hair clip – tutorial, the assembly phase is where the magic truly comes together. Proper assembly ensures that your beautiful yarn creations remain firmly attached to the metal bases through daily use, styling, and storage. Taking shortcuts during this step can result in the yarn peeling away from the slick metal surface, so patience is key here.
The first step in assembly is managing your yarn tails by using your tapestry needle to weave them deeply into the back of your stitches. Cutting the yarn too close to a knot can cause the project to unravel later, so weaving the tail through several stitches ensures maximum security. A clean, neat back is just as important as a beautiful front, especially if you plan to sell your finished crafts.
Next, prepare your adhesive, with a high-temperature hot glue gun being the most popular and efficient choice for most crafters. Carefully apply a thin, even line of glue along the top surface of the metal alligator clips or snap clips, avoiding the hinge mechanism. It is crucial not to use too much glue, as excess adhesive can squeeze out of the sides and ruin the look of your yarn.
Gently but firmly press your finished crochet piece onto the glued metal base, ensuring it is perfectly centered and aligned from end to end. Hold the piece in place for about thirty seconds to a minute, allowing the glue to cool down and form a permanent, secure bond. If you are using fabric glue instead of hot glue, you may need to use a small craft clip to hold it together while it dries overnight.
For an extra touch of security and professionalism, you can cut a small piece of felt fabric to match the shape of the clip’s underside. Gluing this felt piece between the metal clip and the crochet fabric sandwiches the metal securely and provides a beautifully soft, scratch-free finish for the wearer. This extra step is highly recommended if you are making accessories intended for babies or toddlers with sensitive scalps.
Finally, inspect your assembled piece for any loose threads or tiny stray glue strings, clearing them away gently to reveal your finished masterpiece. Your crochet hair clip – tutorial creation is now fully assembled, strong, and ready to be worn with pride or packaged up beautifully as a thoughtful gift. With the assembly mastered, you can now explore endless ways to customize and style your new handmade creations.
4. Creative Customization and Styling Ideas for Your Clips
The absolute best part of completing a crochet hair clip – tutorial is the endless potential for creative customization and personal expression. Once you know the basics, you can easily alter the colors, sizes, and decorations to create an entire collection of unique hair accessories. For a classic, timeless look, try using neutral earth tones, pastel pinks, or soft creams that can match almost any everyday outfit effortlessly.
If you want to create something more eye-catching, consider experimenting with variegated yarn or metallic threads woven into your standard cotton yarn. These specialized yarns create beautiful, shifting color patterns automatically as you crochet, giving each individual clip a completely unique, one-of-a-kind appearance. You can also mix and match contrasting colors for the main body and the outer border to make the design pop visually.
Adding small embellishments is another fantastic way to elevate your crochet hair clip – tutorial designs to a premium, boutique level. You can sew tiny faux pearls, shiny sequins, or rustic wooden beads onto the center of your crochet flowers for added texture and sparkle. These small details catch the light beautifully and transform a simple everyday hair clip into an elegant accessory suitable for special occasions.
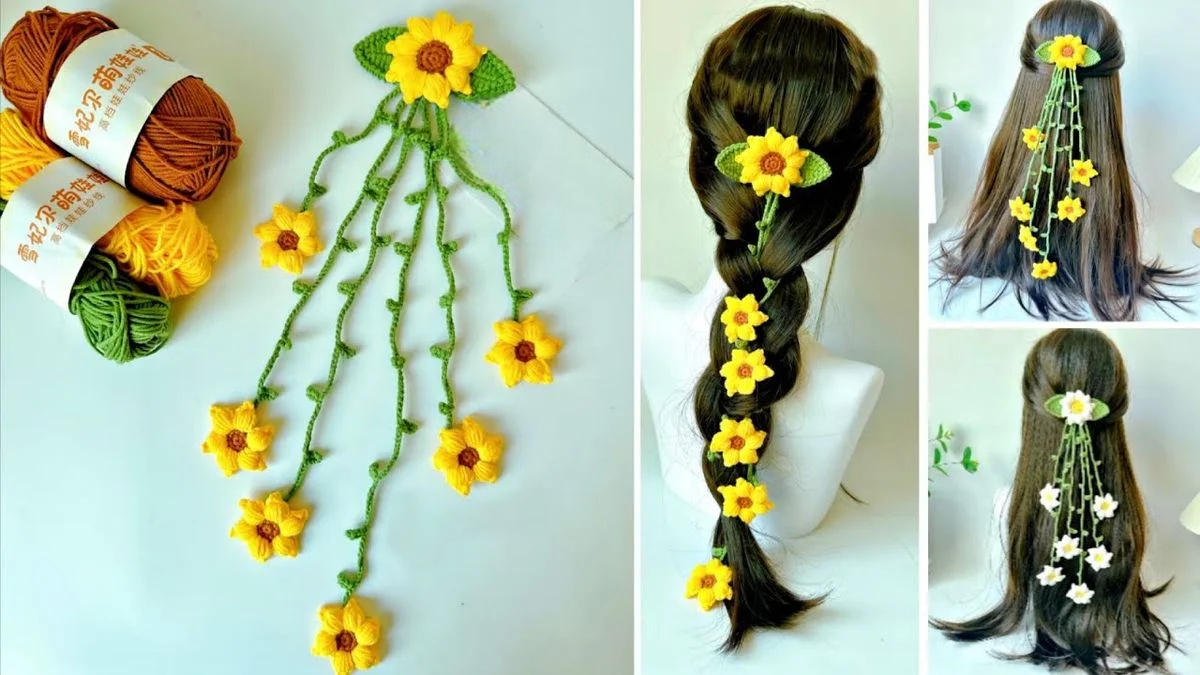
Seasonal themes offer incredible inspiration for customizing your clips throughout the year, keeping your crafting routine fresh, exciting, and inspiring. You can crochet tiny orange pumpkins for autumn, festive red and green bows for the holidays, or bright yellow sunflowers for warm summer days. These themed accessories make wonderful stocking stuffers, party favors, or festive additions to your own holiday wardrobe.
Don’t limit yourself to just one style of clip base either; try adapting your crochet designs to fit bobby pins, large hair slides, or even headbands. A matching set featuring a crochet hair clip and a coordinating headband makes an adorable, highly giftable photography prop for newborn photo sessions. The skills you have learned here can easily be scaled up or down to fit any size of hair hardware available.
Ultimately, crafting is all about enjoying the process, expressing your personal style, and sharing love through handmade gifts. Share your beautiful creations with friends, family, or your online crafting community to inspire others to take up this wonderful, rewarding hobby. Keep experimenting with new stitches, fibers, and layouts, and watch your unique collection of crochet hair accessories grow beautifully over time.
FAQ: Frequently Asked Questions About Crochet Hair Clips
What is the best type of yarn to use for a crochet hair clip?
The best yarn for a crochet hair clip – tutorial is 100% cotton yarn in a lightweight (sport or fingering) category. Cotton yarn offers incredible stitch definition, does not stretch out of shape easily, and resists pilling over time, which keeps your hair accessories looking brand new even after heavy use.
How do I prevent the metal clip from showing through the crochet stitches?
To keep the metal clip completely hidden, make sure to use a crochet hook that is slightly smaller than what the yarn label recommends. This creates tighter, denser stitches that block the metal from peeking through, and choosing a yarn color that matches the metal base can also help camouflage it.
Can I wash handmade crochet hair clips if they get dirty?
Yes, you can wash them, but it must be done carefully to protect the adhesive and the metal base. Gently spot-clean the yarn surface with cold water and a drop of mild soap, then blot it dry with a towel, making sure not to submerge the metal clip to prevent rust.
What is the best glue to secure the crochet fabric to the metal clip?
A high-temperature hot glue gun is the most popular, fast-drying, and reliable option for securing your crochet work to metal bases. For an even stronger, industrial-strength hold that remains flexible over time, specialized jewelry glues or clear fabric adhesives can also be used effectively.
Are these crochet hair clips safe for babies and young children?
They are safe, but extra care should be taken to ensure all small parts, like beads or buttons, are sewn on incredibly tightly to prevent choking hazards. For babies, using soft snap clips wrapped entirely in yarn or adding a felt fabric backing ensures maximum comfort on their delicate heads.
Conclusion
In this crochet hair clip – tutorial, we have explored everything from selecting the perfect cotton yarn and tools to mastering essential beginner stitches and assembling your finished accessories securely.
Creating your own handmade hair clips is an incredibly fulfilling craft that allows you to transform simple materials into beautiful, practical art pieces. By practicing these techniques, you now have the skills to create endless variations of custom hair accessories for yourself, your loved ones, or your handmade shop.