Easy Patchwork Curtains – Tutorial is the ultimate project for anyone looking to add a touch of warmth, personality, and handmade charm to their home decor. Whether you are an experienced quilter or a complete beginner picking up a sewing machine for the first time, crafting your own window treatments is incredibly rewarding. Windows are the focal points of any room, and dressing them in custom, colorful fabrics can instantly elevate your space from ordinary to extraordinary. This guide will walk you through every single step of the process, ensuring you achieve a professional finish without the stress.
Creating easy patchwork curtains allows you to mix and mtch your favorite fabric prints, colors, and textures in a way that commercial store-bought curtains simply cannot match. It is also an exceptional way to practice sustainable crafting by utilizing fabric scraps, old linens, or leftover material from previous quilting projects. Throughout this comprehensive patchwork tutorial, you will discover that you do not need master-level sewing skills to create something beautiful, functional, and durable. All it takes is a little patience, accurate measuring, and a passion for DIY home design.
In this extensive guide, we will cover everything from selecting the right patchwork fabric to mastering the straight stitch, managing seam allowances, and hanging your finished masterpiece. By the end of this reading, you will possess the confidence and knowledge required to transform simple fabric squares into stunning, light-filtering works of art. Grab your fabric scissors, thread your machine, and let us dive straight into the wonderful, creative world of sewing custom window panels.
1. Choosing the Perfect Fabric for Your Easy Patchwork Curtains
Selecting the right material is the foundation of any successful patchwork curtain tutorial because the weight and drape of the fabric dictate how the finished panels will look in your window. For an easy patchwork curtains tutorial, 100% quilting cotton is highly recommended because it is stable, easy to cut, and comes in an endless variety of beautiful prints. Beginners will find that quilting cotton holds its shape perfectly under the sewing machine needle, making it a joy to sew.
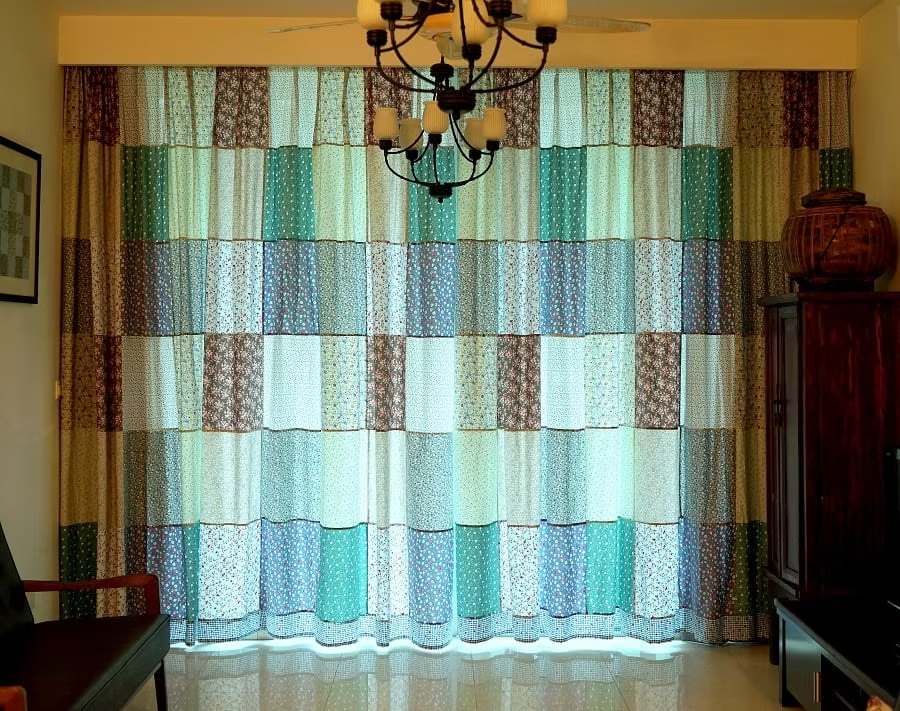
When planning your patchwork curtains, think about the lighting in your room and choose colors that complement your existing furniture and wall paint. You can opt for a cohesive color palette, such as various shades of blue and cream, or go for a vibrant, bohemian look by mixing eclectic floral and geometric prints. Mixing larger prints with smaller motifs and solid fabrics creates visual balance, preventing the final patchwork design from looking too chaotic or overwhelming to the eye.
Don’t hesitate to think outside the box and incorporate upcycled fabrics into your easy patchwork project, such as clean cotton shirts or vintage linens. Combining different fabric sources adds an authentic, lived-in story to your handmade curtains, which is exactly what makes patchwork decor so uniquely appealing. Just ensure that all the fabrics you choose have similar washing requirements so your curtains won’t warp or shrink unevenly during future cleanings.
Before you make a single cut, it is absolutely vital to pre-wash and iron all of your selected curtain fabrics to prevent shrinkage later on. Raw cotton fabrics tend to shrink during their first wash, and skipping this step could ruin your beautifully aligned panels the first time you launder them. Once washed, iron the fabric completely flat with plenty of steam, as crisp fabric is significantly easier to measure and cut with high precision.
Gathering your essential tools beforehand will make the entire process smooth and highly enjoyable for your afternoon crafting session. You will need a reliable rotary cutter, a self-healing cutting mat, a long acrylic quilting ruler, high-quality sewing thread, sharp pins, and a basic sewing machine. Having the right patchwork sewing tools ensures that your fabric squares are perfectly square, which makes aligning the rows during assembly an effortless task.
Take a moment to sketch your desired layout on a piece of paper or arrange your fabric pieces on a large table or clean floor space. This visual layout allows you to distribute colors and dark or light values evenly across the entire surface of the panel before sewing. Seeing the composition beforehand guarantees you will love the final look of your easy patchwork curtains – tutorial project once it is hanging in your window.
2. Accurate Measuring and Precise Cutting Techniques
The secret to flawless easy patchwork curtains lies entirely in the accuracy of your initial measurements and the precision of your fabric cuts. To determine the size of your panels, measure the width and height of your window frame, taking into account how much gather you want. For a standard look, multiply the window width by 1.5 or 2, which gives the curtains a beautiful, full appearance when fully closed.
Once you have your total desired dimensions, remember to add extra inches for the top rod pocket and the bottom hem adjustments. For a standard rod pocket, adding an extra 4 to 5 inches to the top is customary, while a substantial 3-inch bottom hem adds weight and helps the curtain drape elegantly. After calculating the grand total area, divide that number by the size of the fabric squares you plan to use for your patchwork rows.
For this specific easy patchwork curtains – tutorial, using 6-inch or 8-inch squares is ideal because they sew up quickly and showcase fabric patterns beautifully. Remember that a standard 1/4-inch seam allowance will be consumed on every side of the square during the sewing process. Therefore, cutting 6.5-inch squares will result in finished 6-inch squares once everything is securely stitched together into rows.
Place your pre-washed, ironed fabric onto your self-healing cutting mat, aligning the straight grain of the fabric with the grid lines on the mat. Use your acrylic quilting ruler to press down firmly on the fabric, preventing any slipping while you roll the rotary cutter along the edge. Take your time during this step, as perfectly cut squares mean your corners will match up beautifully during the assembly phase.
If you are working with a large variety of fabric scraps, try cutting an equal number of squares from each fabric print to maintain a balanced look. Keep your cut squares organized in neat stacks according to color or pattern so you can easily access them when organizing your design layout. Organization keeps your creative workspace tidy and prevents mistakes like accidentally sewing two identical fabric squares right next to each other.
Always double-check your mathematical calculations and your fabric cuts before moving away from the cutting table to start the sewing machine. It is always better to measure twice and cut once than to realize halfway through that your panels are a few inches too short. With all your vibrant squares neatly cut and stacked, you are officially ready to begin the fun process of piecing your curtain panels together.
3. Sewing the Patchwork Squares and Row Assembly
Now that your pieces are cut, arrange them on your design floor or table to create the exact layout for your easy patchwork curtains. Work row by row, placing the squares in horizontal lines until you achieve a satisfying distribution of colors, tones, and patterns. Once you are completely happy with the arrangement, stack each row from left to right and label them with a sticky note or pin to keep track of the order.
To begin sewing, take the first two squares of row one and place them right sides together, aligning the raw edges perfectly on all sides. Sew along the right-hand edge using a strict 1/4-inch seam allowance, which is the standard standard for most successful patchwork quilting projects. Keep your sewing speed steady and use a straight stitch, making sure to remove pins before your needle reaches them to avoid breaking components.
Continue adding the remaining squares to the first row in the exact order of your layout until the entire horizontal strip is complete. Repeat this exact piecing process for all the subsequent rows, maintaining an identical seam allowance throughout to ensure all strips end up the exact same length. As you complete each horizontal strip, place it back on your layout surface to watch your beautiful custom window panel slowly come to life.
Pressing your seams is a critical step that differentiates a homemade project from a truly professional-looking piece of DIY home decor. For row one, press all the seam allowances to the right side, and for row two, press all the seam allowances to the left side. This alternating pressing technique allows the seams to “nest” together perfectly when you join the rows, resulting in flat, crisp, and beautifully aligned corners.
Next, place row one and row two right sides together, carefully matching up the intersecting vertical seams where the fabric squares meet. Pin securely at each intersection, ensuring the nested seams lock tightly against one another to prevent shifting while under the machine foot. Sew the rows together across the entire width, then repeat the process for all the remaining rows until the main body of the panel is joined.
Once the entire patchwork panel is fully assembled, take it back to the ironing board for one final, comprehensive press on both sides. Press the long horizontal seams downward, ensuring the front of your easy patchwork curtains looks flat, crisp, and free of any unwanted puckers. You now have a gorgeous, complete patchwork canvas that is ready to be transformed into a functional, working window curtain panel.
4. Hemming the Edges and Creating the Rod Pocket
The final phase of this easy patchwork curtains – tutorial involves finishing the raw edges to ensure durability and creating the top casing for hanging. Start by trimming away any loose threads or slight unevenness along the outer sides of your newly assembled patchwork panel. Turn the left and right side edges in toward the wrong side of the fabric by 1/2 inch, press with your iron, fold over another 1/2 inch, and pin.
Stitch close to the inner folded edge of both side hems using a matching thread to create a clean, durable border that won’t fray in the wash. Next, move to the bottom of the panel to create a classic, substantial hem that gives the curtain a professional weight. Fold the bottom edge up by 1 inch, press it flat, then fold it up an additional 3 inches before pinning and stitching it securely in place.
Creating the top rod pocket is just as simple and can be adjusted depending on the thickness of the curtain rod you plan to use. Fold the top raw edge down toward the wrong side by 1/2 inch and press it neatly with your steam iron. Then, fold it down again by an additional 3 inches, which easily accommodates most standard decorative curtain rods available on the market today.
Pin the top fold securely across the entire width of the panel, ensuring it remains straight and uniform from one side to the other. Stitch along the lower folded edge, backstitching at the beginning and end of the row to reinforce the seams against the weight of the rod. For an extra touch of style, you can sew an additional line 1 inch below the top fold to create a beautiful header ruffle.
Give your finished curtain panel one last meticulous inspection, trimming any remaining stray threads and pressing out any final wrinkles with your iron. Now is the perfect time to slide your brand-new, customized patchwork curtain onto your curtain rod and hang it up in your chosen room. Step back and admire how the natural sunlight filters beautifully through the individual fabric squares, highlighting your unique stitching and creative layout.
You can easily repeat this entire process to create a matching second panel if you prefer a traditional split-curtain look for wider windows. Handmade curtains bring an unmatched sense of coziness, artistic flair, and pride into your living space, making all your careful measuring and sewing completely worth it. Enjoy the wonderful compliments you will surely receive from friends and family members who admire your gorgeous custom craftsmanship.
Frequently Asked Questions (FAQ)
What type of fabric is best for making patchwork curtains?
The best fabric for making easy patchwork curtains is 100% quilting cotton because it is durable, non-slippery, and available in thousands of colors. Lightweight linens and cotton blends also work beautifully if you prefer a softer drape or a more relaxed, airy appearance. Avoid heavy upholstery fabrics or highly slippery materials like silk for your first project, as they can be challenging to align and sew accurately.
Do I need to line my patchwork curtains?
Lining your curtains is entirely optional and depends on your specific light-filtering preferences and privacy needs in the room. Unlined curtains allow beautiful natural light to shine through the patchwork pieces, showcasing the colors and design like stained glass. Adding a white cotton lining protects the front fabrics from sun fading and provides extra privacy and insulation from outdoor weather.
Can I make these curtains using fabric scraps?
Absolutely! This easy patchwork curtains – tutorial is one of the absolute best projects for using up your accumulated stash of fabric scraps. Scrap quilting gives your curtains a delightful, vintage charm and is an eco-friendly way to ensure no beautiful textile goes to waste. Just make sure to group scraps of similar fabric weights together so the curtain panel hangs straight and evenly.
How do I wash and care for handmade patchwork curtains?
To keep your handmade curtains looking beautiful, wash them on a gentle, cold cycle in your washing machine using mild detergent. Avoid bleach, which can fade the vibrant colors of your patchwork fabric squares over time. Hang them up to air dry until they are slightly damp, then iron them on a cotton setting with steam to remove creases.
What size should the patchwork squares be?
For beginners, squares ranging from 5 to 8 inches are ideal because they cut quickly and reduce the total amount of piecing required. Larger squares mean you will finish the overall project much faster and allow larger fabric patterns to take center stage. Smaller squares, like 3 or 4 inches, create a highly intricate mosaic look but require significantly more time, pinning, and precise sewing.
Do I need an advanced sewing machine for this project?
Not at all! You only need a basic sewing machine capable of stitching a reliable, consistent straight line to complete this entire tutorial. A standard universal sewing needle and regular polyester or cotton thread are perfectly adequate for piecing quilting cottons together. Focus on keeping your sewing speed steady and maintaining an accurate, even seam allowance throughout the assembly process.
Conclusion
In this Easy Patchwork Curtains – Tutorial, we have explored the entire rewarding process of creating your own stunning, custom window treatments from scratch. We covered how to select the ideal quilting cottons, calculate precise measurements, cut perfect fabric squares, and master the art of row assembly with nested seams.
Finally, we learned how to finish your project with professional side hems and a sturdy top rod pocket that is ready for immediate display in your home. This project is a wonderful testament to how simple techniques can yield incredibly beautiful, functional, and personalized results for your living space.