How to Make a Churn Dash Quilt Block in this complete Tutorial is one of the most rewarding projects you can undertake as a quilter. Whether you are a seasoned pro or just starting your sewing journey, mastering this classic design is a fantastic milestone. The traditional churn dash quilt block pattern dates back to the 19th century, drawing inspiration from the shape of an old-fashioned butter churn. Today, it remains a favorite among modern makers because of its geometric simplicity and incredible versatility in quilt layouts.
If you are wondering exactly how to bring this beautiful motif to life, you are in the right place. In this comprehensive guide, we will break down every single step required to create a perfect churn dash quilt block. We will cover everything from choosing your fabrics and precise cutting instructions to assembling the pieces with crisp, accurate seams. By focusing on fundamental quilting techniques like making half-square triangles (HSTs) and strip piecing, you will build valuable skills that apply to countless other quilt blocks.
Quilting is more than just sewing fabric together; it is a form of creative expression and a wonderful way to relax. This churn dash quilt block step-by-step tutorial is designed to give you the confidence to dive into your fabric stash and start creating. We will ensure your points match perfectly and your blocks press beautifully flat. Grab your rotary cutter, wind a fresh bobbin, and let us explore the timeless art of making a churn dash quilt block together.
1. Choosing Fabrics and Gathering Your Quilting Tools
Selecting the right fabrics is the first exciting step when learning how to make a churn dash quilt block. To make the classic design pop, you will want a strong contrast between your light background fabric and your darker focus fabric. High-quality 100% quilting cotton is always recommended because it holds its shape well and minimizes fraying during cutting and piecing.
Beyond fabric, having the right tools on hand will make this tutorial much easier and more enjoyable. A self-healing cutting mat, a sharp rotary cutter, and a clear acrylic quilting ruler are absolutely essential for precision. Because this block relies heavily on accurate geometry, straight cuts will directly impact how well your final pieces line up.
You will also need a reliable sewing machine equipped with a standard piecing foot or a 1/4-inch quilting foot. Thread choice matters too; a neutral, high-quality 50-weight cotton thread works beautifully for piecing because it does not add bulk to your seams. Having an iron and a pressing mat nearby is also crucial for achieving crisp, professional results.
Before making your first cut, it is always a good idea to press your fabric to remove any wrinkles or folds. Wrinkled fabric can lead to inaccurate measurements, which might throw off your entire churn dash quilt block pattern. Spending a few extra minutes at the ironing board now saves a lot of frustration later at the sewing machine.
If you are feeling creative, consider using a variety of prints or even scrappy fabrics for a more eclectic look. The structured nature of the churn dash design looks amazing with everything from traditional florals to bold modern solids. Take some time to audition your fabric combinations next to each other to ensure you love the contrast.
Once your space is organized and your tools are ready, you can confidently move forward with the project. Remember that quilting is a journey best enjoyed one steady step at a time. With your materials prepared, you are fully ready to tackle the cutting process for your churn dash quilt block.
2. Cutting the Fabric Pieces with Precision
Accurate cutting is the secret foundation of any successful quilt block, especially for the churn dash quilt block design. For a standard 12-inch finished block, you will need to cut specific squares and rectangles from both your focal and background fabrics. Let us break down the exact measurements to ensure your pieces fit together perfectly like a puzzle.
From your main focus fabric, you will need to cut two squares measuring 5 inches by 5 inches for the corner units. You will also need to cut four rectangles measuring 2.5 inches by 4.5 inches for the outer frame sides. Finally, cut one central square measuring 4.5 inches by 4.5 inches to serve as the exact middle of your block.
From your light background fabric, you will mirror some of these cuts to create the necessary contrast. Cut two squares measuring 5 inches by 5 inches, which will pair with the focus squares to create your corner triangles. Then, cut four rectangles measuring 2.5 inches by 4.5 inches to frame the center.
When cutting, align the lines on your acrylic ruler carefully with the straight edge of your fabric. Apply firm, even downward pressure on the ruler so it does not slip while you roll the rotary cutter along the edge. Consistent cutting ensures that every seam allowance behaves exactly as expected during assembly.
If you prefer an alternative method for the side units, you can also use strip piecing techniques. To do this, simply sew a 2.5-inch strip of focus fabric to a 2.5-inch strip of background fabric along the long edge. Once pressed, you can sub-cut that joined strip into four 4.5-inch segments to save time.
Double-check your piece counts before moving away from your cutting mat to ensure nothing was missed. You should have a total of nine distinct units ready for assembly once the corner triangles are formed. Organizing your cut pieces into small stacks will keep your workspace tidy and efficient as we begin sewing.
3. Assembling the Half-Square Triangles and Side Units
The corners of a churn dash quilt block are made of half-square triangles, often abbreviated as HSTs in the quilting community. To make them, take one 5-inch background square and one 5-inch focus square and place them right sides together. Use a fabric pen and your ruler to draw a light diagonal line from one corner to the opposite corner on the back of the lighter fabric.
Next, take this pair to your sewing machine and sew a precise 1/4-inch seam down both sides of the drawn diagonal line. Once you finish sewing both sides, place the square back on your cutting mat. Use your rotary cutter to cut directly on the drawn center line, separating the piece into two identical units.
Open up the triangles and press the seams carefully toward the darker focus fabric to prevent the seam shadow from showing through. Now, you will need to trim these half-square triangle units down to exactly 4.5 inches by 4.5 inches. Align the 45-degree diagonal line of your quilting ruler with the seam line to keep everything perfectly centered while trimming.
Repeat this exact process with the second pair of 5-inch squares so you end up with four perfect HST units. These will form the distinctive angled corners that give the churn dash quilt block its historic look. Set these four completed corner units aside together in a neat pile.
Now, let us assemble the easy side units if you did not choose the strip piecing method earlier. Take one 2.5-inch by 4.5-inch focus rectangle and sew it to a matching background rectangle along the long 4.5-inch side. Use a steady 1/4-inch seam allowance and press the seam open or toward the darker fabric.
Repeat this process for the remaining three pairs of rectangles until you have four completed side units measuring 4.5 inches square. At this point, all your components are ready, and they should all match the 4.5-inch size of your center square. You are now ready for the final assembly of your beautiful block.
4. Joining the Pieces into a Finished Quilt Block
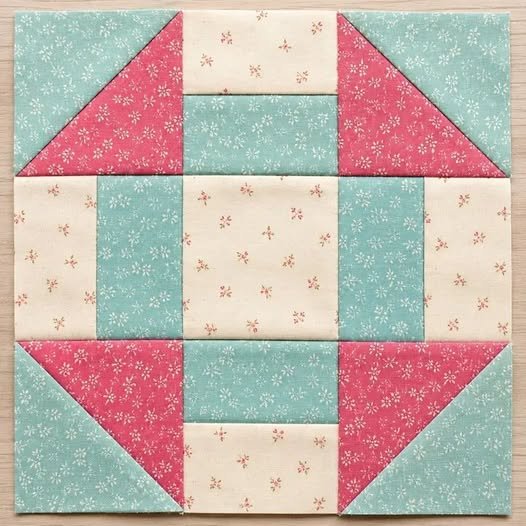
Lay out all nine of your completed 4.5-inch units on your workspace or design wall to form a large grid. Arrange them into three rows of three units each, carefully mimicking the classic churn dash quilt block pattern layout. Make sure the half-square triangles point inward toward the center, and the background sides face outward.
We will assemble the block row by row, starting with the very top row of three squares. Place the left corner HST right sides together over the middle side unit and sew along the right edge using a 1/4-inch seam. Then, attach the right corner HST to the other side of that middle unit to finish the first row.
Repeat this exact layout process for the middle row, joining the center square to the two remaining side units. Finally, sew the three units of the bottom row together in the exact same manner as the top row. You will now have three long horizontal fabric rows ready to be joined together.
Before sewing the rows to each other, press the seam allowances of the top and bottom rows inward toward the center. Press the seam allowances of the middle row outward, away from the center square. This alternating pressing direction allows the seams to nest beautifully, resulting in perfectly flat, sharp corners.
Place the top row right sides together with the middle row, aligning the nested seams carefully, and secure them with pins. Sew across the long edge with a precise 1/4-inch seam, removing the pins just before your needle reaches them. Repeat this process to attach the bottom row to the middle assembly.
Give your entire completed churn dash quilt block one final, gentle press on your ironing mat. Press the final horizontal seams flat, and measure your beautiful block to ensure it is exactly 12.5 inches square. Congratulations, you have successfully mastered this timeless quilting tradition!
Frequently Asked Questions (FAQ)
What is a Churn Dash Quilt Block?
A churn dash quilt block is a classic geometric quilting pattern featuring a central square surrounded by four rectangle frames and four corner triangle units. It resembles the old-fashioned paddles used to churn butter in households during the pioneer era.
What size should I cut fabric for a 12-inch finished Churn Dash block?
To make a 12-inch finished block, cut four 5-inch squares for the half-square triangles, eight 2.5-inch by 4.5-inch rectangles for the sides, and one 4.5-inch square for the center. This includes the standard 1/4-inch seam allowances required for assembly.
How do you press the seams to make the block lay flat?
Press the corner triangle seams toward the darker fabric to prevent shadowing. When joining the units into rows, press adjacent rows in opposite directions so the seams nest together perfectly, minimizing bulk at the intersections.
Can beginners successfully make a Churn Dash block?
Yes! This pattern is highly recommended for beginners because it introduces fundamental skills like creating half-square triangles and maintaining a consistent 1/4-inch seam allowance without being overly complex.
Conclusion
In this tutorial, we explored exactly how to make a classic churn dash quilt block from start to finish. We covered fabric selection, precise cutting, making half-square triangles, and the row-by-row assembly method that ensures sharp, clean points.
By breaking the process down into manageable steps, you can easily create beautiful, flat blocks for your next quilting project.