How to Make Popsicle sleeve – Tutorial: If you are looking for a fun, practical, and incredibly rewarding sewing project, you have come to the right place. Learning how to make popsicle sleeve – tutorial step-by-step is the perfect way to combine your passion for crafting with a functional everyday item. These little fabric pockets, also frequently called ice pop holders or freezer pop cozies, are absolute lifesavers during the hot summer months because they keep little hands warm and comfortable while keeping the treats icy cold.
When you dive into a how to make popsicle sleeve – tutorial, you quickly realize that this is an excellent project for beginners and experienced crafters alike. It is a fantastic way to utilize small fabric scraps, especially insulated materials or bright cotton prints, turning what would be waste into something beautiful and usable. Parents, grandparents, and teachers love these because they completely eliminate the need for wrapping messy paper towels around freezing cold treats.
In this comprehensive guide, we will explore everything you need to know about this popular crafting trend. From selecting the absolute best materials to mastering the stitching techniques, this how to make popsicle sleeve – tutorial will guide you through the process seamlessly. By the end of this article, you will be able to create gorgeous, durable sleeves that make amazing gifts, party favors, or even profitable items to sell on your craft blog or online shop.
1. Choosing the Best Materials for Your Popsicle Sleeve
Selecting the right fabric is the first crucial step when learning how to make popsicle sleeve – tutorial guidelines successfully. For the outer layer, high-quality 100% cotton fabric is the most popular choice because it comes in endless fun patterns, is easy to wash, and handles heat and moisture well. You can let your creativity shine here by choosing vibrant summer themes, geometric patterns, or cartoon characters that kids will absolutely love.
The magic of an effective ice pop cozy lies entirely within its middle insulating layer, which prevents the heat from your hands from melting the ice treat too quickly. Many crafters prefer using Insul-Bright, a specialized needle-punched insulating material that reflects energy back to its source, keeping things incredibly cold. If you do not have access to insulated batting, a double layer of standard cotton quilt batting or even thick fleece can work as a great alternative.
For the inner lining of your sleeve, you can either use matching cotton fabric or opt for something water-resistant like PUL fabric (polyurethane laminate). Using a wipeable lining makes the finished product much easier to clean if any sticky liquid happens to drip inside. Gathering these high-quality materials before you begin ensures that your finished product looks professional and performs beautifully.
Don’t forget about your basic sewing notions, which are just as important as the fabric itself when following a how to make popsicle sleeve – tutorial. You will need a strong universal sewing machine needle, high-quality polyester or cotton thread, fabric shears, a rotary cutter, and plenty of sewing clips or pins. Investing a little time in selecting premium coordinates will elevate your work from a basic DIY to a boutique-quality item.
Upcycling is another fantastic avenue to explore when gathering your supplies for this project. If you love sustainable crafting, you can easily repurpose old denim jeans, canvas bags, or flannel shirts into rugged, eco-friendly freezer pop sleeves. Upcycled denim provides excellent natural insulation and durability, making it perfect for older kids or outdoor camping trips where gear needs to be tough.
Ultimately, the materials you choose will define the durability and style of your final piece. Make sure to pre-wash all your cotton fabrics before cutting to prevent any unwanted shrinking later on when the item gets thrown into the washing machine. Once your fabrics are washed, dried, pressed, and perfectly organized, you are officially ready to move on to the cutting and measuring phase.
2. Accurate Cutting and Measurement Guide
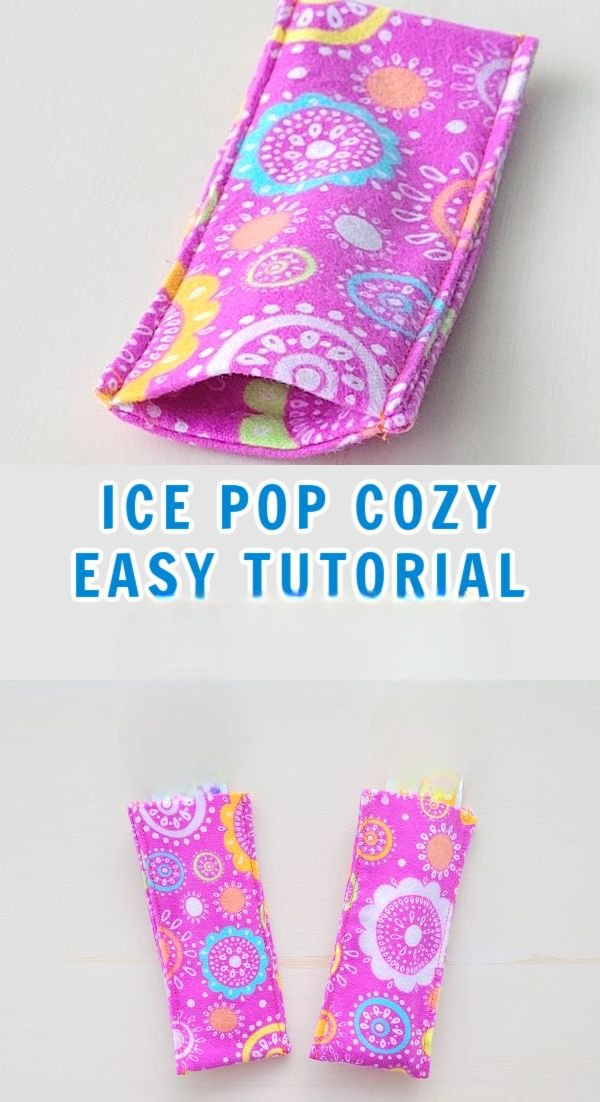
Precision is key to a beautiful finish, and this part of the how to make popsicle sleeve – tutorial will ensure your dimensions are absolutely flawless. Standard freezer pops usually require a sleeve that measures roughly 2 inches wide by 6 inches tall when finished. To achieve this perfect size while accounting for seam allowances, you will need to cut your fabric rectangles to exactly 3 inches by 7 inches.
For every single sleeve you plan to make, you will need to cut two pieces of your outer fabric, two pieces of lining fabric, and two pieces of your chosen insulating batting. Utilizing a self-healing cutting mat, a clear acrylic quilting ruler, and a sharp rotary cutter will make this repetitive cutting process incredibly fast and accurate. Cutting all your pieces simultaneously in assembly-line fashion is a great tip if you are making large batches.
If you are designing these specifically for larger, gourmet ice pops or wider reusable plastic popsicle molds, you may need to adjust these dimensions slightly. Simply measure the circumference of the specific popsicle mold you use, add 1 inch for ease and seam allowance to determine the width, and adjust the height accordingly. The beauty of a custom handmade popsicle sleeve is that it can be tailored to fit absolutely any treat.
Properly preparing your fabric pieces after cutting will save you a massive amount of frustration once you actually sit down at your sewing machine. Layer your outer fabric pieces directly on top of the corresponding insulating batting pieces, ensuring all the edges align perfectly. You can choose to baste stitch around the edges at this stage or perform some light quilting to permanently secure the layers together.
Quilting the outer fabric to the batting not only keeps the layers from shifting during future washes but also adds a gorgeous tactile texture to the final product. Simple diagonal cross-hatch lines or straight vertical lines look incredibly professional and take only a few extra minutes to sew. Use a slightly longer stitch length, such as 3.0mm, when quilting through these thicker layers to prevent fabric bunching.
Once all your individual rectangles are cut, layered, basted, or quilted, take a quick moment to trim away any loose threads or tiny imperfections along the borders. Having perfectly square, clean edges will make the assembly process much smoother and ensure your corners turn out crisp and sharp. With your organized piles of prepared pieces, you are now ready to begin the actual construction.
3. Step-by-Step Sewing and Construction Process
Now we reach the heart of our how to make popsicle sleeve – tutorial, where all your beautifully prepared pieces finally come together into a finished product. Start by taking one outer quilted piece and one lining piece, placing them right sides together along the top short edge (the 3-inch side). Secure them with a sewing clip and repeat this exact step with the remaining outer and lining pieces so you have two matching sets.
Take these sets to your machine and sew across that top short edge using a standard 1/4-inch seam allowance, making sure to backstitch at the beginning and the end. Press the seams open gently with a warm iron, and then fold the pieces out so the right sides are facing outward. Press along that newly sewn top edge to create a crisp, clean border that will eventually form the opening of your cozy.
Next, place these two completed units directly on top of each other, ensuring that the right sides of the outer fabric are facing each other, and the right sides of the lining are facing each other. Line up that center top seam perfectly, as this is the most visible part of the project, and secure the entire perimeter with plenty of sturdy clips. Your piece should look like a long rectangle with the outer fabrics on one half and linings on the other.
You will now sew around the entire outside edge of this combined rectangle, but you must leave a 2-inch opening at the bottom short edge of the lining side for turning. Start at the bottom of the lining, sew up the side, carefully cross over the center junction where the fabrics meet, pivot at the corners, and come back down the other side. Always maintain a consistent seam allowance to ensure the sleeve stays perfectly straight.
Before turning the sleeve right side out, it is absolutely essential to clip the corners diagonally, being very careful not to cut through your actual stitches. Clipping the corners removes the excess bulky fabric inside, allowing the corners to push out flat and sharp rather than looking lumpy. Once clipped, carefully reach through the opening in the lining and pull the entire sleeve right side out.
Use a dull tool like a chopstick, a turning tool, or a bone folder to gently push out all four corners until they are completely square. Tuck the raw edges of the opening in the lining inward by 1/4 inch, press it flat with your iron, and sew the opening closed using a very close edge-stitch or an invisible hand ladder stitch. Push the lining down inside the outer sleeve, give it one final press, and your sleeve is structurally complete.
4. Customization and Care Tips for Longevity
Learning how to make popsicle sleeve – tutorial variations is where you can truly let your unique personal branding and artistic style shine through. You can easily customize these sleeves by adding personalized machine embroidery, heat transfer vinyl names, or colorful decorative ribbons before assembling the pieces. Adding a small woven fabric loop to the side allows kids to clip their personal sleeves onto backpacks during summer camp.
Another fantastic modification is adding a small strip of hook-and-loop fastener (Velcro) or a plastic snap closure at the top opening. This addition allows the sleeve to wrap tightly around skinnier ice pops without slipping off, providing a universal fit for various brands. You can also experiment with making double-wide sleeves designed to hold those classic twin-pop treats that are so popular at summer barbecues.
If you are producing these items to sell on a digital platform or at local craft fairs, high-quality finishing touches are what will set your brand apart. Consider sewing a small, professional cork or faux-leather tag featuring your business logo onto the front lower corner of the sleeve. Packaging them in sets of three or four wrapped in a rustic twine bow makes them instantly giftable and increases your average order value.
Taking care of these handmade fabric cozies is incredibly simple, which is one of the main reasons they are so wildly popular among busy parents. Because they are made of durable cotton and synthetic insulation, you can simply toss them directly into the washing machine on a gentle cycle with cold water. Avoid using liquid fabric softeners, as they can occasionally degrade the heat-reflective properties of specialized insulated batting over time.
After washing, it is highly recommended to reshape the sleeves gently with your hands and lay them completely flat to air dry. While they can technically survive a low-heat cycle in a standard clothes dryer, air drying preserves the vibrancy of the fabric colors and extends the overall lifespan of the inner insulation. If they ever look wrinkled after washing, a quick press with a warm iron will make them look brand new.
By mastering the creation, customization, and maintenance of these delightful items, you create an eco-friendly product that reduces waste and brings joy. They are a wonderful introduction to structural sewing, working with batting, and mastering turning techniques. Now that you know the exact process, you can easily create dozens of these in a single afternoon, keeping your freezer stocked and your fingers cozy all summer long.
Frequently Asked Questions (FAQ)
What is the best fabric to use for a popsicle sleeve?
The best fabric for the exterior is 100% quilting cotton because it is durable, machine washable, and comes in many vibrant patterns. For the inside lining, you can use matching cotton or a water-resistant fabric like PUL fabric to make wiping away sticky drips easy.
Do I absolutely need to use Insul-Bright or insulated batting?
While Insul-Bright is highly recommended because it reflects cold temperatures and keeps the ice pop frozen longer, it is not mandatory. You can use standard 100% cotton or polyester quilt batting, fleece, or even thick flannel scraps to provide decent insulation for little hands.
Can I make these without a sewing machine?
Yes, absolutely. Because the pieces are small and the straight lines are quite short, you can easily hand sew this entire project using a strong backstitch. It will take a bit longer than using a machine, but the results can be just as durable and beautiful.
What are the standard dimensions to cut the fabric?
For a standard store-bought freezer pop, cutting your rectangles to 3 inches by 7 inches is the ideal size. This dimension includes a 1/4-inch seam allowance and results in a finished sleeve that measures approximately 2 inches by 6 inches, which fits most brands perfectly.
Are these popsicle sleeves safe to put in the microwave?
No, you should never put them in the microwave if you use insulated materials like Insul-Bright, as they contain a hidden metalized polyester film that will spark. Always keep these sleeves strictly for cold preservation or standard hand washing.
How do I clean stuck-on popsicle residue from the fabric?
Simply throw the soiled sleeves into your standard washing machine with cold water and your regular detergent. For stubborn stains from artificial food dyes, pre-treat the spot with a gentle fabric stain remover before washing, and always let them air dry completely.
Conclusion
In this how to make popsicle sleeve – tutorial, we have covered every single detail necessary to create beautiful, functional, and eco-friendly ice pop cozies from scratch.
We discussed selecting high-quality quilting cottons and specialized insulating layers, cutting your pieces with absolute precision, and navigating the step-by-step sewing process to get crisp corners and clean lines. Finally, we looked into fun customization options and proper washing techniques to make sure your handmade creations last for many summers to come.