How to Make Crochet Baby Turban – Tutorial is the ultimate guide you need to create a cozy, stylish, and adorable accessory for the little ones in your life. Whether you are an experienced crafter or someone looking to dive into a rewarding new hobby, learning how to make crochet baby turban styles is a fantastic project. Not only are these turbans incredibly fashionable, but they also serve a practical purpose by keeping a baby’s head warm and protected during cooler days. In this comprehensive tutorial, we will break down everything you need to know, ensuring your finished piece looks professional, feels soft, and brings a smile to anyone who sees it.
Crochet has experienced a massive resurgence in recent years, evolving from a traditional craft into a modern DIY trend loved by parents and makers worldwide. When it comes to baby items, handmade gifts hold a special, sentimental value that store-bought items simply cannot replicate. By mastering this how to make crochet baby turban – tutorial, you are gaining a skill that allows you to create personalized, high-quality gifts for baby showers, birthdays, or even to start your own small handmade business. The beautiful texture of crochet stitches adds a unique depth to the turban, making it a standout piece in any infant wardrobe.
As you embark on this creative journey, keep in mind that patience and the right materials are your best tools for success. Crafting for infants requires special attention to detail, particularly regarding yarn selection and sizing, to ensure the ultimate comfort of the child. This guide is structured to walk you through every single phase of the process, from selecting the perfect yarn to executing the final assembly stitches. Let’s explore the essential materials, the step-by-step creation process, adjustments for various sizes, and how you can personalize your creation to make it truly one-of-a-kind.
1. Choosing the Perfect Materials for Your Crochet Baby Turban
Selecting the right yarn is the foundation of a successful project, especially when creating wearable items for newborns and infants. A baby’s skin is incredibly delicate and prone to irritation, which means you must prioritize softness and hypoallergenic properties above all else. For this how to make crochet baby turban – tutorial, we highly recommend opting for premium acrylic, bamboo blends, or organic cotton yarns labeled as “baby yarn” or “sport weight.” These fibers are not only gentle against tender skin but are also durable enough to withstand frequent washing.
The weight of the yarn plays a crucial role in the overall drape and flexibility of the finished crochet baby turban. A medium weight (worsted) or light weight (sport/DK) yarn works best, as it provides excellent warmth without making the hat feel overly heavy or restrictive. Avoid using scratchy wools or yarns with loose fibers that could potentially shed and get into the baby’s eyes or mouth. Taking the time to feel the yarn in person before purchasing can make a massive difference in the final comfort level of your handmade accessory.
Equally important to your yarn choice is selecting the correct crochet hook size to match your fiber. For a standard light-weight baby yarn, a size G/4.0mm or H/5.0mm crochet hook is generally ideal, but you should always check the yarn label for specific recommendations. If your stitches tend to be tight, using a slightly larger hook will help maintain a soft, stretchy, and pliable fabric. Conversely, if you are a loose crocheter, dropping down a hook size ensures the turban maintains its structural integrity and fits snugly.
Beyond the yarn and hook, you will need a few essential notions to complete your work efficiently and professionally. A pair of sharp embroidery scissors, a sturdy yarn needle with a large eye for weaving in ends, and a flexible measuring tape are absolutely mandatory. Stitch markers can also be incredibly helpful, especially for beginners who need to keep track of row counts and stitch placements. Having these tools organized and ready at your workstation will streamline your crafting process and prevent unnecessary interruptions.
Before diving into the actual stitches, it is highly recommended to crochet a small gauge swatch to test your tension. A gauge swatch allows you to see how many stitches and rows fit into a standard four-inch square with your chosen hook and yarn. If your swatch matches the project guidelines, your finished turban will turn out exactly the size you intend. Skipping this step can lead to a turban that is either way too large for a newborn or too tight to fit comfortably on a growing infant’s head.
Lastly, consider the color palette you want to use for this specific tutorial project. Soft pastel tones like mint green, lavender, blush pink, and baby blue are timeless classics that match almost any infant outfit. If you prefer a more modern aesthetic, neutral earth tones like mustard, cream, oatmeal, and slate gray are incredibly trendy and look stunning in photographs. No matter what color you choose, ensure the dye is safe and free from harsh chemicals that could irritate a baby’s sensitive skin.
2. Step-by-Step Instructions to Crochet the Main Turban Body
To begin the actual construction of our how to make crochet baby turban, we will start by creating a simple foundation chain. The length of this initial chain determines the width or height of your turban, depending on the orientation of your stitching pattern. For a standard 0-3 month size, you will generally want to chain a length that measures approximately 5 to 6 inches. Keep your foundation chain relatively loose so that the bottom edge of the finished piece retains its natural elasticity and does not pinch the baby’s forehead.
Once your foundation chain is complete, you will transition into the first row of stitches using a standard stitch like the half double crochet (HDC). The half double crochet is the perfect stitch for a crochet baby turban because it strikes a beautiful balance between density and flexibility, creating a warm fabric that still stretches easily. Work one HDC into the second chain from your hook, and continue placing one HDC into each remaining chain across the row. At the end of the row, chain two and turn your work to prepare for the subsequent row.
To create the beautiful, ribbed texture that gives the turban its classic, vintage look, you will work into the back loops only (BLO) for the remaining rows. Working in the BLO creates a raised ridge on the front of your work, mimicking a knitted knit-and-purl sequence that looks incredibly sophisticated. Continue crocheting rows of HDC in the BLO until your fabric piece reaches the desired length to wrap around a baby’s head. For a newborn, this total length will typically be around 12 to 13 inches of unstretched fabric.
As you progress through the rows, it is crucial to count your stitches regularly to ensure you are not accidentally adding or dropping stitches at the edges. A perfectly rectangular piece of fabric is necessary for the turban to gather correctly and look symmetrical when assembled. If you notice your edges are becoming uneven or triangular, undo your work back to the mistake and utilize stitch markers in the first and last stitches of each row. Consistency in your stitch count is the secret to achieving a polished, high-end retail look for your handmade items.
When your rectangular fabric strip reaches the ideal measurement for your target size, it is time to fasten off your yarn, leaving a very long tail. This extended yarn tail, ideally around 18 to 24 inches long, will be used to sew the rectangle together and create the iconic turban gather. Thread this tail onto your large yarn needle, ensuring there are no knots or tangles in the fiber before you proceed to the assembly phase. Secure the final stitch tightly so that the entire piece remains stable during the upcoming construction steps.
Lay your finished crochet rectangle flat on a clean surface with the ribbed ridges running vertically or horizontally, depending on your visual preference. Fold the rectangle in half so that the two shorter ends meet perfectly, forming a loop or a cuff structure. You will use a simple whipstitch or mattress stitch to join these two short ends together, creating a seamless tube of crochet fabric. Make sure your stitches are secure but not pulled so tightly that they distort the natural elasticity of the crochet fabric.
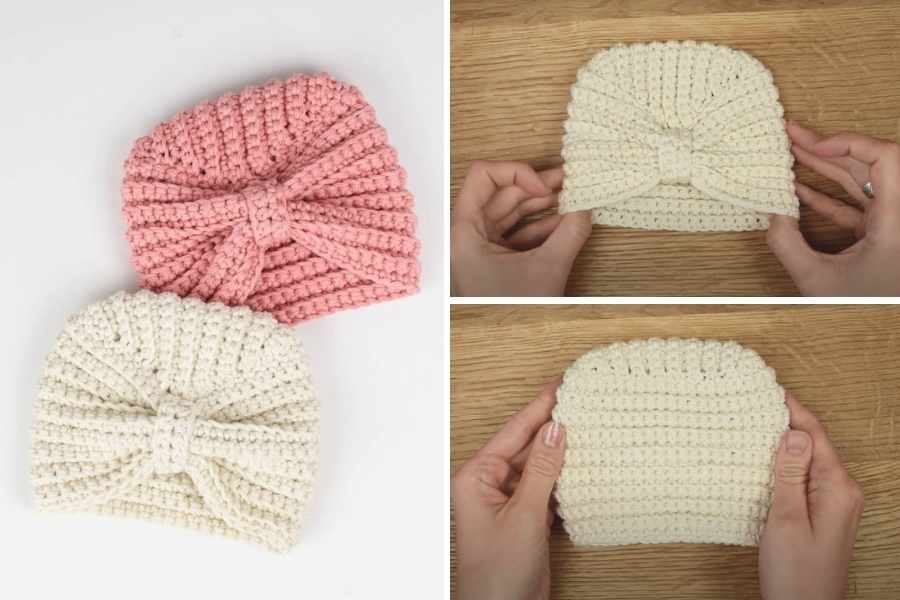
3. Gathering and Securing the Iconic Turban Knot Front
Now that you have a completed crochet tube, you are ready to execute the magical step that transforms a basic beanie shape into an elegant turban. Turn your joined tube so that the seam you just sewed is facing outward, as this will become the inside or the back of your hat, keeping the front perfectly clean. Thread your long yarn tail back onto the needle if you unthreaded it, and position your project so you are working along one of the open circular edges. This top open edge is what we will gather closely together to close the hat.
Using a simple running stitch or a weaving motion, pass your needle in and out of the stitches all the way around the top perimeter of the circle. Space your running stitches evenly, roughly every half-inch, to ensure that the fabric gathers into uniform, beautiful pleats when pulled tightly. Once you have woven the needle completely around the circle and returned to your starting point, gently but firmly pull the yarn tail. You will see the top of the crochet tube cinch together tightly, closing the hole and creating a gathered crown.
While holding the gather tightly in place with one hand, use your yarn needle to pass through the bunched fabric multiple times to lock it securely. It is vital to knot this area thoroughly, as any loose threads could cause the turban to unravel when stretched over a baby’s head. Once the crown is completely closed and securely knotted, flip the entire turban right-side out to inspect your work from the front. You should see a beautifully gathered top that radiates outward, forming the foundational shape of your crochet baby turban.
To create the distinct focal point at the front of the turban, we will now craft a small accent band or use a separate strip of fabric to cinch the front. If you want a classic turban look, pinch a section of the front brim upward toward the crown gather, creating a vertical cinched effect right above the forehead area. You can use your yarn needle to stitch through this pinched section, holding the fabric in a permanent accordion fold. This specific folding technique is what gives the turban its elegant, vintage-inspired silhouette that looks so adorable on infants.
To cover these structural stitches and complete the look, crochet a tiny separate rectangle consisting of about 6 chains and 10 rows of single crochet. Wrap this small crochet band around the cinched front section, pulling it snug to accentuate the beautiful folds of the main turban body. Bring the two ends of the small band to the inside of the turban and sew them together securely using your yarn needle. This completely hides the raw edges and structural stitches, leaving you with a gorgeous, professional-looking center knot.
Alternatively, if you prefer a more whimsical style, you can replace the simple center band with a large crochet bow or a layered flower accent. The beauty of learning how to make crochet baby turban styles is that the core pattern remains incredibly versatile, serving as a blank canvas for your creativity. Ensure that whatever embellishment you choose is sewn onto the main body with absolute security, preventing any small parts from detaching. Take a moment to gently stretch the turban in all directions to verify that the front gather moves dynamically without snapping any threads.
4. Sizing Guidelines and Customizing Your Finished Project
One of the most common challenges crafters face when learning how to make crochet baby turban – tutorial techniques is achieving the absolute perfect fit for different age groups. Babies grow at an astonishing rate, meaning a turban designed for a newborn will quickly be outgrown within a matter of weeks. To help you plan your projects effectively, it is incredibly beneficial to understand standard infant head circumference measurements. By adjusting your initial chain count and the total number of rows you crochet, you can easily adapt this pattern for any size from preemie to toddler.
For a tiny preemie baby, the average head circumference ranges between 10 and 12 inches, requiring a finished turban height of about 4.5 inches. For a standard newborn to 3-month-old baby, look to aim for a circumference of 13 to 14 inches and a hat height of 5.5 inches. As babies reach the 3-6 month mark, their head size increases to roughly 15 to 17 inches, needing a height of 6 inches. Finally, for older infants aged 6-12 months, target a circumference of 17 to 18 inches and a total turban height of roughly 6.5 inches.When customizing your sizes, always remember that crochet fabric naturally possesses a high amount of stretch, especially when using the back loops only technique. Therefore, it is standard practice to design the turban with about 1 to 1.5 inches of negative ease, meaning the hat is slightly smaller than the actual head. This negative ease ensures that the turban clings securely to the baby’s head without slipping down over their eyes or falling off during movement. A hat that is too loose will fail to keep the baby warm and can quickly become a nuisance for parents to constantly adjust.
Once you have mastered the basic sizing, the real fun begins with customizing the aesthetics of your crochet baby turban. You can experiment with variegated or self-striping yarns to create gorgeous, effortless color transitions throughout the ribbed texture without needing to switch yarn balls manually. Another fantastic customization idea is adding a delicate scalloped or shell-stitch border along the bottom brim of the turban for a touch of vintage elegance. These small, thoughtful details elevate your work from a basic craft to a luxury heirloom item.
As a final quality control step before gifting or selling your handmade turban, always weave in all loose yarn ends completely and securely. Use your yarn needle to weave the remaining threads through the inside stitches in multiple directions, ensuring they will not pop out after being washed. It is highly recommended to hand wash the finished turban with a gentle, baby-safe detergent and lay it flat on a clean towel to dry completely. This relaxes the stitches, sets the final shape, and ensures the item is perfectly clean and hygienic for the sweet baby who will wear it.
Frequently Asked Questions (FAQ)
What is the best type of yarn to use for a crochet baby turban?
The best yarn for an infant project is one that is exceptionally soft, lightweight, and completely machine washable. Premium baby acrylics, bamboo blends, and 100% organic cotton yarns are highly recommended because they do not irritate sensitive skin. Avoid using rough textures, wools that cause itching, or mohair yarns that shed loose fibers, as these can easily cause discomfort or allergic reactions for a newborn.
How do I wash and care for a handmade crochet baby turban?
To maintain the shape, elasticity, and softness of your handmade turban, hand washing in cool water with a mild, hypoallergenic baby detergent is best. Gently squeeze out excess water without wringing or twisting the fabric, as twisting can permanently warp and stretch out the crochet stitches. Lay the turban flat on a clean, dry towel away from direct sunlight and allow it to air dry completely before use.
Can a beginner tackle this crochet baby turban tutorial?
Absolutely! This project is incredibly beginner-friendly because the main body of the turban is constructed from a simple, flat rectangle of fabric. If you know how to make a basic chain and execute a half double crochet stitch, you have all the technical skills required. The iconic turban look is achieved entirely through clever folding and gathering techniques at the very end, making it look much more complex than it actually is.
How long does it typically take to crochet one baby turban?
Because baby items are quite small, a crochet baby turban is a wonderfully fast project that can usually be completed in about 1 to 2 hours. This quick turnaround time makes it an ideal choice for last-minute baby shower gifts or for makers looking to stock up on inventory for craft fairs. Once you memorize the simple row repetition, you will find yourself moving through the steps much faster.
Is this crochet baby turban safe for newborns to wear unsupervised?
While these turbans are completely soft and comfortable, babies should always be supervised while wearing any type of hat, headbands, or accessories. Ensure that all added embellishments, such as bows, buttons, or flowers, are stitched onto the main body with extreme security so they cannot pull loose. It is always recommended to remove hats when placing a baby down to sleep to ensure maximum safety.
How do I make the turban stretchier if it feels too tight?
If your finished piece lacks elasticity, it is usually a result of tight stitch tension or using a hook that is too small for your yarn. To fix this, try recreating the project using a crochet hook that is one half-size or a full size larger than before. Additionally, make sure you are working strictly into the back loops only (BLO), as this specific technique creates the ribbing necessary for maximum stretch.
Conclusion
Mastering how to make crochet baby turban – tutorial methods opens up a world of creative possibilities, allowing you to handcraft beautiful, functional accessories that protect and stylize infants.
Throughout this guide, we explored the vital importance of picking skin-friendly yarns, creating a textured ribbed rectangle, mastering the elegant front gather, and adapting your measurements for a flawless fit. Handmade items carry a warmth and love that mass-produced clothing simply cannot match, making your completed turban a truly treasured keepsake.