
Crochet Pouch Pattern is a wonderful project for crocheters who enjoy creating beautiful, functional, and stylish handmade accessories. This compact pouch is perfect for storing coins, earbuds, jewelry, keys, lip balm, or other small essentials while showcasing elegant crochet stitches and a decorative flap. Whether you are a beginner looking for a practical project or an experienced crocheter searching for a quick gift idea, this Crochet Pouch Pattern offers an enjoyable experience from the first chain to the final stitch.
One of the reasons the Crochet Pouch Pattern has become increasingly popular is its versatility. You can customize the size, colors, closure, texture, and embellishments to match your personal style or the preferences of the person receiving it as a gift. Handmade crochet pouches are also ideal for craft fairs, online shops, and holiday markets because they require relatively little yarn while delivering a professional and charming result.
This tutorial explains the complete process using standard crochet terminology and easy-to-follow instructions. Throughout this guide, you will learn how to build the pouch from the base upward, shape the decorative flap, add texture using simple stitch combinations, and finish your project with a beautiful button closure. By following each step carefully, you will develop valuable crochet skills while creating an accessory that is both practical and elegant.
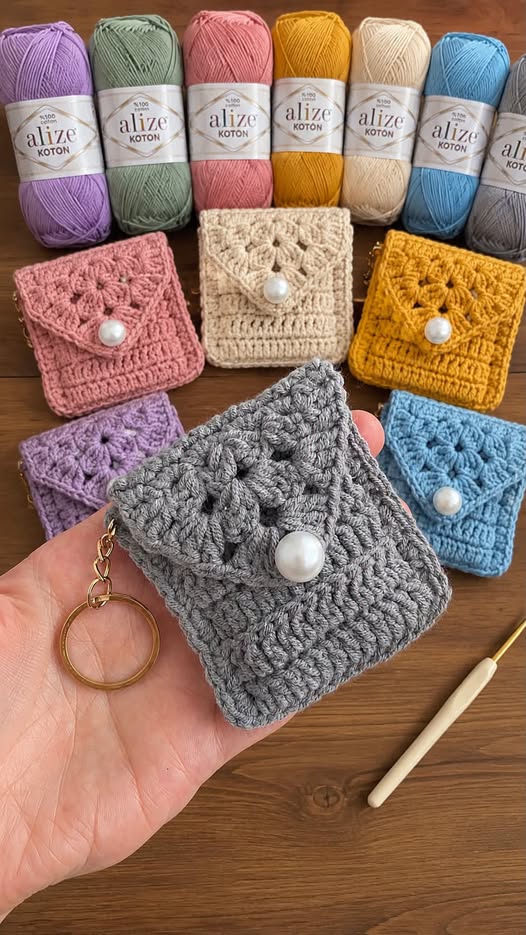
1. Materials, Crochet Stitches, and Project Preparation
Choosing quality materials is the first step toward creating a beautiful Crochet Pouch Pattern. Cotton yarn is highly recommended because it offers excellent stitch definition, durability, and a clean finished appearance. Medium-weight cotton yarn provides enough structure for the pouch without making it overly stiff.
Select a crochet hook that matches the yarn label recommendation. Most medium cotton yarns work beautifully with a 3.5 mm to 4.0 mm crochet hook. If you crochet tightly, consider using a slightly larger hook to maintain flexibility.
Additional materials include a tapestry needle for weaving in ends, scissors, one decorative pearl or wooden button, and optionally a small keyring if you would like to transform your pouch into a keychain accessory.
Before beginning the project, crochet a small gauge swatch. Although this pouch is forgiving in size, maintaining consistent tension ensures that both sides remain symmetrical and that the flap closes neatly over the front.
The pouch is primarily worked using basic crochet stitches. You should be familiar with chain stitch (ch), slip stitch (sl st), single crochet (sc), half double crochet (hdc), double crochet (dc), and simple cluster stitches used to create the decorative floral texture on the flap.
Take a few minutes to organize your yarn, hook, and accessories before starting. Preparing everything in advance makes the crocheting process smoother and allows you to enjoy each stage without interruptions.
2. Step-by-Step Instructions for the Crochet Pouch Pattern
Begin by creating a foundation chain that matches the desired width of your pouch. For a pouch similar to the sample, chain approximately 20 stitches. Add one extra turning chain before working the first row.
Row 1 consists entirely of single crochet stitches worked into each chain across. This creates a strong, stable foundation that supports the rest of the pouch. Turn your work after completing the row.
Continue working rows of single crochet or half double crochet until the rectangle reaches approximately three times the height of the finished pouch. This long rectangle will eventually fold to create the front, back, and flap.
Fold the rectangle so the lower section becomes the front and the middle section forms the back. Leave the remaining upper portion unfolded because it will become the decorative flap. Check that all edges align evenly before joining.
Join the side edges using slip stitches or single crochet stitches. Work carefully through both layers to produce clean, strong seams. Avoid pulling the stitches too tightly, as this can distort the shape of the pouch.
After the pouch body has been assembled, crochet one round of single crochet evenly around the flap edges. This border smooths the outline and prepares the flap for the decorative stitch section.
3. Creating the Decorative Crochet Flap and Floral Texture
The decorative flap is what gives this Crochet Pouch Pattern its elegant appearance. The textured flower motif can be created using groups of double crochet stitches separated by chain spaces.
Locate the center of the flap and begin working cluster stitches according to your chosen floral arrangement. Typically, each petal is formed by working multiple double crochet stitches into the same space, followed by chain stitches that separate each cluster.
Continue building the floral design symmetrically across the flap. Consistent stitch placement creates a balanced appearance that enhances the overall beauty of the finished pouch.
Once the decorative section is complete, crochet another round of single crochet around the flap to frame the textured stitches. This finishing edge helps define the floral motif while reinforcing the flap.
Create a small button loop by chaining approximately six to eight stitches at the center of the flap tip. Join the chain with a slip stitch to form a secure loop that comfortably fits around your chosen button.
Sew the decorative pearl or button onto the front center of the pouch. Double-check the button placement before securing it permanently to ensure that the flap closes neatly without excessive tension.
4. Finishing, Customization, and Professional Tips
Weave in every yarn tail carefully using a tapestry needle. Hide the ends inside the stitches instead of trimming them too closely. This improves durability, especially if the pouch will be used frequently.
Light blocking may improve the final appearance of the pouch. Slightly dampen the finished piece, shape it evenly, and allow it to dry completely before use. Blocking enhances stitch definition and straightens the edges.
This Crochet Pouch Pattern can easily be customized in many ways. Try using gradient yarn, pastel colors, bold solids, striped combinations, or seasonal palettes depending on your personal style.
You can also increase or decrease the size simply by adjusting the starting chain and the overall rectangle height. Larger versions make excellent cosmetic bags, while smaller versions work perfectly as coin purses.
Adding a lining is another excellent option. A simple cotton fabric lining protects delicate items, prevents stretching, and gives the pouch an even more professional appearance. Although optional, it is highly recommended for everyday use.
Finally, attach a metal keyring, wrist strap, zipper, or decorative charm if desired. Small finishing details transform a simple crochet project into a polished handmade accessory suitable for gifts or craft market sales.
FAQ
Is this Crochet Pouch Pattern suitable for beginners?
Yes. Anyone familiar with basic crochet stitches such as chain, single crochet, and double crochet can successfully complete this project. The decorative flap may require slightly more attention, but it is still beginner-friendly with patience.
What yarn works best?
Medium-weight cotton yarn is the most popular choice because it provides durability, excellent stitch definition, and a structured finish that helps the pouch maintain its shape.
Can I make the pouch larger?
Absolutely. Simply increase the number of foundation chains and continue adding rows until you achieve your preferred dimensions before folding the rectangle.
Can I replace the button closure?
Yes. Magnetic snaps, zippers, wooden toggles, snap buttons, and even drawstring closures can all be used depending on the style you prefer.
How long does this project usually take?
Most crocheters can complete the pouch within a few hours. Beginners may take a little longer, while experienced crocheters often finish it in one relaxing afternoon.
Is this project good for handmade gifts?
Definitely. The Crochet Pouch Pattern makes an excellent gift for birthdays, Mother’s Day, Christmas, bridal showers, teacher appreciation gifts, and many other special occasions.
Can I sell finished pouches?
Yes. Handmade crochet pouches are popular items at craft fairs and online marketplaces. Many makers enjoy producing them in different colors and styles to offer customers a wider selection.
What other embellishments can I add?
You can decorate your pouch with crochet flowers, embroidery, beads, tassels, wooden buttons, lace trim, leather labels, or personalized tags to create a completely unique handmade accessory.
Conclusion
This Crochet Pouch Pattern is a practical and enjoyable crochet project that combines beauty, functionality, and creativity in a single handmade accessory. Throughout this tutorial, you learned how to choose the right materials, prepare your project, crochet the pouch body, assemble the sides, create the decorative textured flap, attach a button closure, and finish your work with professional details.
Because the design is highly customizable, you can experiment with different yarn colors, stitch textures, embellishments, and sizes to create personalized pouches for yourself, your family, or your customers.