
Fabric Zippered Pouch Pattern is one of the most rewarding sewing projects for beginners and experienced makers alike. A beautifully designed Fabric Zippered Pouch Pattern combines practicality, elegance, and creativity into a single project that can be used every day. Whether you want a cosmetic bag, pencil pouch, travel organizer, or handmade gift, this timeless sewing pattern is a perfect choice for any sewing enthusiast.
Creating a Fabric Zippered Pouch Pattern allows you to practice essential sewing skills such as accurate cutting, gathering fabric, installing zippers, pressing seams, and working with lining. Unlike many complex sewing projects, this pouch comes together relatively quickly while still producing a polished, professional-looking result. With thoughtful fabric choices and careful stitching, you can create a pouch that looks like it came from a boutique.
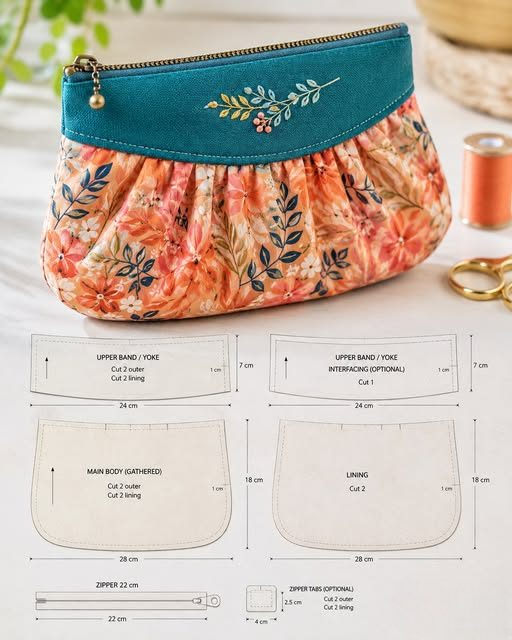
The project shown features a softly gathered floral body, a contrasting curved upper yoke, a fully lined interior, and a zipper closure that keeps everything secure. These details give the pouch an elegant appearance while remaining simple enough for confident beginners. Throughout this guide, you’ll learn every step needed to successfully complete this Fabric Zippered Pouch Pattern, from choosing materials to adding the final finishing touches.
1. Choosing Materials and Preparing Your Fabric Zippered Pouch Pattern
The success of any Fabric Zippered Pouch Pattern begins with selecting quality materials. Medium-weight quilting cotton works exceptionally well because it is easy to sew, holds its shape, and comes in endless beautiful prints.
For the upper band, choose a coordinating solid fabric that complements the main print. This creates visual balance and highlights the gathered body beneath it. Floral prints paired with deep teal, navy, cream, or dusty rose often produce elegant results.
You’ll also need lightweight fusible interfacing. Applying interfacing to the upper band helps the pouch maintain its curved structure while preventing unwanted stretching during zipper installation.
The lining fabric should be durable yet lightweight. Many sewists use coordinating quilting cotton, but waterproof lining fabrics can also be used if the pouch will store cosmetics or toiletries.
Choose a high-quality zipper that slides smoothly. A metal zipper gives the pouch a sophisticated appearance, while nylon zippers are flexible and easier for beginners to install.
Before cutting any fabric, wash, dry, and press every piece. Prewashing removes shrinkage and ensures your finished Fabric Zippered Pouch Pattern maintains its shape after future laundering.
2. Cutting the Fabric and Sewing the Main Body
Accurate cutting is essential for achieving a professional finish. Transfer all pattern pieces carefully onto the wrong side of the fabric using removable fabric markers or tailor’s chalk.
Cut the outer body pieces, lining pieces, upper yoke pieces, optional interfacing, zipper tabs, and interfacing exactly as indicated by your pattern. Precision here makes assembly much easier later.
Apply fusible interfacing to the wrong side of the upper yoke pieces according to the manufacturer’s instructions. Press carefully without stretching the fabric.
To create the gathered effect, sew two parallel rows of long gathering stitches along the top edge of each main body piece. Leave long thread tails on both ends.
Gently pull the bobbin threads until the gathered edge matches the width of the upper yoke. Distribute the gathers evenly so the fullness looks balanced across the entire pouch.
With right sides together, sew the gathered body to the upper yoke using a consistent seam allowance. Press the seam upward toward the yoke, taking care not to flatten the gathers completely.
3. Installing the Zipper and Constructing the Lining
One of the defining features of this Fabric Zippered Pouch Pattern is the clean zipper installation. Take your time during this step for the most professional results.
Place one outer pouch piece right side up. Position the zipper face down along the top edge. Then place one lining piece on top, creating a fabric zipper sandwich.
Use clips instead of pins whenever possible to avoid shifting the zipper tape. Stitch close to the zipper teeth using a zipper foot.
After sewing, fold both fabrics away from the zipper and press carefully. Topstitch approximately ⅛ inch from the folded edge to secure everything neatly in place.
Repeat the same process for the opposite side of the zipper with the remaining outer and lining pieces.
Before sewing the pouch together, remember to partially open the zipper. This simple step allows you to turn the finished pouch right side out after construction.
Place outer fabrics right sides together and lining fabrics right sides together. Stitch around the pouch, leaving a turning opening in the lining. Carefully box the lower corners if your pattern includes depth, then turn the pouch through the lining opening before closing it with an invisible stitch.
4. Finishing Techniques for a Professional Fabric Zippered Pouch Pattern
After turning the pouch right side out, gently push out every curve using a blunt turning tool or chopstick. Avoid sharp objects that could damage the fabric.
Press the pouch thoroughly. Good pressing between each construction step is one of the biggest differences between homemade-looking and professionally finished sewing projects.
Topstitch around the upper edge if desired. This reinforces the zipper area while adding an elegant decorative detail.
Add optional embellishments such as machine embroidery, appliqué, decorative labels, handmade tags, or delicate quilting to personalize your Fabric Zippered Pouch Pattern.
Experiment with different fabric combinations. Linen, canvas, denim, cork fabric, or faux leather accents can completely change the pouch’s appearance while using the same basic pattern.
Once complete, your pouch can be used as a makeup bag, travel organizer, sewing notions case, pencil pouch, electronic accessories organizer, or thoughtful handmade gift for family and friends.
Frequently Asked Questions
What fabric is best for a Fabric Zippered Pouch Pattern?
Quilting cotton is the most popular choice because it is stable, easy to sew, widely available, and comes in thousands of beautiful prints. Canvas and linen are also excellent alternatives for added durability.
Do I need interfacing?
Yes. Interfacing provides structure, prevents stretching, and helps the pouch maintain its shape. Most pouch patterns benefit from lightweight or medium-weight fusible interfacing.
Can beginners sew this project?
Absolutely. Although zipper installation may seem intimidating at first, this project is considered beginner-friendly and is an excellent way to practice essential sewing techniques.
What zipper length should I use?
The zipper length depends on the finished pouch size. Many medium cosmetic pouches use zippers between 8 and 10 inches, but always follow the measurements provided in your specific Fabric Zippered Pouch Pattern.
How can I make the pouch sturdier?
Adding interfacing, foam stabilizer, or fusible fleece gives the pouch more body and allows it to stand upright while protecting the contents inside.
Can I resize the pattern?
Yes. Once you understand the construction method, you can enlarge or reduce the pattern to create pencil cases, travel pouches, toiletry bags, or oversized project bags while maintaining the same assembly process.
Can I wash the finished pouch?
Most cotton pouches can be machine washed on a gentle cycle if prewashed fabrics were used. Air drying helps preserve both the fabric and the zipper over time.
What are common mistakes to avoid?
The most common mistakes include uneven gathering, skipping interfacing, sewing with the zipper fully closed before turning, inaccurate cutting, and failing to press the seams during construction.
Conclusion
This Fabric Zippered Pouch Pattern is an enjoyable sewing project that combines beauty, functionality, and practical sewing skills into one elegant handmade accessory. Throughout this guide, you learned how to select suitable fabrics, prepare the pattern pieces, apply interfacing, create even gathers, attach the upper yoke, install a zipper neatly, assemble the lining, finish the pouch professionally, and personalize the final design with decorative details.
By mastering these techniques, you can confidently create pouches in countless colors, sizes, and fabric combinations for personal use, gifts, or even small handmade business collections. Every new version offers another opportunity to improve your sewing accuracy and creativity. If you found this tutorial helpful, please leave your honest opinion and share your suggestions. Your feedback is always appreciated and helps inspire future sewing tutorials and pattern guides.