
DIY Car Gear Hoodie Pattern is a fun and creative sewing project that transforms your car’s gear shift into a unique accessory with personality. This DIY Car Gear Hoodie Pattern is perfect for beginners and experienced crafters who enjoy making practical decorations using fabric scraps. It is an affordable project that can be completed in a short time while adding a playful touch to any vehicle interior. Throughout this tutorial, you will learn how to create your own hoodie step by step using simple sewing techniques and easy-to-find materials.
Creating a miniature hoodie for your car gear shifter is an excellent way to practice sewing skills while producing something both decorative and entertaining. The finished hoodie can be customized with different colors, fabrics, embroidery, patches, or printed designs to match your personality or your car’s interior. Whether you prefer classic solid colors or vibrant prints, this project offers endless creative possibilities. It is also a fantastic handmade gift for friends and family who love cars and DIY crafts.
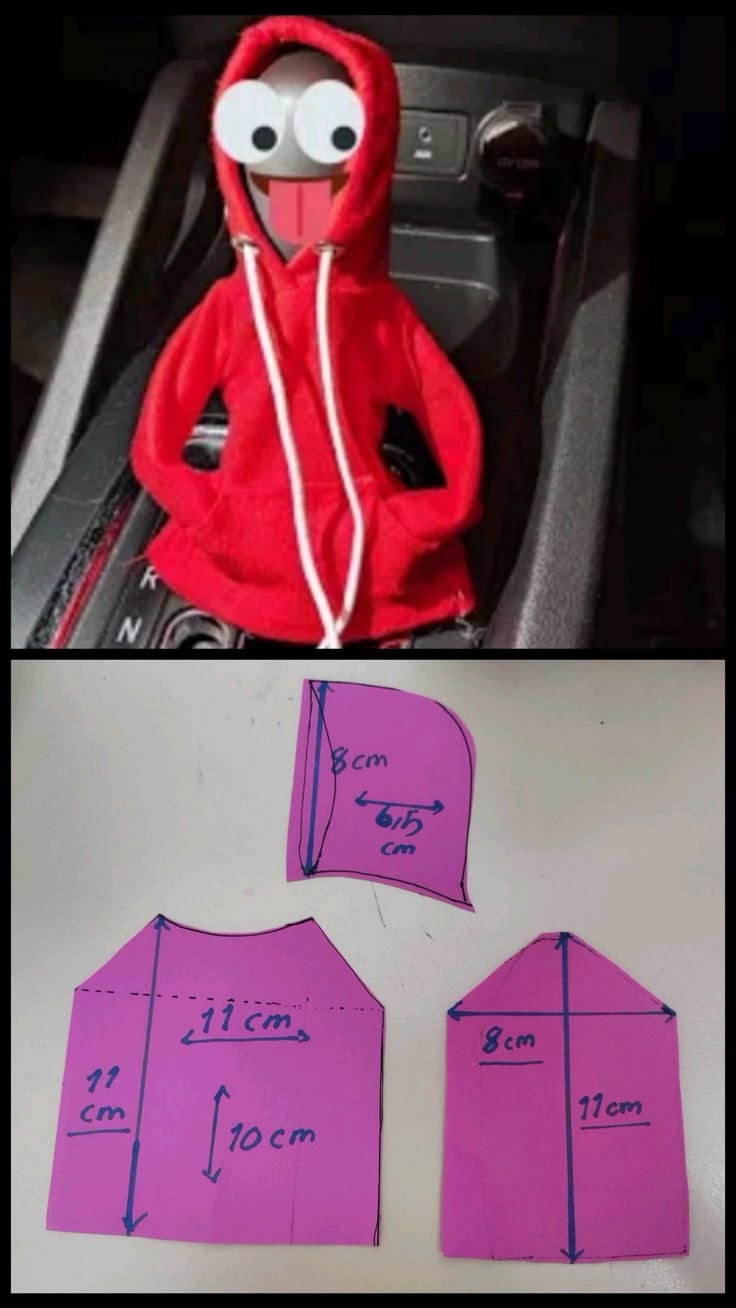
One of the best aspects of this project is that it requires only small fabric pieces, making it ideal for using leftover materials from previous sewing projects. The pattern shown uses three simple fabric pieces with easy measurements, allowing anyone with basic sewing knowledge to recreate the design. Follow the instructions carefully, adjust the dimensions if necessary for your vehicle, and enjoy creating a unique accessory that will surely attract smiles and compliments.
Materials and Preparing the DIY Car Gear Hoodie Pattern
Before beginning the project, gather all the necessary materials to ensure a smooth sewing experience. Cotton fabric, fleece, sweatshirt knit, or soft jersey fabric all work well for this project because they provide flexibility and a realistic hoodie appearance. Choose a fabric that matches your desired style while remaining durable enough for daily use.
Besides the fabric, prepare matching sewing thread, scissors, sewing pins or clips, tailor’s chalk or a washable fabric marker, measuring tape, a ruler, and a sewing machine. Although a sewing machine makes construction faster, this project can also be completed by hand using neat backstitches.
The main body of the hoodie is created using a front and back piece measuring approximately 11 cm high and 11 cm wide, following the curved shoulder shape shown in the pattern. These dimensions can be slightly adjusted depending on the size of your gear shift.
The hood consists of two mirrored pieces approximately 8 cm tall and 6.5 cm wide. When sewn together along the curved edge, they create the recognizable hood shape that gives the project its charming appearance.
The front pocket is made from another small fabric piece measuring approximately 8 cm wide by 11 cm high before folding and shaping. This pocket becomes one of the cutest details of the finished hoodie.
Wash and iron your fabric before cutting the pattern pieces. Prewashing helps prevent future shrinking, while pressing the fabric ensures more accurate cutting and cleaner sewing lines.
Cutting and Sewing the Main Hoodie Pieces
Begin by placing the body pattern onto the folded fabric. Pin the pattern securely and cut two identical body pieces. Transfer any alignment marks using tailor’s chalk so both pieces match perfectly during assembly.
Next, cut two mirrored hood pieces using the hood template. Make sure they are mirror images rather than identical, allowing them to sew together correctly along the curved top edge.
Cut the pocket piece carefully, maintaining smooth edges. Fold the upper edge twice to create a clean hem, press it with an iron, and sew a straight stitch across the folded edge for a professional finish.
Position the finished pocket onto the front body piece. Stitch around the sides and bottom, leaving the top open exactly like a real hoodie pocket. Reinforce the upper corners with a few extra stitches for durability.
Place the front and back body pieces right sides together. Sew along the shoulder areas and side seams while leaving the bottom open. Turn the piece right side out and press the seams flat using an iron.
Test the body over your gear shift before attaching the hood. If it feels slightly loose or tight, make small adjustments now to achieve the perfect fit. Every vehicle may have a slightly different gear shift size, so small modifications are completely normal.
Assembling the Hood and Adding the Final Details
With the hood pieces right sides together, sew along the rounded back curve using a narrow seam allowance. Clip small notches into the seam allowance around the curve to help the hood lay smoothly once turned right side out.
Turn the hood right side out and gently shape the rounded top using a blunt tool such as a chopstick or point turner. Press carefully with an iron to define the shape without flattening the curves too much.
Align the hood with the neckline opening of the body. Pin evenly around the neckline and sew slowly, making sure the hood remains centered. A balanced hood greatly improves the final appearance.
To create realistic hoodie drawstrings, cut two pieces of white cord, ribbon, or thick yarn. Thread them through the front hood opening and knot the ends to prevent fraying. These decorative drawstrings instantly give the miniature hoodie an authentic sweatshirt look.
Finish the lower edge by folding the fabric inward and sewing a clean hem. Depending on your preference, you may also add a small elastic casing so the hoodie hugs the gear shift more securely.
If desired, personalize the hoodie with embroidery, fabric paint, iron-on patches, miniature logos, initials, or seasonal decorations. These finishing touches make every DIY Car Gear Hoodie Pattern unique and allow you to create different versions for holidays or special occasions.
Customization Ideas and Helpful Sewing Tips
One of the greatest advantages of this DIY Car Gear Hoodie Pattern is its versatility. You can create hoodies inspired by sports teams, holidays, favorite colors, or even matching outfits for different family members’ vehicles.
Fleece fabric creates a cozy winter appearance, while lightweight cotton offers a cleaner look suitable for warm weather. Printed fabrics featuring cartoons, plaid, floral motifs, or camouflage can completely change the personality of the finished project.
If your gear shift is taller or wider than average, simply increase each pattern measurement proportionally while maintaining the original shape. Always create a quick paper test before cutting your final fabric if you are unsure about sizing.
Using contrasting thread can create a decorative effect, while matching thread produces a cleaner, more professional finish. Double stitching stress points like the pocket corners helps extend the life of the finished accessory.
Keep seam allowances consistent throughout the project. Accurate seam allowances help maintain the intended proportions and make assembly much easier, especially around the curved hood section.
Most importantly, enjoy the creative process. Handmade accessories often become conversation starters, and this miniature hoodie is a perfect example of how a simple sewing project can bring humor and personality into everyday life.
FAQ
Is this project suitable for beginners?
Yes. The DIY Car Gear Hoodie Pattern uses simple shapes and basic sewing techniques, making it an excellent beginner-friendly project.
What fabric works best?
Cotton, sweatshirt fleece, jersey knit, French terry, and lightweight fleece all work beautifully. Choose a fabric that is soft but durable.
Can I sew it by hand?
Absolutely. While a sewing machine speeds up the process, careful hand stitching produces excellent results as well.
Will this fit every car?
Most cars have similar gear shift sizes, but measuring your own gear shift before cutting the fabric is recommended. Small adjustments may be necessary.
Can I wash the finished hoodie?
Yes. Hand washing or using a gentle machine cycle with mild detergent helps preserve the fabric and decorative details.
Can I decorate it?
Definitely. Add embroidery, vinyl designs, patches, miniature buttons, or printed fabric to personalize your hoodie.
How long does the project take?
Most crafters can complete this project in approximately one to two hours, depending on their sewing experience and desired level of customization.
Is this a good gift idea?
Yes. A handmade miniature gear shift hoodie makes a thoughtful and inexpensive gift for car enthusiasts, sewing lovers, and anyone who enjoys fun automotive accessories.
Conclusion
This DIY Car Gear Hoodie Pattern demonstrates how a few small fabric pieces and basic sewing techniques can become a charming handmade accessory that adds personality to any vehicle.
Throughout this tutorial, you learned how to prepare the materials, cut each pattern piece, sew the body, assemble the hood, attach the pocket, add realistic drawstrings, and customize the finished project with your own creative style. By following these simple steps, you can easily recreate the design, adjust the measurements to fit your vehicle, and experiment with different fabrics and colors for unique results.