
Mini Waist Bag Pattern projects are a wonderful way to combine creativity, practicality, and sewing skills into one rewarding handmade accessory. Whether you are creating your first small bag or looking for a professional-looking project to expand your sewing experience, this Mini Waist Bag Pattern is an excellent choice. Its compact design, secure flap closure, and belt attachment make it perfect for everyday use while offering endless customization possibilities.
Creating a Mini Waist Bag Pattern from scratch allows you to practice accurate cutting, curved stitching, edge finishing, and hardware installation without requiring advanced techniques. The finished bag is lightweight, durable, and large enough to hold essentials like keys, cards, cash, and a smartphone. Because of its simple construction, this project is suitable for confident beginners while still being enjoyable for experienced sewists who want a quick weekend project.
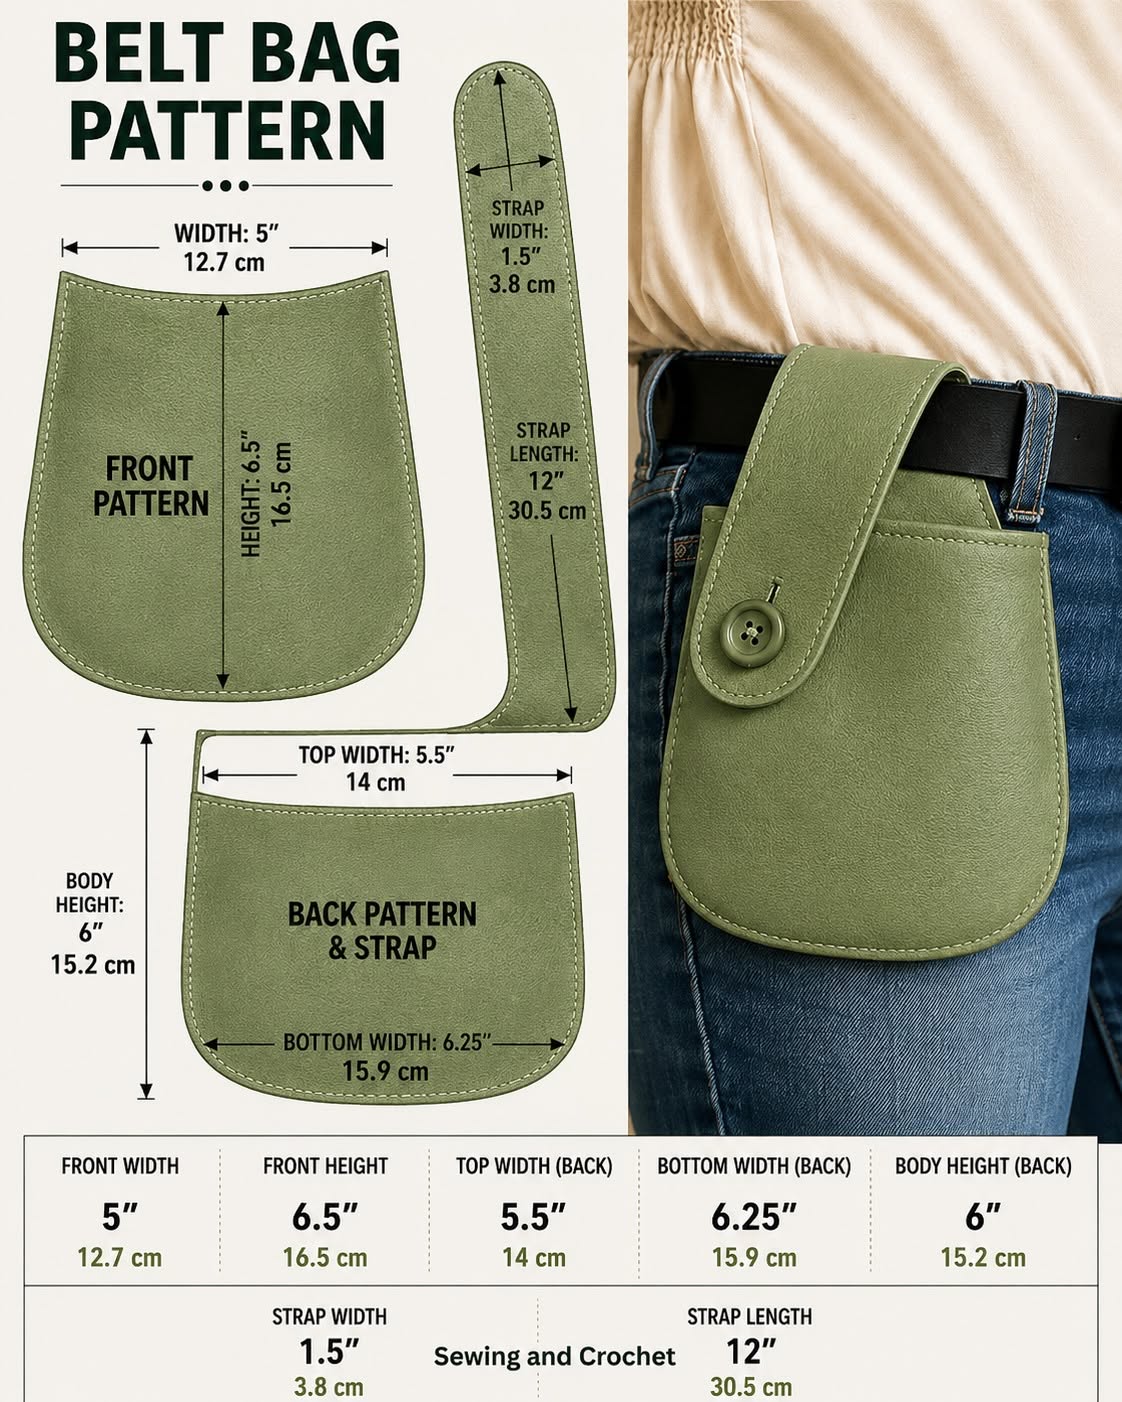
Another advantage of this Mini Waist Bag Pattern is its versatility. You can sew it using faux leather, genuine leather, canvas, cork fabric, denim, waxed cotton, or heavy quilting cotton combined with interfacing. By selecting different colors, textures, and closures, every finished waist bag becomes completely unique. The pattern shown in the project features a rounded front pocket, a slightly wider back panel, and a long integrated flap secured with a decorative button.
Choosing Materials and Preparing the Pattern
Before cutting any fabric, gather all the supplies required for the project. Choosing quality materials will significantly improve the final appearance and durability of your finished waist bag. Faux leather is especially beginner-friendly because it offers a professional finish while being easier to sew than thick genuine leather.
For this project, prepare the front panel, back panel, and flap according to the dimensions shown in the pattern. The front panel measures approximately 5 inches (12.7 cm) wide and 6.5 inches (16.5 cm) high, while the back section is slightly wider at the bottom to provide extra room inside the pouch.
If you prefer fabric instead of faux leather, reinforce every piece using medium-weight fusible interfacing. This helps the bag maintain its shape after repeated use while preventing sagging around the pocket opening.
Carefully transfer all pattern markings before cutting. Mark the fold line, stitching lines, button placement, and flap position with removable fabric chalk or washable markers. Accurate markings make assembly much easier later.
Use sharp fabric scissors or a rotary cutter for clean, smooth edges. Uneven cuts can affect the symmetry of the curved sections, so take your time during this step.
Before sewing, arrange all pieces on your worktable and verify that every component has been cut correctly. Double-check measurements and orientation before moving to the next stage.
Cutting, Sewing, and Building the Main Body
Begin by placing the front panel onto the lower section of the back panel with right sides facing outward if using faux leather, or right sides together if using traditional fabric construction. Align the curved edges carefully.
Clip or use sewing clips instead of pins when working with faux leather, since pins leave permanent holes. Clips hold the material securely without damaging its surface.
Sew slowly around the curved perimeter using approximately a ¼-inch (6 mm) seam allowance. Reduce your sewing speed around tight curves to maintain smooth, even stitching.
Trim excess seam allowance if necessary, especially around the rounded corners. Carefully clip curves when using woven fabrics so the edges turn smoothly without puckering.
Turn the bag right side out if applicable and gently shape the curved bottom using a blunt turning tool. Avoid sharp objects that could puncture the fabric or faux leather.
Topstitch around the outer edge approximately ⅛ inch (3 mm) from the seam. This strengthens the construction while giving the Mini Waist Bag Pattern a clean, professional appearance.
Creating the Flap, Belt Loop, and Closure
The integrated flap is one of the most recognizable features of this Mini Waist Bag Pattern. It extends from the back panel and folds neatly over the front of the pouch to secure the contents.
Round the corners of the flap carefully before stitching. Smooth curves create a polished appearance and help the flap lie flat after sewing.
Finish the edges of the flap with topstitching around the entire perimeter. A longer stitch length often produces more attractive decorative stitching on thicker materials like faux leather.
The belt loop section should be folded according to the pattern dimensions and stitched securely onto the back panel. Make sure there is enough space for your preferred belt width while keeping the bag stable during wear.
Mark the button placement carefully. Position the button on the front panel so the flap closes comfortably without stretching or leaving excessive looseness.
If preferred, replace the decorative button with a magnetic snap, hidden snap fastener, hook-and-loop closure, or decorative buckle. Each option gives the bag a different personality while maintaining functionality.
Finishing Touches, Personalization, and Care Tips
After completing the construction, inspect every seam for consistency. Trim loose threads and reinforce any areas that may experience frequent stress, such as the belt loop and flap attachment.
Personalizing your Mini Waist Bag Pattern is one of the most enjoyable parts of the project. Decorative stitching, embroidery, appliqué, engraved buttons, contrast thread, and metal rivets can all transform a simple design into a one-of-a-kind accessory.
Color selection also makes a dramatic difference. Neutral shades like olive, black, tan, cream, and brown create timeless accessories, while vibrant colors such as red, teal, mustard, or navy produce a bold statement piece.
Consider adding an interior lining for a more luxurious finish. A lining hides seam allowances, protects the inside of the bag, and allows you to include a small inner pocket for additional organization.
Proper care will keep your handmade waist bag looking beautiful for years. Wipe faux leather with a damp cloth, avoid prolonged exposure to direct sunlight, and store the bag in a cool, dry place when not in use.
Most importantly, enjoy the creative process. Every completed Mini Waist Bag Pattern improves your sewing confidence and teaches valuable construction techniques that can be applied to larger handbags, crossbody bags, and other accessories in future projects.
Frequently Asked Questions
What fabric works best for a Mini Waist Bag Pattern?
Faux leather, canvas, cork fabric, denim, waxed cotton, upholstery fabric, and heavy quilting cotton reinforced with interfacing all produce excellent results.
Is this project suitable for beginners?
Yes. Beginners with basic sewing knowledge can complete this project successfully because it uses simple construction methods and a manageable number of pattern pieces.
Can I make the bag larger?
Absolutely. Increase all pattern pieces proportionally while maintaining the same overall shape and seam allowances.
What closure is easiest to install?
A decorative button combined with an elastic loop is beginner-friendly, while magnetic snaps provide a cleaner, more modern finish.
Do I need a heavy-duty sewing machine?
Not necessarily. Most domestic sewing machines can handle faux leather or canvas when fitted with the correct needle and sewn at a moderate speed.
Can I add pockets inside?
Yes. Interior slip pockets or zippered pockets can be sewn into the lining before assembling the bag.
Which needle should I use?
For faux leather, use a leather or microtex needle. For canvas or denim, a size 90/14 or 100/16 universal needle usually works well.
Can this pattern be sewn entirely by hand?
Yes. Hand sewing with strong waxed thread is possible, although it requires additional time and patience.
How can I make the bag more durable?
Reinforce stress points with backstitching, use quality thread, apply interfacing when appropriate, and install rivets on high-stress areas if desired.
Is lining required?
No. The bag functions perfectly without lining, but adding one improves appearance, durability, and organization.
Conclusion
This Mini Waist Bag Pattern demonstrates how a compact sewing project can produce a practical, stylish, and highly functional everyday accessory. Throughout this guide, you learned how to select suitable materials, prepare the pattern pieces, cut accurately, assemble the body, sew smooth curved seams, create a secure flap closure, attach the belt loop, and apply professional finishing techniques. You also discovered ways to personalize the design with different fabrics, colors, closures, decorative stitching, and hardware to create a truly unique handmade piece.
Whether you choose faux leather for a modern appearance or sturdy fabric for a casual style, this Mini Waist Bag Pattern offers an enjoyable sewing experience while helping you strengthen essential bag-making skills. With careful measuring, precise stitching, and thoughtful finishing, you can create a durable accessory that is both attractive and practical for everyday use.