
Denim Slippers Pattern is a practical and stylish sewing project that transforms durable denim fabric into a pair of comfortable indoor slippers. Whether you are reusing old jeans or working with new denim, this Denim Slippers Pattern is an excellent beginner-friendly project that combines functionality, sustainability, and creativity. By following a simple construction process, you can create personalized slippers that are both attractive and long-lasting.
Creating your own Denim Slippers Pattern is a rewarding experience because it allows you to customize every detail, from the fabric color to the sole thickness and decorative finishes. Handmade slippers also make thoughtful gifts for family members and friends, offering comfort while showcasing your sewing skills. Denim is especially suitable because of its durability, texture, and timeless appearance.
Another advantage of making a Denim Slippers Pattern is the opportunity to practice several essential sewing techniques. You will learn how to trace patterns, cut curved pieces accurately, attach binding neatly, and assemble multiple fabric layers for comfort and strength. These techniques can later be applied to many other sewing projects, helping you grow your confidence and creativity.
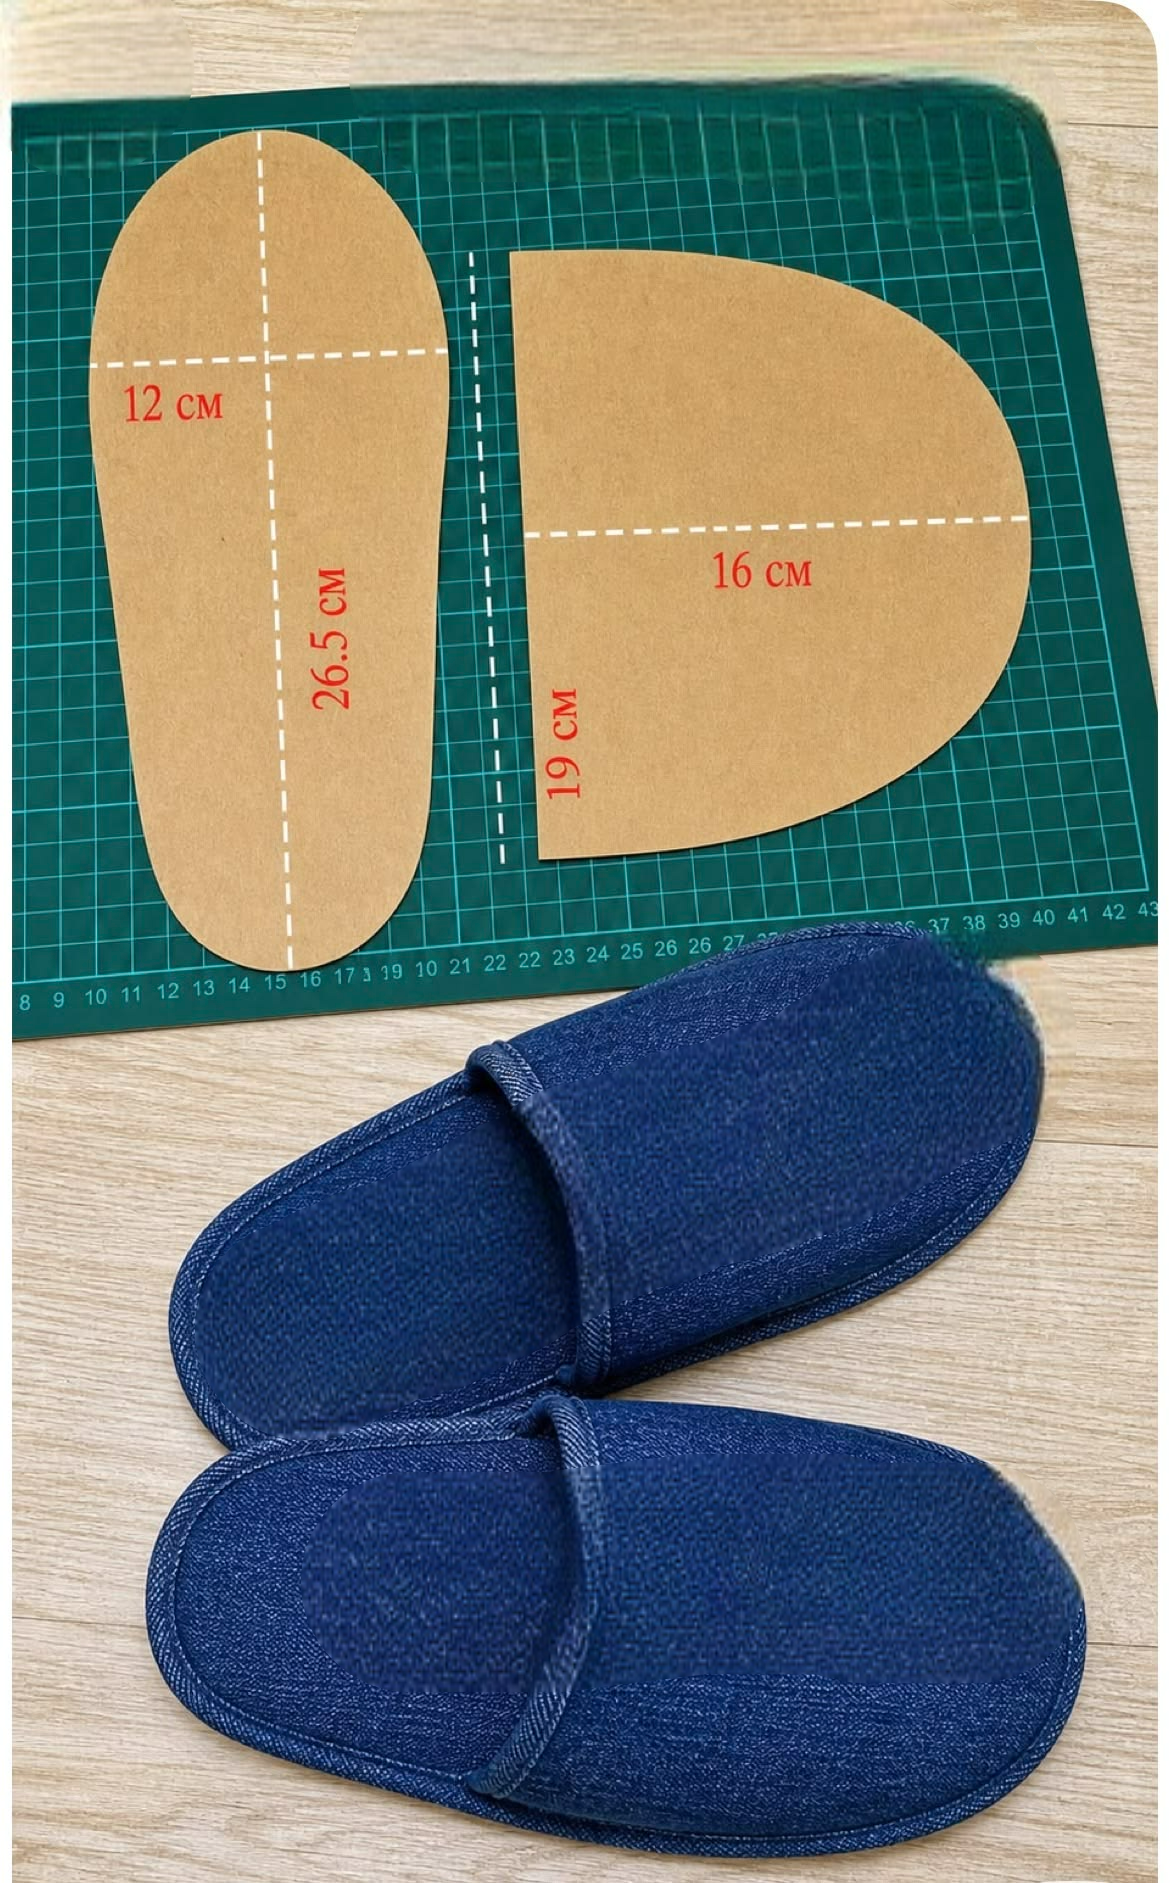
Materials and Preparing the Denim Slippers Pattern
Before starting your Denim Slippers Pattern, gather all the necessary supplies. You will need medium-weight denim fabric, cotton lining, quilt batting or foam padding, non-slip sole fabric if desired, matching sewing thread, fabric clips or pins, scissors, rotary cutter, cutting mat, ruler, fabric marker, bias binding, and a sewing machine capable of handling thicker layers.
Begin by preparing the pattern pieces. The project consists of two primary templates: the sole and the upper section. Carefully transfer the measurements from your paper template onto sturdy cardstock or pattern paper so they can be reused multiple times. Accuracy at this stage ensures both slippers will be symmetrical.
If you are recycling old jeans, inspect the fabric carefully. Choose areas without excessive wear or weak fibers. Wash and iron the denim before cutting to eliminate shrinkage and make the fabric easier to handle during construction.
Cut two outer soles, two lining soles, two padding layers, and two upper pieces for each slipper. Remember to mirror the pieces correctly so you obtain one left slipper and one right slipper.
If additional cushioning is desired, cut an extra layer of batting or foam for the sole. This provides greater comfort, especially if the slippers will be worn on hardwood or tile floors.
Finally, organize all your cut pieces before sewing. Keeping everything neatly arranged saves time and reduces the risk of assembling the wrong layers together.
Sewing the Upper and Sole
Start your Denim Slippers Pattern by assembling the upper section. Place the denim fabric right sides together with the lining fabric, stitch around the curved edge, then turn it right side out. Press the seam carefully to achieve a smooth professional finish.
Topstitch close to the curved edge. Besides adding a decorative touch, topstitching strengthens the seam and helps the upper maintain its shape after repeated use.
Prepare the sole by layering the outer denim, batting, and lining. Quilt the layers together if desired. Simple parallel stitching or decorative quilting lines both improve durability and keep the padding from shifting.
Position the upper onto the sole according to the pattern markings. Secure it with clips before stitching to prevent movement while sewing around the curves.
Use a slightly longer stitch length when sewing through multiple denim layers. This allows the machine to feed the fabric more smoothly while producing stronger seams.
Once the upper has been attached securely, trim any excess seam allowance carefully while avoiding cutting through the stitches. This helps reduce bulk before the finishing stage.
Finishing Techniques for Professional Results
Binding is one of the most important finishing steps in the Denim Slippers Pattern. Apply bias binding around the entire edge of the slipper, enclosing all raw fabric edges neatly. Sew slowly around the curves to keep the binding smooth and even.
For additional durability, reinforce the toe area and heel with a second row of stitching. These areas experience the greatest wear during everyday use.
If you want better traction, attach a non-slip fabric or rubberized sole underneath the slipper. This is especially useful for slippery flooring such as tile or hardwood.
Decorative details can personalize your slippers without affecting functionality. Consider adding embroidery, fabric labels, decorative stitching, small fabric patches, or contrasting denim pieces to create a unique handmade appearance.
After completing the stitching, press the slippers gently using steam and a pressing cloth. Proper pressing helps flatten bulky seams and gives the finished project a polished look.
Inspect both slippers carefully before considering the project complete. Compare their shape, size, and stitching consistency to ensure they match as closely as possible.
Customizing Your Denim Slippers Pattern
One of the best features of a Denim Slippers Pattern is its versatility. The basic design can easily be adapted for different foot sizes by enlarging or reducing the sole template proportionally.
Different denim colors create completely different visual styles. Classic indigo, black denim, gray denim, white denim, or recycled patchwork denim each produce a distinctive finished look.
Seasonal versions are also easy to create. Lightweight cotton lining works well for warmer weather, while fleece, sherpa, or flannel lining adds warmth during colder months.
Children’s slippers can be made using exactly the same construction process. Bright fabrics, colorful stitching, or playful appliqués can make them even more appealing for younger family members.
Gift-making becomes much easier once you have perfected your Denim Slippers Pattern. Handmade slippers are practical presents for birthdays, holidays, Mother’s Day, Father’s Day, or housewarming celebrations.
As your sewing skills improve, experiment with decorative quilting, contrast bindings, embroidered initials, or patchwork denim combinations. These creative details transform a simple sewing project into a personalized handmade accessory.
FAQ
What fabric works best for a Denim Slippers Pattern?
Medium-weight denim is ideal because it provides durability while remaining flexible enough for comfortable indoor footwear. Recycled jeans are also an excellent choice.
Can beginners sew this project?
Yes. This Denim Slippers Pattern is suitable for beginners who already know basic sewing machine operation, straight stitching, and simple curved seams.
Should I add seam allowance to the pattern?
Yes. If your printed template does not already include seam allowance, add approximately 0.6 cm (¼ inch) to all sewing edges before cutting the fabric.
What padding should I use inside the slippers?
Quilt batting, thin foam, felt, or cotton batting all work well. The choice depends on how soft or firm you want the finished slippers to feel.
Can I wash denim slippers?
Yes. Most handmade denim slippers can be machine washed on a gentle cycle using cold water. Air drying is recommended to preserve their shape and extend their lifespan.
How can I make the slippers non-slip?
Attach specialized non-slip sole fabric, suede, rubberized fabric, or silicone grip material to the bottom of the slippers before completing the final assembly.
Can I adjust the pattern for larger or smaller feet?
Absolutely. Simply resize the sole template while maintaining the proportions of the upper piece to achieve a proper fit.
Are recycled jeans suitable for this project?
Yes. Recycled denim is one of the best materials for this project because it is durable, economical, environmentally friendly, and often already softened from previous use.
Conclusion
This Denim Slippers Pattern demonstrates how a few carefully prepared pattern pieces and quality sewing techniques can produce comfortable, durable, and attractive indoor slippers.
Throughout this guide, you learned how to prepare the materials, trace and cut the templates, assemble the upper and sole, apply professional finishing techniques, and customize the design to suit different styles and sizes. With patience and attention to detail, this project becomes an enjoyable way to practice sewing skills while creating something practical for everyday use.