
Fabric Turban Pattern is a stylish and practical sewing project that combines elegance, comfort, and versatility in a single accessory. Whether you are creating it for everyday wear, fashion, hair protection, or as a thoughtful handmade gift, this Fabric Turban Pattern is beginner-friendly while offering enough creativity to satisfy experienced sewists. With only a few fabric pieces and basic sewing skills, you can create a beautiful turban that fits comfortably and looks professionally made.
One of the greatest advantages of making your own Fabric Turban Pattern is the freedom to personalize every detail. You can choose soft jersey knit, velvet, cotton spandex, bamboo fabric, or lightweight stretch materials depending on the season and the desired appearance. Selecting quality fabric allows the finished turban to drape beautifully while remaining comfortable enough for all-day wear. Handmade accessories also give you complete control over color combinations, texture, and finishing details.
Another reason why the Fabric Turban Pattern continues to grow in popularity is its timeless design. Unlike trendy accessories that quickly go out of style, a classic turban complements casual outfits, elegant clothing, and even special occasions. It is also appreciated by individuals seeking comfortable head coverings for hair protection or personal preference. Throughout this tutorial, you will learn every important step required to transform simple fabric into a sophisticated accessory while improving your sewing skills.
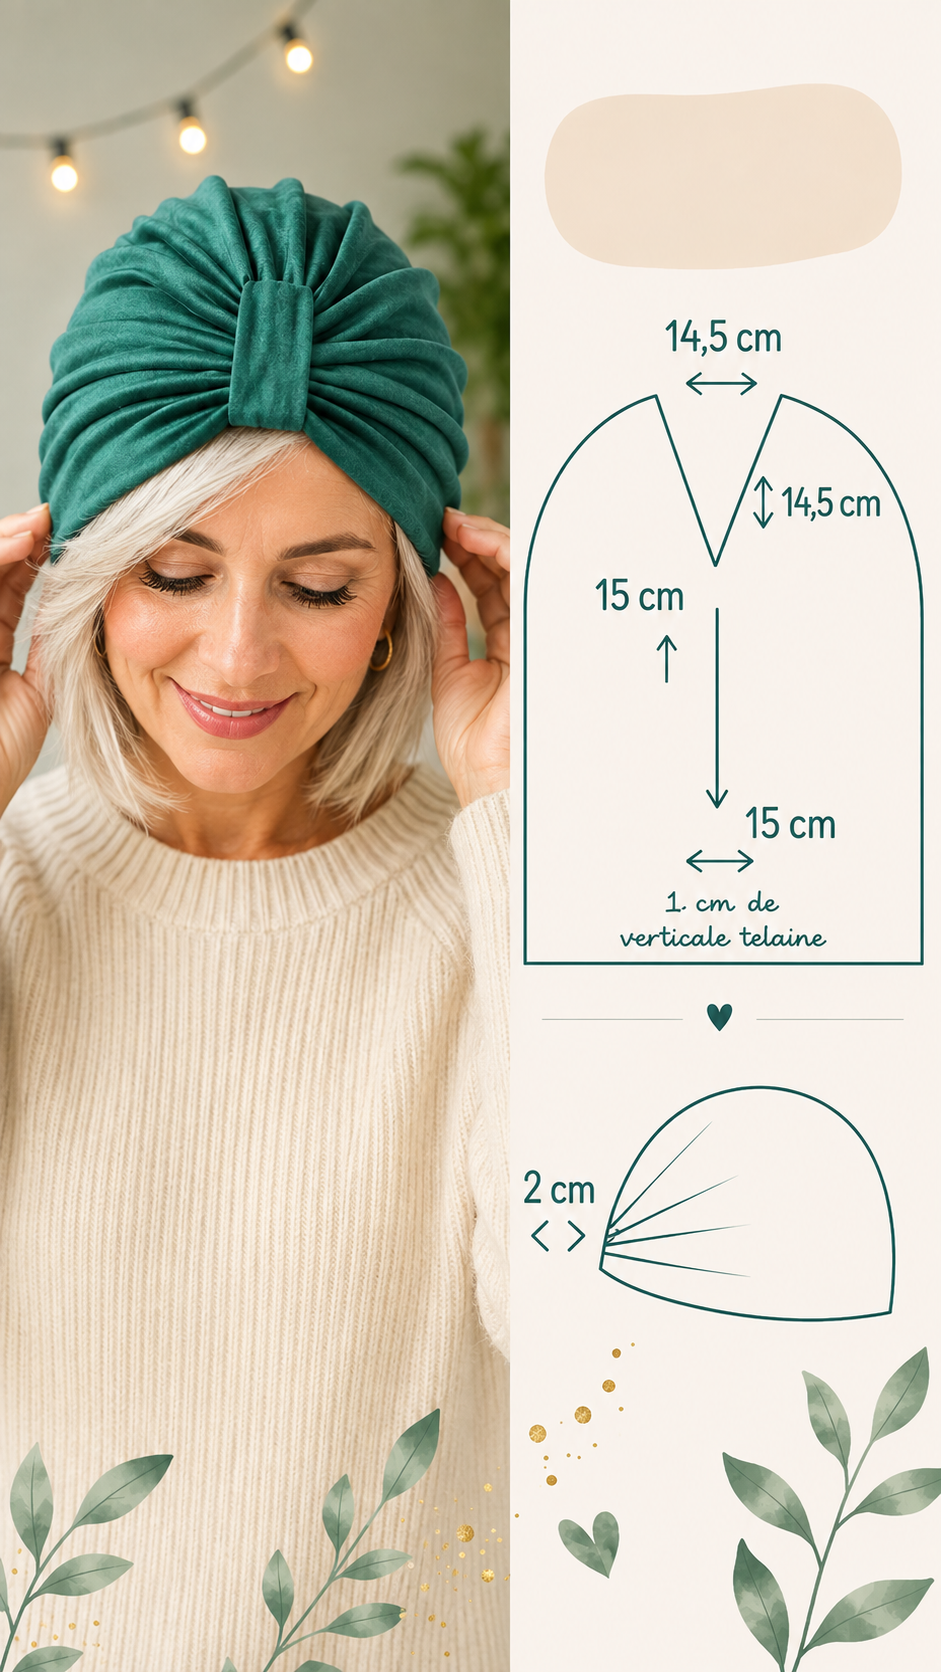
Choosing Materials and Preparing the Fabric
Selecting the correct fabric is the first step toward a successful Fabric Turban Pattern. Stretch knit fabrics usually provide the best balance of comfort and flexibility. Jersey knit, rayon spandex, bamboo knit, and cotton spandex are all excellent choices because they adapt naturally to different head sizes without feeling restrictive.
Medium-weight fabrics generally produce the most attractive folds. Extremely lightweight materials may collapse instead of forming elegant pleats, while very thick fabrics can create unnecessary bulk around the forehead. Testing a small fabric sample before cutting the entire project is always a smart practice.
Before cutting, wash and dry the fabric according to its care instructions. Prewashing prevents future shrinkage and ensures that your finished turban maintains its original size after laundering. Ironing the fabric also removes wrinkles that could interfere with accurate cutting.
Prepare your sewing tools before beginning. You will need fabric scissors, pins or sewing clips, measuring tape, stretch sewing needles, polyester thread, fabric chalk, and either a sewing machine or a serger. Having everything ready makes the sewing process smoother and more enjoyable.
Using the measurements shown in the pattern image, carefully transfer each shape onto your fabric. Mark all important notches, folding points, and center lines. Accurate markings make assembly much easier later in the project.
Finally, double-check every measurement before making the first cut. Precise cutting is one of the simplest ways to achieve professional-looking results, especially when working with symmetrical accessories like turbans.
Cutting and Sewing the Main Turban Pieces
After preparing the fabric, begin cutting the main body according to your Fabric Turban Pattern. Cut slowly and use long, smooth scissor strokes to avoid jagged edges. If using rotary cutters, ensure your cutting mat is stable and your blade is sharp.
Lay both main pieces together with the right sides facing each other. Pin or clip them carefully, paying close attention to matching the curved edges evenly. Proper alignment prevents twisting once the seams are sewn.
Using a stretch stitch or narrow zigzag stitch, sew around the curved edges while leaving the indicated opening. A stretch stitch allows the seam to move naturally with the fabric without breaking during wear.
Trim excess seam allowance where necessary, especially around tight curves. This reduces bulk and helps the finished curves lie smoothly once turned right side out. Be careful not to clip into the stitching line.
Turn the sewn piece right side out and gently shape every curved section using your fingers. Avoid pulling aggressively on knit fabrics, as stretching may permanently distort the shape.
Lightly press the seams using a warm iron with steam if the fabric allows. Pressing improves the appearance of the project and prepares the fabric for forming the signature pleats that give the Fabric Turban Pattern its elegant look.
Creating the Signature Pleats and Front Knot
The defining feature of every beautiful Fabric Turban Pattern is the carefully arranged pleating across the front. Begin by locating the center point of the turban and marking it with fabric chalk or a removable marker.
Using the measurements from your pattern, create evenly spaced folds that radiate toward the center. Each pleat should have a similar width so the finished design appears balanced and symmetrical from every angle.
Secure the pleats temporarily using pins or sewing clips. Before stitching, place the turban around a dress form, mannequin head, or carefully test the fit on yourself to confirm that the folds sit comfortably across the forehead.
Once satisfied with the arrangement, sew across the base of the pleats using several reinforcing stitches. These stitches remain hidden beneath the decorative center band while providing long-lasting durability.
Next, prepare the rectangular center band that wraps around the pleated section. Fold it lengthwise with right sides together, stitch along the long edge, turn it right side out, and press it flat before positioning it around the gathered front.
Wrap the finished band around the pleated section, overlapping the ends neatly on the inside. Hand stitch or machine stitch the band securely in place. This creates the polished centerpiece that gives the Fabric Turban Pattern its classic appearance.
Finishing, Styling, and Caring for Your Fabric Turban
Complete the remaining opening using a hidden ladder stitch or a narrow machine seam, depending on the construction of your pattern. A clean finish improves both durability and appearance while making the inside as attractive as the outside.
Inspect every seam carefully before wearing the finished turban. Trim loose threads, reinforce any weak areas, and gently stretch the seams to confirm that the stitching moves comfortably with the fabric.
One of the best features of a handmade Fabric Turban Pattern is its versatility. It can be worn with the decorative knot centered, slightly off-center, or paired with brooches, fabric flowers, or decorative pins for different occasions.
Experiment with various fabrics to create an entire wardrobe of turbans. Velvet offers elegance for evening wear, lightweight jersey is perfect for everyday comfort, while printed cotton blends add personality and seasonal style.
Caring for your handmade turban is simple. Wash it using gentle detergent in cool water, either by hand or on a delicate machine cycle. Allow it to air dry whenever possible to preserve both elasticity and shape.
As your confidence grows, consider modifying the original Fabric Turban Pattern by adjusting width, adding extra pleats, lengthening the center band, or incorporating decorative embellishments. Small design changes allow each project to become uniquely yours while strengthening your sewing experience.
FAQ
Is the Fabric Turban Pattern suitable for beginners?
Yes. This project uses basic sewing techniques and simple construction, making it an excellent introduction to sewing stretch fabrics.
What is the best fabric for a Fabric Turban Pattern?
Soft stretch fabrics such as cotton spandex, bamboo knit, rayon jersey, and lightweight jersey are among the most popular choices because they provide comfort, flexibility, and beautiful draping.
Can I make this turban without a serger?
Absolutely. A regular sewing machine with a stretch stitch or narrow zigzag stitch works perfectly for constructing the entire project.
How do I choose the correct size?
Measure the circumference of the head where the turban will be worn and compare those measurements with your pattern before cutting the fabric.
Can I use woven cotton fabric?
Stretch fabrics are strongly recommended because they provide a more comfortable fit. Woven fabrics may require additional closures or elastic inserts.
How long does this project usually take?
Most beginners can complete the project in approximately one to two hours, while experienced sewists often finish it in less than one hour.
Can I personalize the Fabric Turban Pattern?
Yes. You can change the fabric, alter the pleat arrangement, add decorative embellishments, modify the width, or create different center band styles to make every turban unique.
How should I wash my handmade turban?
Wash using cold water with mild detergent and allow it to air dry whenever possible. This helps preserve the fabric’s elasticity and extends the life of your handmade accessory.
Conclusion
Throughout this Fabric Turban Pattern tutorial, you learned how to choose the right materials, prepare and cut the fabric accurately, sew the main body, create elegant front pleats, attach the decorative center band, and finish the project with professional techniques.
You also discovered practical care tips and creative customization ideas that allow you to produce multiple versions of this timeless accessory. Whether you are sewing your first turban or expanding your handmade collection, this project offers an enjoyable combination of style, comfort, and creativity. If you found this guide helpful, please leave your honest opinion and share your suggestions.