
Crochet Granny Square Christmas Tree Pattern is a charming way to transform the familiar granny-square technique into a festive handmade decoration for the holiday season. The design combines the traditional open spaces and clustered stitches of a crochet granny square with clever folding and shaping to create the triangular silhouette of a Christmas tree. It is an approachable project for crocheters who already know a few basic stitches, while beginners can also enjoy it by working slowly through each round. Because the finished piece is relatively small, it is also a practical project for using leftover green and brown yarn from other crochet creations.
One of the most appealing features of this Crochet Granny Square Christmas Tree Pattern is how much character can come from such simple construction. Instead of crocheting a complicated tree shape from the beginning, you first create a granny-style square using clusters of double crochet stitches and chain spaces. The square is then folded or arranged diagonally so that the layers form the recognizable branches of an evergreen tree. A small brown crochet section creates the trunk, while optional embellishments can turn each finished tree into something completely unique. The result can be used as an ornament, appliqué, garland element, gift decoration, or small seasonal accent.
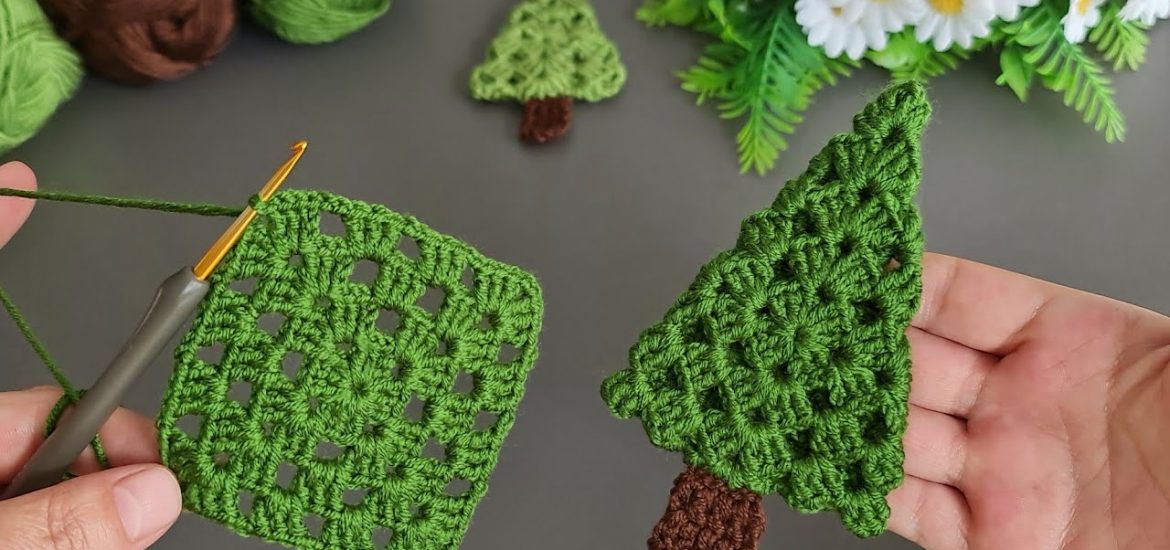
This tutorial uses U.S. crochet terminology and focuses on creating a tree inspired by the structure shown in the project image. Exact dimensions can vary according to yarn weight, hook size, tension, and the number of granny-square rounds you crochet. For a small ornament, a lightweight or medium-weight cotton yarn works especially well because it provides stitch definition and enough structure to maintain the folded shape. Before beginning, remember that handmade crochet naturally varies from one person to another. Your tree does not have to look perfectly identical to another version; consistent stitches, secure finishing, and balanced shaping are much more important.
Materials, Crochet Stitches, and Preparing the Granny Square
For this Crochet Granny Square Christmas Tree Pattern, prepare green yarn for the main tree and a small amount of brown yarn for the trunk. Medium-weight cotton or cotton-blend yarn is a versatile choice, although acrylic yarn can also work nicely. A crochet hook around 3.5–4.5 mm is suitable for many medium-weight yarns. You will also need scissors, a yarn needle, and optional stitch markers. Choose a hook that produces a fairly neat fabric rather than extremely loose stitches, because the tree should hold its shape after folding.
The principal stitch used in the pattern is the double crochet (dc). To make a U.S. double crochet, yarn over, insert the hook into the indicated stitch or chain space, yarn over and pull up a loop. You should have three loops on the hook. Yarn over and pull through two loops, then yarn over again and pull through the remaining two loops. Granny squares typically place several double crochets into the same space, creating recognizable clusters.
You will also use the chain stitch (ch) throughout the square. Make a chain by placing the yarn over your hook and pulling it through the loop already on the hook. Chains create the spaces between clusters and provide extra room at the corners. Keeping these chains relaxed is useful because overly tight chain spaces can cause the square to curl or prevent the corners from opening properly.
Another useful technique is the slip stitch (sl st). Insert your hook into the indicated stitch, yarn over, and pull the yarn through both the stitch and the loop on your hook in one movement. Slip stitches are commonly used to close rounds and move the working yarn into the correct position without adding noticeable height. They are also helpful when finishing the trunk or joining decorative elements.
Begin the granny square with green yarn. You can make a small chain and join it into a ring with a slip stitch, or use a magic ring if you are comfortable with that method. A traditional starting option is to chain 4 and slip stitch into the first chain, creating a small center ring. This center becomes the foundation for the four sides and four corners of the square.
For the first round, chain 3 to represent the height of the first double crochet. Work 2 dc into the center ring. Chain 2 for the first corner, then work 3 dc into the ring. Repeat the sequence of ch 2, 3 dc until you have four groups of three double crochets. Chain 2 after the final group and join with a slip stitch to the top of the beginning chain. You should now see the basic four-corner structure of your granny square Christmas tree foundation.
Building the Granny Square Round by Round
For Round 2, move into the nearest corner space with slip stitches if necessary. Chain 3 and work 2 dc into that same corner space. Chain 2, then work another 3 dc into the same space. This creates a complete corner containing two clusters separated by a chain space. Chain 1 before moving to the next corner. In that next corner, work 3 dc, ch 2, 3 dc, followed by ch 1. Repeat around all four corners and join the round neatly.
Round 3 begins to make the characteristic granny pattern more visible. Start in a corner and make 3 dc, ch 2, 3 dc into that corner. Chain 1. You will now encounter the chain space located between two corners. Work 3 dc into this side space, then chain 1. Continue to the next corner and repeat the corner sequence. Work this pattern around the square, keeping every cluster aligned with a chain space from the previous round.
For Round 4, continue using the same granny-square logic. Every corner receives 3 dc, ch 2, 3 dc, while every ordinary chain-1 space along a side receives one cluster of 3 dc. Place ch 1 between neighboring clusters. As the square becomes larger, each new round naturally creates additional spaces along every side. This repetition makes the pattern easy to memorize once you understand the basic construction.
Depending on the size you want, four or five rounds can be enough for a small crochet Christmas tree ornament. If you are using thinner yarn, you may prefer five or six rounds. Instead of relying exclusively on round count, look at the physical size of your square. A square measuring approximately 5–7 inches (13–18 cm) can create a useful small decorative tree, although there is no mandatory finished measurement.
Pay attention to tension while crocheting. If the square begins forming a bowl shape, your stitches may be too tight or your corner spaces may need slightly more room. If the edges become extremely wavy, the stitches may be too loose. A well-balanced granny square should rest relatively flat before it is transformed into the tree. Minor irregularities can usually be corrected with gentle blocking.
After completing your final green round, fasten off securely and weave the yarn tail through several stitches on the wrong side. At this stage, you have completed the main foundation of the Crochet Granny Square Christmas Tree Pattern. The square itself may not yet resemble a Christmas tree, but the next stage uses its corners and diagonal structure to produce the layered evergreen shape.
Folding and Shaping the Granny Square Into a Christmas Tree
Place your finished square flat with one corner pointing upward, so it looks like a diamond rather than a conventional square. This orientation is important because the upper corner will become the tip of the Christmas tree. Smooth the fabric gently with your fingers and identify the center line running from the upper corner to the lower corner. Keeping the piece symmetrical at this stage makes the final tree look much cleaner.
Begin folding the lower portions of the diamond inward and upward to form stacked triangular sections. The idea is to create overlapping layers that become progressively wider toward the bottom of the tree. Because granny-square fabric is flexible, the chain spaces naturally allow the piece to bend without creating excessive bulk. Adjust each fold until the silhouette resembles a tapered evergreen tree.
When arranging the folds, do not pull the fabric too tightly. The crochet granny square tree looks attractive when the layers retain a little dimension. Slightly projecting edges can suggest individual branches, giving the tree more personality than a completely flat triangle. Compare both sides frequently so that one side does not become noticeably wider than the other.
Once you are satisfied with the arrangement, thread a yarn needle with matching green yarn. Add several discreet stitches through the overlapping layers on the back of the tree. These stitches should secure the folds without passing unnecessarily through the decorative front surface. Work from the center outward, checking the front after every few stitches. This method keeps the construction stable while preserving the recognizable granny-stitch texture.
Next, make the crochet tree trunk using brown yarn. One simple option is to chain approximately 5–8 stitches, depending on your desired trunk width, and work rows of single crochet until you have a small rectangle. For example, chain 6, single crochet into the second chain from the hook and across, chain 1 and turn. Continue for approximately three or four rows. Fasten off while leaving a long tail for sewing.
Position the brown rectangle behind the bottom center of the tree so that part of it remains visible. Sew the upper section of the trunk securely to the back of the green tree using the remaining yarn tail. Weave in all ends carefully. Your Crochet Granny Square Christmas Tree Pattern should now have its essential shape: a pointed green top, layered branches, and a small contrasting brown trunk.
Finishing, Decorating, and Using Your Crochet Christmas Tree
Before adding decorations, examine the tree from the front and make any final adjustments. Straighten the tip, gently separate the folded layers, and check that the trunk is centered. If the tree feels too soft, light blocking can improve its shape. Pin it into position on an appropriate blocking surface, lightly dampen it according to the yarn manufacturer’s care requirements, and allow it to dry completely before handling.
For a simple rustic appearance, you can leave the tree entirely green and brown. The granny clusters and open spaces already provide plenty of texture. This minimalist version works particularly well for farmhouse-inspired Christmas décor. Different shades of forest green, olive, sage, or emerald can completely change the personality of the finished granny square Christmas tree without changing the crochet instructions.
If you prefer a more festive design, decorate the tree with tiny crocheted circles, small yarn bows, embroidery, or lightweight craft embellishments. Sew decorations firmly rather than simply placing them through loose chain spaces. If the project may be handled by young children or pets, avoid small detachable decorations that could become a choking hazard. Embroidered decorations are an especially practical alternative.
To transform the project into a crochet Christmas tree ornament, make a hanging loop at the top. Attach green yarn near the upper point, chain approximately 15–25 stitches, and slip stitch back into the attachment point. Fasten off and weave in the ends securely. Adjust the chain count depending on whether the ornament will hang from a small branch, hook, door handle, or decorative display.
You can also make several trees for a handmade garland. Crochet the same basic pattern in different shades of green, then connect the finished trees to a long chain. Alternating dark and light greens adds visual variety while maintaining a coordinated appearance. Small trees can also decorate wrapped gifts, handmade cards, fabric stockings, table settings, wreaths, or seasonal crochet displays.
The Crochet Granny Square Christmas Tree Pattern is also easy to personalize through yarn choices. Try traditional green and brown for a classic tree, cream and gold for a neutral holiday style, or several bright colors for a playful interpretation. You can even use variegated yarn for the granny square, allowing the color changes to appear naturally across the folded branches. Once you understand the square-and-fold construction, experimenting with variations becomes one of the most enjoyable parts of the project.
FAQ About the Crochet Granny Square Christmas Tree Pattern
Is the Crochet Granny Square Christmas Tree Pattern suitable for beginners?
Yes. A beginner who understands chains, slip stitches, single crochet, and double crochet should be able to complete the project. The most important skill is understanding how traditional granny-square clusters are placed into chain spaces. The folding stage may require a little experimentation, but it does not involve complicated crochet techniques.
What yarn is best for a granny square Christmas tree?
Cotton and cotton-blend yarns provide excellent stitch definition and usually hold the folded structure well. Acrylic is another accessible option and can create a softer tree. Medium-weight yarn is convenient for beginners, while lighter yarn produces smaller, more delicate ornaments.
How large should the original granny square be?
There is no single required size. A square around 5–7 inches (13–18 cm) is a practical starting point for a decorative tree. Smaller squares make compact ornaments, while larger squares can create wall decorations or larger seasonal accents.
Can I make the tree larger?
Absolutely. Simply continue adding granny-square rounds before folding. Remember that a larger square will require more yarn and may produce thicker overlapping layers. For significantly larger trees, choosing yarn with good structure can help the finished project maintain its shape.
Why is my granny square curling?
Curling is commonly related to tension. Tight stitches, tight chains, or insufficient space around the corners can pull the fabric inward. Try relaxing your tension and making sure each corner has enough chain space. Gentle blocking can also correct minor curling.
Can I use a magic ring instead of a chain ring?
Yes. A magic ring works perfectly for the center of this pattern. Crochet the four initial granny clusters into the adjustable ring, then carefully tighten it. Make sure the yarn tail is woven in securely because the center will experience some movement during folding and shaping.
How do I keep the folded tree from opening?
Use matching yarn and a yarn needle to make small securing stitches through the overlapping sections on the back. Avoid sewing every edge completely flat. A few strategically positioned stitches are usually enough to preserve the triangular structure while keeping the branches dimensional.
Can these trees be used for a Christmas garland?
Yes. Make multiple trees and attach them at regular intervals along a crocheted chain or suitable decorative cord. You can alternate colors, sizes, and embellishments to create a personalized handmade garland.
How can I make the tree look more professional?
Consistent tension, careful folding, invisible securing stitches, neatly woven ends, and gentle blocking make a significant difference. Take extra time when positioning the trunk and hanging loop. Small finishing details often have a greater impact than adding many decorations.
Can leftover yarn be used for this pattern?
Yes, and that is one reason this project is so practical. The Crochet Granny Square Christmas Tree Pattern requires relatively small amounts of yarn, especially when making ornament-sized versions. Leftover green yarn can be combined with small amounts of brown, cream, gold, red, or other festive colors.
Can I sell finished trees made with this type of project?
Handmade finished items can be appealing at seasonal craft events or as gift accessories, but sellers should always make sure their own finished products, photographs, branding, and sales practices respect any applicable pattern terms and local requirements.
How long does one crochet Christmas tree take to make?
The time varies according to experience, size, and finishing details. An experienced crocheter may complete a small version relatively quickly, while a beginner may prefer to work slowly through the granny-square rounds. There is no need to rush; neat tension and careful finishing produce a better result.
Conclusion
The Crochet Granny Square Christmas Tree Pattern shows how a familiar crochet technique can become an imaginative Christmas decoration. Starting with basic green yarn, you learned how to create the center ring, work granny clusters with double crochet stitches, build corners and chain spaces, continue the square round by round, and prepare the finished fabric for shaping.The most interesting part of this project is the transformation from a simple crochet granny square into a dimensional Christmas tree. By positioning the square like a diamond, arranging the fabric into layered triangular sections, and securing the folds discreetly from the back, an ordinary square develops the recognizable shape of an evergreen tree.
You also learned how to crochet and attach a small brown trunk, secure loose ends, block the finished piece, and add an optional hanging loop. From there, the same basic pattern can become an ornament, garland decoration, gift topper, appliqué, or festive accent for your home.Most importantly, this pattern leaves plenty of room for creativity. Experiment with different shades of green, yarn textures, tree sizes, embroidered ornaments, and simple decorative details while keeping the basic construction unchanged. Each version can have its own handmade personality.I hope this Crochet Granny Square Christmas Tree Pattern inspires you to turn a classic granny-square technique into something special for the holiday season. If you make your own version, leave your sincere opinion about the pattern and share your suggestions. Your ideas about colors, sizes, decorations, and creative variations can inspire even more ways to enjoy this festive crochet project.