
City Tote Bag Pattern is a practical sewing project for anyone who loves creating a roomy, stylish, and reusable fabric bag with a professional handmade appearance. Inspired by the tote shown in the reference image, this design combines a softly curved body, comfortable purchased or handmade handles, a fully finished lining, and optional decorative details that can transform a simple bag into an attractive everyday accessory. The generous shape makes it useful for shopping, casual outings, craft supplies, books, or daily essentials, while the curved upper edge gives the bag a distinctive silhouette. One of the best features of this City Tote Bag Pattern is that the basic construction can be adapted to many fabrics, colors, and sizes without changing the fundamental sewing method.
Making a fabric tote bag is also an excellent opportunity to practice several important sewing techniques in one manageable project. You will learn how to prepare exterior and lining pieces, add interfacing for structure, sew curved seams, create a flat bottom, attach handles securely, and finish the opening neatly. The floral exterior in the inspiration image creates a cheerful vintage-inspired appearance, while the contrasting lining gives the interior a polished finish. You do not need exactly the same print to follow this tutorial. Cotton canvas, home décor fabric, medium-weight cotton, linen blends, and similar stable fabrics can all work beautifully. Choosing the correct interfacing is especially important because it helps the handmade tote bag hold its shape without becoming unnecessarily stiff.
The finished dimensions can be customized, but a convenient medium-to-large version is approximately 17 inches (43 cm) wide at its broadest point, 12 inches (30.5 cm) high, and about 4 inches (10 cm) deep at the base. These measurements are suitable for an everyday City Tote Bag Pattern, although you can enlarge or reduce the pattern pieces proportionally. Allow approximately 1 yard (0.9 m) of exterior fabric, 1 yard (0.9 m) of lining fabric, and a similar amount of medium-weight fusible interfacing. You will also need coordinating polyester thread, fabric scissors or a rotary cutter, pins or sewing clips, an iron, a sewing machine, a marking tool, and two sturdy bag handles. A standard 1/2-inch (1.3 cm) seam allowance works well throughout unless otherwise stated.
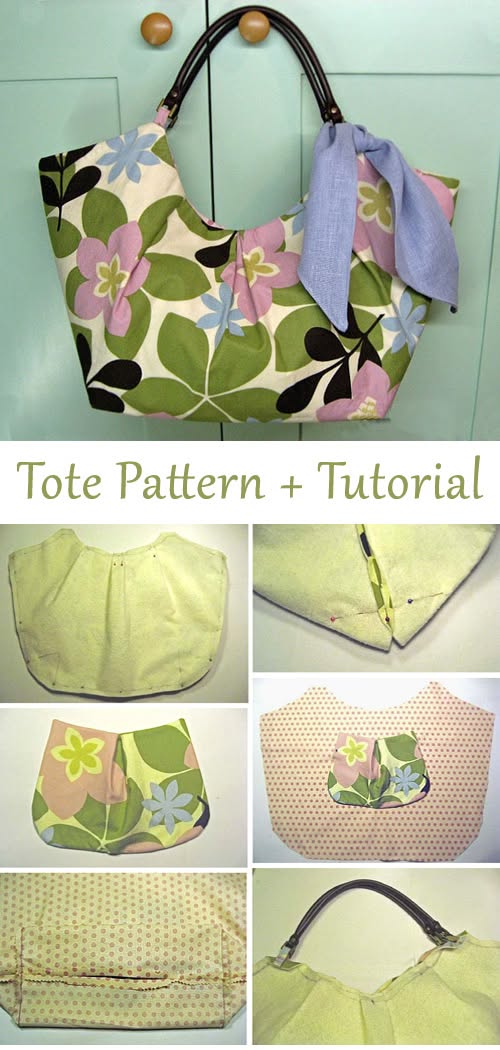
Materials, Measurements, and Preparing the City Tote Bag Pattern
Begin your City Tote Bag Pattern by selecting the exterior fabric. A medium-weight woven fabric is ideal because it provides enough stability for a tote while remaining easy to sew around the curved edges. If you choose lightweight quilting cotton, reinforce it with fusible interfacing. For heavier canvas or upholstery fabric, lighter interfacing may be sufficient. Prewash washable fabrics before cutting so unexpected shrinkage does not alter the finished shape of your bag.
For the main pattern, draw a large symmetrical tote shape on pattern paper. Start with a rectangle approximately 18 inches (45.7 cm) wide and 14 inches (35.6 cm) high. Gently round the two lower corners and create a shallow curved opening along the upper center. The side sections should extend slightly higher than the center opening, reproducing the graceful shape visible in the reference project. Fold the paper pattern vertically before trimming the curves so both sides remain symmetrical.
Cut two main pieces from the exterior fabric and two identical pieces from the lining. Next, cut two matching pieces of fusible interfacing. Apply the interfacing to the wrong side of the exterior fabric according to the manufacturer’s general heat requirements for the material you are using. Press rather than sliding the iron continuously, because excessive movement can distort the fabric. Allow the pieces to cool completely before continuing with the tote bag sewing pattern.
The lining deserves the same attention as the exterior. A coordinating cotton fabric works particularly well because it is durable, washable, and easy to sew. If you want additional organization, this is the ideal stage to prepare an interior pocket. Cut a rectangle approximately 9 x 7 inches (23 x 18 cm), fold and press the upper edge twice, stitch the hem, then press the remaining raw edges toward the wrong side.
Position the pocket on the right side of one lining panel, approximately 4 inches (10 cm) below the upper opening. Pin it carefully and stitch around both sides and the bottom, leaving the upper edge open. Reinforce the upper corners with a few additional stitches. This simple addition makes your City Tote Bag Pattern more functional because small objects such as keys, cards, or sewing notions can be stored separately from the main compartment.
Before assembling anything, transfer all important marks from the paper pattern to the fabric. Mark the center of the upper curves, handle positions, side matching points, and any areas that will remain open for turning. Accurate markings make curved sections much easier to align. This preparation may seem like an extra step, but careful cutting and marking are often what separate a polished DIY tote bag from a project that looks uneven.
Sewing the Exterior and Creating the Structured Bag Shape
Place the two exterior pieces right sides together and carefully match their edges. Pin or clip along both sides and around the curved bottom, but leave the entire upper opening unsewn. Starting at one upper side, sew downward using a consistent 1/2-inch (1.3 cm) seam allowance, continue around the bottom, and finish at the opposite upper side. Backstitch at the beginning and end for additional strength.
To create the slightly dimensional base seen in the inspiration image, add boxed corners. With the exterior still wrong side out, pull one bottom corner apart so the side seam aligns with the bottom seam. Flatten the corner into a triangle and measure approximately 2 inches (5 cm) from the point. Draw a line perpendicular to the seam and stitch directly across it. Repeat on the opposite corner.
Trim the excess corner fabric approximately 1/2 inch (1.3 cm) beyond the new stitching line. Turn the exterior right side out and gently shape the bottom with your fingers. You should now see a wider base that allows the fabric tote bag to stand more naturally and provides additional storage space. If you prefer a deeper tote, make larger boxed corners; for a flatter bag, reduce their size.
Inspect the curved lower corners and make sure there are no puckers. When sewing curves, shortening the stitch length slightly can improve control. You can also clip into the seam allowance around strongly curved areas, taking care not to cut through the stitching. Pressing the seams afterward helps establish the final shape of the City Tote Bag Pattern.
Now prepare the lining in the same general way. Place the lining pieces right sides together and sew the sides and bottom. However, leave an opening of approximately 5 to 6 inches (13 to 15 cm) along the bottom seam. This opening will later allow you to turn the entire tote right side out after the lining and exterior have been joined.
Create matching boxed corners in the lining using exactly the same measurement used for the exterior. Consistency is essential because a lining that is substantially larger or smaller than the outer bag may bunch or pull after assembly. Once both components are prepared, place the lining inside the exterior temporarily and check the fit. Make any small adjustments before attaching the handles and finishing the upper opening.
Attaching Handles and Joining the Exterior to the Lining
The handles are an important structural element of this City Tote Bag Pattern. The inspiration project uses firm curved handles that give the tote a sophisticated handbag-like appearance. Similar ready-made handles can be used, or you can make fabric straps from reinforced exterior fabric. For comfortable shoulder or hand carrying, handles approximately 18 to 24 inches (46 to 61 cm) long work well, depending on your preferred carrying style.
Mark the handle positions symmetrically on both exterior panels. Each handle attachment should generally sit approximately 3 to 4 inches (7.5 to 10 cm) away from the center of the bag. Before permanently stitching, hold the bag by the handles and check whether the spacing feels balanced. The handles should not twist, overlap, or pull the upper edge into an awkward shape.
If your purchased handles have fabric tabs, position those tabs against the right side of the exterior and baste them securely within the seam allowance. Stitch across each attachment point several times because the handles will carry most of the bag’s weight. If you are creating fabric tote handles, reinforce the strap ends with interfacing and use a rectangular or box-shaped stitching pattern for extra durability.
With the handles basted in position, place the exterior bag right side out. Turn the lining wrong side out and slide the exterior inside it. The right sides of the exterior and lining should now be facing one another. Match the side seams and center markings along the entire upper opening. Carefully tuck the handles between the two layers so they remain away from the stitching path.
Pin or clip generously around the curved opening. Sew around the complete upper edge using the established seam allowance. Curves require patience, so guide the fabric slowly instead of pulling it through the machine. If the center curves are relatively tight, clipping small notches into the seam allowance after stitching will help the edge turn smoothly. Do not cut through the seam itself.
Reach through the opening left in the lining bottom and carefully pull the City Tote Bag Pattern right side out. Work gradually so the handles and reinforced sections pass through without stressing the seams. Push the lining into the exterior and shape the upper curves. Press the opening carefully, then topstitch approximately 1/8 to 1/4 inch (3 to 6 mm) from the upper edge for a crisp, professional finish.
Finishing Details, Customization, and Professional Sewing Tips
Close the turning opening in the lining before completing your City Tote Bag Pattern. Fold the raw edges inward so they align with the existing seam, press them flat, and stitch close to the folded edge using coordinating thread. For an almost invisible finish, the opening may also be closed by hand with a ladder stitch. Push the lining completely inside the tote afterward and smooth it into the boxed corners.
Give the finished bag a careful final pressing. Use a pressing cloth when necessary, particularly if the exterior fabric has a delicate print or unusual finish. Shape the curved opening with your fingers while the fabric is still slightly warm from pressing. Avoid pressing directly over synthetic handles or hardware, as high heat may damage them.
A decorative fabric scarf or bow can be tied around one handle to recreate the playful appearance of the reference bag. This embellishment is completely optional and does not affect construction. Choose a coordinating solid fabric if the exterior already has a bold floral print. The contrast can make your handmade City Tote Bag look more intentional without requiring complicated decorative sewing.
You can also personalize the interior. Consider adding a divided pocket, zipper pocket, magnetic closure, key strap, or reinforced base insert. If adding a magnetic snap, install it in the lining or facing before joining the lining to the exterior. Reinforce the area behind the snap with a small square of interfacing so repeated opening does not weaken the fabric.
For a sturdier City Tote Bag Pattern, consider adding a removable bottom support. Cut a rectangle of heavy stabilizer or flexible plastic slightly smaller than the finished base and cover it with matching lining fabric. This insert can rest inside the bottom of the tote and be removed when the bag needs cleaning. It is particularly useful when the tote will regularly carry books or other moderately heavy objects.
Finally, inspect every seam and trim loose threads. Check that both handles are equally positioned and firmly secured. Look inside the bag to ensure the lining sits smoothly and that the corners reach fully into the exterior corners. These small finishing checks take only a few minutes but make a significant difference in the overall appearance and durability of your City Tote Bag Pattern.
FAQ – Frequently Asked Questions About the City Tote Bag Pattern
What fabric is best for a City Tote Bag Pattern?
Medium-weight cotton canvas, home décor cotton, linen blends, denim, and other stable woven fabrics are excellent options. Regular quilting cotton can also be used, but adding interfacing will provide the structure needed for a bag that holds its shape.
How much fabric do I need to make this tote bag?
For the approximate dimensions described in this tutorial, about 1 yard (0.9 m) of exterior fabric and 1 yard (0.9 m) of lining should provide enough material. Fabric requirements can increase if you enlarge the bag or need to match a directional print.
Can a beginner sew this City Tote Bag Pattern?
Yes. A confident beginner can complete the project by working slowly around the curved areas. The main skills required are straight stitching, sewing gentle curves, attaching interfacing, creating boxed corners, and joining a lining.
What seam allowance should I use?
A 1/2-inch (1.3 cm) seam allowance is practical for this project. The most important point is consistency. Using the same seam allowance on the exterior and lining helps both sections fit together correctly.
How can I make the tote bag stand up better?
Use medium or firm fusible interfacing and consider adding a structured base insert. The boxed corners also contribute to a stable bottom. Very lightweight fabric without reinforcement will naturally produce a softer, more relaxed tote.
Can I add a zipper to the top?
Yes. An experienced sewist can adapt the opening by adding zipper panels between the lining and exterior. Because the original design has a curved opening, a recessed zipper panel is usually easier to incorporate than trying to install a zipper directly along the curved edge.
Can I use fabric straps instead of purchased handles?
Absolutely. Cut two long fabric strips, reinforce them with interfacing, fold the raw edges inward, and topstitch along both sides. Make sure the ends are attached securely because handles receive significant stress during everyday use.
How do I prevent puckering around the curved opening?
Sew slowly, avoid stretching the fabric, and make small clips in the seam allowance after sewing. Understitching or topstitching the finished edge can also help keep the lining from rolling outward.
Can I resize the City Tote Bag Pattern?
Yes. You can increase or decrease the overall pattern while maintaining the same general proportions. Remember that changing the width and height may also require adjusting the depth of the boxed corners and the placement of the handles.
Should I prewash the fabric before sewing?
Prewashing is recommended for washable natural fabrics because it removes potential shrinkage before construction. After washing, press the fabric thoroughly before measuring and cutting your pattern pieces.
How can I make the handles stronger?
Reinforce the attachment areas with interfacing and sew each handle securely several times. For fabric straps, a box with an X stitched through the center is a common reinforcement method when the design allows it.
Can I add more pockets?
Yes. Additional slip pockets can be divided into sections for a phone, pens, or small accessories. A zippered interior pocket can also be added before assembling the lining. Planning all pockets before joining the lining makes construction much easier.
Conclusion
The City Tote Bag Pattern combines practical construction with an attractive curved silhouette that can be customized for many different styles. Throughout this tutorial, you learned how to select suitable exterior and lining fabrics, prepare an appropriately shaped pattern, apply interfacing, create a useful interior pocket, sew the main body, form boxed corners, and build a structured base.You also learned how to position and reinforce the handles, connect the exterior to the lining, turn the bag correctly, finish the curved opening, and add professional details. These techniques are useful beyond this individual project because many of them can also be applied to other tote bag sewing patterns, handbags, organizers, and reusable fabric bags.
The greatest advantage of making your own City Tote Bag Pattern is the freedom to customize it. Floral fabrics can create a cheerful statement bag, neutral linen can produce a minimalist version, and colorful patchwork can transform leftover fabric into something useful. Pockets, closures, decorative scarves, reinforced bases, and different handle styles provide even more possibilities.Once your tote is complete, take a moment to inspect the stitching, press the finished shape, and enjoy the result of building the project from individual fabric pieces into a functional handmade accessory. If you try this City Tote Bag Pattern, leave your sincere opinion about the tutorial and share your suggestions. Your ideas about fabrics, pockets, handle styles, sizes, or other improvements can inspire even more creative versions of this versatile sewing project.