The Log Cabin quilt pattern is one of the most iconic and versatile quilt designs in the quilting world.
Known for its simplicity and stunning visual impact, this pattern has been a favorite among quilters for generations. In this tutorial, we will guide you step-by-step on how to create your own Log Cabin quilt.
We will cover everything from selecting fabrics to cutting and assembling the blocks. Let’s get started on this quilting journey!

Selecting Your Fabric
Choosing the Right Fabrics
When it comes to selecting fabrics for your Log Cabin quilt, the possibilities are endless. Traditionally, Log Cabin quilts use a combination of light and dark fabrics to create contrast and highlight the intricate design.
For a classic look, opt for fabrics in shades of white, cream, beige, or pastels for the light sections, and rich, deep colors like navy, burgundy, or forest green for the dark sections.
It’s essential to choose fabrics that complement each other while providing enough contrast to make the design stand out.
If you’re aiming for a more modern look, consider using bold, bright colors or even a monochromatic color scheme. Whatever your preference, ensure the fabrics are of similar weight and quality for a cohesive finish.
Fabric Quantities
To make a standard throw-size Log Cabin quilt, you’ll need the following fabric quantities:
- Light fabrics: 2 yards total (can be a mix of different light prints)
- Dark fabrics: 2 yards total (can be a mix of different dark prints)
- Backing fabric: 4 yards
- Batting: A piece measuring 60 x 70 inches

Prepping Your Fabric
Before cutting your fabric, it’s crucial to wash and iron them to remove any sizing and ensure they are pre-shrunk. This step prevents any unwanted shrinking or bleeding of colors after the quilt is completed. Once your fabrics are washed and pressed, you can start cutting them into the required sizes.
Cutting Your Fabric
Cutting the Strips
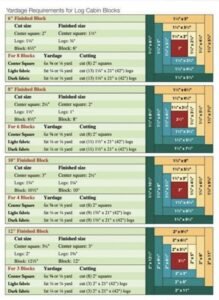
The Log Cabin quilt pattern is made up of strips of fabric sewn together around a central square. Here are the cutting instructions for a basic 12-inch finished block:
- Center Square: Cut a 2.5 x 2.5-inch square from a light or dark fabric.
- Logs (strips): Cut strips measuring 2.5 inches wide. The lengths will vary as you build the block, so cut multiple strips from each fabric, and you can trim them down as needed.
For a throw-size quilt (approximately 60 x 70 inches), you’ll need about 20 blocks. Each block will consist of the following strips:
- Light strips: 2.5 x 2.5 inches, 2.5 x 4.5 inches, 2.5 x 6.5 inches, 2.5 x 8.5 inches, 2.5 x 10.5 inches, 2.5 x 12.5 inches
- Dark strips: 2.5 x 4.5 inches, 2.5 x 6.5 inches, 2.5 x 8.5 inches, 2.5 x 10.5 inches, 2.5 x 12.5 inches, 2.5 x 14.5 inches
Organizing Your Cuts
It’s helpful to keep your cut strips organized by size and color. Using a design board or a large table, lay out your strips in the order they will be sewn. This organization will streamline the sewing process and ensure you don’t mix up the sizes or colors.

Assembling the Blocks
Sewing the Center and First Strip
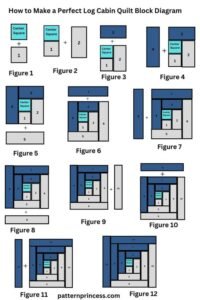
Start by placing the center square on your workspace. Take the shortest light strip (2.5 x 2.5 inches) and place it right sides together with the center square. Sew along one edge using a 1/4-inch seam allowance. Press the seam towards the strip.
Next, take the second shortest light strip (2.5 x 4.5 inches) and sew it to the opposite side of the center square, right sides together. Press the seam towards the strip.
Adding the Dark Strips
Once the first two light strips are sewn, it’s time to add the dark strips. Take the shortest dark strip (2.5 x 4.5 inches) and sew it to the adjacent side of the block, right sides together. Press the seam towards the strip.
Continue adding the dark strips, working in a counterclockwise direction around the block. After the first dark strip, add the second shortest dark strip (2.5 x 6.5 inches) to the opposite side. Repeat this process, alternating between light and dark strips, until all the strips are sewn around the center square.
Completing the Block
As you add each strip, ensure the seams are pressed away from the center. This pressing method helps the block lay flat and prevents bulk at the center. Once all the strips are sewn, your Log Cabin block should measure 12.5 x 12.5 inches, including seam allowances.
Repeat the process to create the remaining blocks for your quilt. Aim for a consistent seam allowance and accurate cutting to ensure all blocks are uniform in size.
Assembling the Quilt Top
Laying Out the Blocks
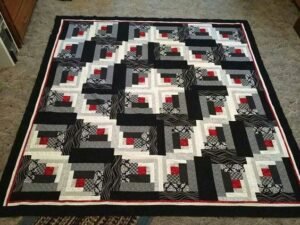
With all your blocks completed, it’s time to lay out the quilt top. Arrange the blocks on a design wall or a large flat surface, experimenting with different layouts until you’re satisfied with the overall design. The Log Cabin pattern can be arranged in various ways, such as the classic Barn Raising, Fields and Furrows, or Streak of Lightning designs.
Sewing the Blocks Together
Once you’ve decided on a layout, start sewing the blocks together into rows. Use a 1/4-inch seam allowance, and press the seams between the blocks open or to one side. This step reduces bulk and helps the quilt lay flat.
After sewing the rows, join them together to complete the quilt top. Again, press the seams open or to one side, and ensure all seams align correctly.
Adding Borders (Optional)
If you’d like to add borders to your quilt, measure the length and width of the quilt top. Cut border strips to the desired width, adding a few inches to the length for a more oversized fit. Sew the side borders first, then add the top and bottom borders. Press the seams towards the borders.

Finishing the Quilt
Preparing the Quilt Sandwich
To complete your Log Cabin quilt, you’ll need to create a quilt sandwich. Lay out the backing fabric, right side down, and smooth it out. Place the batting on top of the backing, followed by the quilt top, right side up. Smooth out any wrinkles and ensure all layers are aligned.
Basting the Quilt
Baste the quilt sandwich using your preferred method: safety pins, spray basting, or hand basting. Basting secures the layers together, preventing shifting during quilting.
Quilting
Quilt the layers together using a walking foot or free-motion quilting technique. You can quilt along the seam lines (stitch in the ditch) or create a custom quilting design that complements the Log Cabin pattern. Take your time and ensure the quilting is even and consistent across the quilt.

Binding
Finish the quilt by adding binding to the edges. Cut binding strips 2.5 inches wide and the length of your quilt’s perimeter plus a few extra inches. Join the strips end-to-end to create a continuous binding strip. Sew the binding to the front of the quilt, then fold it over to the back and hand or machine stitch it in place.
Congratulations! You’ve completed your Log Cabin quilt. This timeless pattern is sure to become a cherished piece in your collection, showcasing your quilting skills and creativity. Enjoy your beautiful creation!

