The Magic Star Quilt Block – PATTERN is a stunning design that blends traditional quilting techniques with a touch of magic.
It’s a beloved pattern among quilters due to its intricate design and versatility.
Whether you’re a seasoned quilter or a beginner, this block offers a chance to experiment with colors and shapes, creating a dazzling effect in any quilt.
In this article, we’ll explore everything you need to know to create the Magic Star Quilt Block – PATTERN, from the materials and tools you need to the step-by-step instructions for bringing the design to life.
Creating a quilt is more than just stitching fabric together; it’s an opportunity to tell a story through patterns, colors, and textures. The Magic Star Quilt Block – PATTERN is no exception. Its geometric design creates a sense of movement and visual interest, making it a favorite for those who want to create a quilt that stands out. Whether you’re making a small quilt for a gift or a larger project for your home, this pattern can be easily adjusted to suit your needs.
The Magic Star Quilt Block – PATTERN can be customized in many ways, making it a perfect project for quilters of all levels. With just a few basic quilting techniques, you’ll be able to master this pattern and create a beautiful quilt. In the following sections, we will walk through the materials, steps, and helpful tips to ensure your quilt turns out beautifully. Let’s start by exploring the materials you will need to complete your Magic Star quilt block.
1. Materials You Will Need for the Magic Star Quilt Block
Before starting any quilting project, gathering the right materials is essential for a smooth and successful process. For the Magic Star Quilt Block – PATTERN, you don’t need many materials, but what you do need should be high quality to ensure a durable and visually appealing quilt. Here’s a list of the materials required:
- Fabric: The foundation of your quilt is the fabric. For the Magic Star Quilt Block – PATTERN, you will need a variety of fabric in different colors and patterns. Common fabric choices include cotton, which is durable and easy to work with. You’ll need light, dark, and medium fabrics to create contrast and depth in your design.
- Quilting Ruler: A quilting ruler is necessary for precise cuts. It allows you to measure and cut your fabric accurately, which is especially important when working with intricate patterns like the Magic Star.
- Rotary Cutter and Mat: A rotary cutter and mat make cutting fabric quick and easy. This tool will ensure that your cuts are clean and straight, resulting in uniform pieces for your quilt.
- Needle and Thread: Choose a quilting needle and thread that are strong enough to withstand the layers of fabric you’ll be sewing together. High-quality cotton or polyester thread will ensure your seams hold up well.
- Iron and Ironing Board: Pressing your seams as you go is crucial to achieving neat, crisp blocks. An iron and ironing board will help flatten your seams and give your quilt a polished look.
- Quilt Batting and Backing: Once you have completed the top of your quilt, you will need quilt batting for insulation and quilt backing for a finished look. Batting comes in various thicknesses, so choose one that matches the desired warmth for your quilt.
Having these materials on hand will help you move through the project efficiently and with ease. Once you’ve gathered your supplies, it’s time to start working on the Magic Star Quilt Block – PATTERN. Let’s now dive into the step-by-step process of creating the block.
2. Step-by-Step Guide to Creating the Magic Star Quilt Block
Creating the Magic Star Quilt Block – PATTERN involves a series of steps that include cutting, piecing, and sewing. It may seem complex at first, but with a little patience and attention to detail, you can achieve this beautiful block with ease. Follow these steps to create your Magic Star quilt block:
- Cut the Fabric Pieces: Start by cutting your fabric into the necessary pieces for the Magic Star block. You will need squares, triangles, and half-square triangles. Be sure to measure carefully and use a quilting ruler to ensure all pieces are the correct size.
- Sew the Half-Square Triangles: To make the half-square triangles, place two fabric squares right sides together, and sew along the diagonal. Once sewn, cut the squares along the diagonal, press the seams open, and trim the corners to create clean edges.
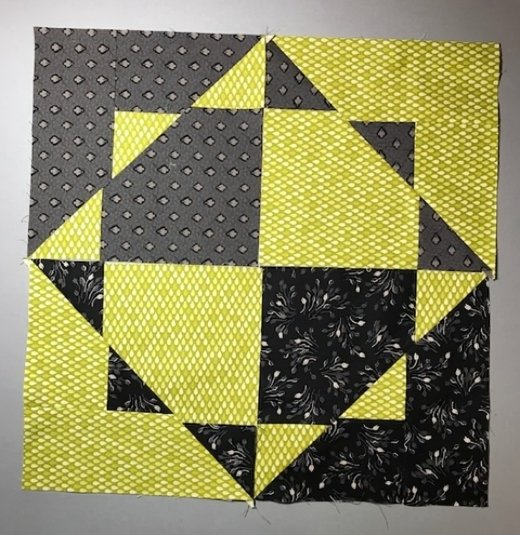
- Assemble the Star’s Points: The Magic Star has distinct points that give it its signature star-like shape. To create these points, you will need to sew the half-square triangles together in a particular arrangement. The dark fabric will form the points, while the light fabric will form the background.
- Sew the Block Together: Once the star points are completed, sew them together with the center of the block. This involves carefully aligning the points with the center and sewing them into place. Press each seam as you go to ensure everything lies flat.
- Join the Rows: After sewing the individual sections of the block, join the rows together. Be sure to match the seams as you sew to maintain the integrity of the star pattern. Press the seams as you go for a smooth finish.
- Final Assembly: After all the rows are sewn together, the Magic Star block will be complete. Trim any excess fabric, if necessary, to ensure the block is square and even. You can now use this block as part of a larger quilt or make more blocks to complete a full quilt.
By following these steps, you’ll have created a beautiful Magic Star Quilt Block – PATTERN that is sure to impress. Let’s now look at how you can customize the Magic Star block to suit your personal style and preferences.
3. Customizing Your Magic Star Quilt Block
The Magic Star Quilt Block – PATTERN is a versatile design that allows for plenty of customization. Whether you want to adjust the colors or change the size, there are many ways you can make this block your own. Here are some tips for customizing your block:
- Play with Color Combinations: The color choices you make will have a significant impact on the look of your Magic Star quilt. Experiment with different color combinations to create contrast and visual interest. You could use a single color scheme for a monochromatic look or mix various colors for a vibrant, eye-catching design.
- Adjust the Size: If you want to make a larger or smaller quilt, you can adjust the size of the Magic Star block. Simply increase or decrease the size of the squares and triangles when cutting your fabric. This will allow you to scale the block up or down depending on your project’s needs.
- Add Borders: To enhance the Magic Star block, consider adding borders around each block or around the quilt top. Borders can help frame the design and give your quilt a polished, finished look.
- Combine with Other Blocks: The Magic Star block can be combined with other quilt blocks to create a larger quilt. Experiment with different block patterns and arrange them in unique ways to create a quilt with both variety and consistency.
- Use Specialty Fabrics: For a truly unique look, consider using specialty fabrics like batiks, hand-dyed fabrics, or even printed fabrics that match a particular theme. This will give your Magic Star quilt a distinctive and personalized touch.
- Play with Layouts: The way you arrange the Magic Star blocks within the quilt can make a big difference in the overall design. Try experimenting with different layouts, such as diagonal, grid, or random arrangements, to create a quilt that reflects your personal style.
Customizing the Magic Star Quilt Block – PATTERN allows you to make a quilt that is truly one-of-a-kind. The possibilities are endless, and the choice is yours! Now let’s move on to some expert tips for ensuring the success of your quilt.
4. Tips for Perfecting Your Magic Star Quilt Block
To ensure that your Magic Star Quilt Block – PATTERN turns out beautifully, here are some expert tips that can help you along the way:
- Measure Twice, Cut Once: Precision is key in quilting, especially when working with complex patterns like the Magic Star. Always double-check your measurements before cutting fabric to ensure everything fits together perfectly.
- Press Your Seams: Pressing your seams as you go will help you achieve a smooth and professional-looking block. This is especially important when working with half-square triangles and other small pieces that need to fit together accurately.
- Use Quality Fabric: The quality of your fabric will affect the overall look and feel of your quilt. Invest in high-quality cotton fabrics that are easy to work with and will stand the test of time.
- Take Your Time: Quilting is a time-consuming process, so don’t rush. Take your time with each step to ensure accuracy and precision. The end result will be worth the extra effort.
- Practice Your Sewing Skills: If you’re new to quilting, take some time to practice basic sewing techniques before attempting the Magic Star block. This will help you build confidence and improve the quality of your work.
- Enjoy the Process: Remember that quilting is an enjoyable and creative process. Don’t get too caught up in perfection—take pride in the effort you put into your project and have fun along the way.
By following these tips, you’ll ensure that your Magic Star Quilt Block – PATTERN turns out just the way you envision it. With patience and practice, you’ll be able to create a beautiful quilt that you’ll cherish for years to come.
FAQ: Frequently Asked Questions about Magic Star Quilt Blocks
1. What is the Magic Star Quilt Block?
The Magic Star Quilt Block – PATTERN is a geometric design that forms a star shape using a combination of squares, triangles, and half-square triangles. It is known for its intricate yet manageable design.
2. How do I make the Magic Star Quilt Block larger?
To make the block larger, simply increase the size of the fabric pieces when cutting them. Ensure that all proportions remain consistent so the design still fits together properly.
3. Can I use any fabric for the Magic Star Quilt Block?
Yes, you can use any fabric, though cotton is the most commonly used fabric for quilting due to its durability and ease of use.
4. How many Magic Star blocks do I need for a full quilt?
The number of blocks required will depend on the size of your quilt. A lap quilt may require around 30 to 40 blocks, while a larger quilt could require 100 or more.
5. Can I change the colors of the Magic Star Block?
Absolutely! The Magic Star block can be customized with any color combination that suits your style. Use light and dark colors to create contrast and make the design pop.
**6. What
is the best way to join the blocks together?**
To join the blocks, simply sew them together row by row, matching seams as you go. Press the seams flat to keep the quilt top smooth and even.
Conclusion
In this article, we’ve explored how to create the beautiful Magic Star Quilt Block – PATTERN from start to finish. From gathering materials and following the step-by-step instructions to customizing and perfecting your block, you now have the tools to create a stunning quilt. The Magic Star block is a versatile and timeless design that can be personalized to suit your style and preferences.
We would love to hear your thoughts! Please share your feedback and any suggestions for future projects in the comments below. Happy quilting!