Crochet butterfly is a delightful project that allows you to create a beautiful and intricate design that can be used for various crafts and decor.
Whether you’re an experienced crocheter or just starting out, creating a crochet butterfly is a rewarding experience that brings a touch of whimsy to your handmade creations.
The detailed wings, delicate stitches, and vibrant colors make this project perfect for adding a personal touch to your home, clothing, or accessories.
In this article, we will guide you through the process of creating a crochet butterfly, step-by-step, including the materials you’ll need, a detailed crochet pattern, and helpful tips to make the process smoother. We will explore different variations of the pattern and discuss how to incorporate different colors and styles. If you’re looking for a fun and creative crochet project, this crochet butterfly – pattern is just the right choice.
Crocheting a butterfly is not only a great way to practice your skills, but it also gives you the opportunity to experiment with different types of yarn and crochet techniques. In this guide, we will break down the steps, making sure even beginners can follow along and successfully complete the project. Let’s dive into the world of crochet butterflies and explore how to bring these delicate creatures to life through yarn.
1. Materials Needed for the Crochet Butterfly – PATTERN
Before you begin crocheting your butterfly pattern, it’s important to gather all the necessary materials. Having the right tools and supplies will ensure that your project turns out beautifully. Here’s a list of essential materials you’ll need:
1.1. Yarn
The type of yarn you choose for your crochet butterfly will significantly impact the final result. For a delicate, intricate design, lightweight yarn such as cotton or lace-weight yarn is ideal. You can also use a medium-weight yarn like worsted if you prefer a slightly bulkier look. Choose vibrant colors to make your butterfly stand out. A variety of shades such as blues, purples, or oranges will give your butterfly a more realistic look, or you can opt for pastels for a softer, dreamy effect.
1.2. Crochet Hook
The size of your crochet hook depends on the thickness of the yarn you are using. For cotton or lace-weight yarn, a 2.5mm to 3mm crochet hook is usually the best choice. If you are working with thicker yarn, you may want to use a larger hook. Always check the yarn packaging for recommended hook sizes to ensure that your stitches are the right tension.
1.3. Scissors
A pair of sharp scissors is essential for cutting the yarn when you finish a section or when you’re ready to tie off the butterfly. Be sure to cut the yarn cleanly and leave enough of a tail to weave in at the end.
1.4. Yarn Needle
A yarn needle, or tapestry needle, is essential for weaving in the loose ends of the yarn. After you finish crocheting the butterfly, use the yarn needle to carefully sew in the ends, ensuring they are hidden and won’t unravel.
1.5. Stitch Markers
Stitch markers are a helpful tool when working on a crochet pattern, especially if it involves multiple rounds or stitches. They will help you keep track of your progress, particularly in the shaping of the butterfly wings. You can use them to mark the beginning of a round or any increases or decreases.
1.6. Blocking Tools (Optional)
Blocking is an optional step in the process of crocheting a butterfly. This step helps shape the wings and gives them a more polished look. You can use blocking mats, pins, and a spray bottle to shape the wings once your crochet butterfly is complete. Blocking can help bring out the beauty of the stitches, especially if you’re working with lace or fine yarn.
2. Step-by-Step Instructions for the Crochet Butterfly – PATTERN
Now that you have your materials ready, it’s time to start working on the crochet butterfly – pattern. Below is a detailed guide to crocheting a butterfly:
2.1. Start with a Magic Ring
To begin the body of the butterfly, create a magic ring. This is a technique that allows you to start crocheting in the round without leaving a hole in the center. To make a magic ring, wrap the yarn around your fingers, insert your hook into the ring, and pull up a loop. Then, chain one and work the first few stitches of your pattern into the ring.
2.2. Crochet the Body
The body of the butterfly is typically made up of a series of single crochet stitches. Work in rounds, increasing the number of stitches as needed to create the desired shape. Make sure to keep your tension consistent, as the body should remain firm but slightly rounded.
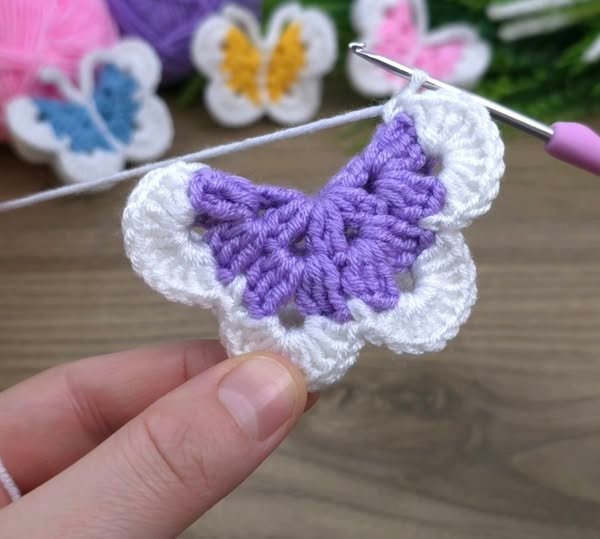
2.3. Create the First Wing
To start working on the wings, crochet a foundation chain, then work in rows or rounds to form the shape of the first wing. Depending on your pattern, you may work with double crochet, treble crochet, or other stitches to create the intricate look of butterfly wings. The wings should be symmetrical, so make sure to keep track of your stitch counts.
2.4. Shape the Wing
The shaping of the wing is key to creating a lifelike crochet butterfly – pattern. You’ll need to use increases and decreases to create the gentle curves of the wings. Take your time with this step, and don’t be afraid to rip out stitches and try again if needed. Patience is key to ensuring the wings are symmetrical and have a natural flow.
2.5. Add the Second Wing
Once the first wing is complete, repeat the process to create the second wing. Ensure that both wings are the same size and shape by following the same stitch pattern. You can choose to make both wings in the same color or use contrasting colors for a more colorful butterfly.
2.6. Assemble the Butterfly
After both wings are crocheted, sew them onto the body using a yarn needle. Position the wings to your liking and carefully stitch them into place. Ensure that they are evenly spaced and symmetrical. Once the wings are secured, weave in any loose ends to finish off the butterfly.
3. Tips for Personalizing Your Crochet Butterfly – PATTERN
Now that you have completed your crochet butterfly, you can personalize it further to make it truly unique. Here are some tips for adding your personal touch to your butterfly design:
3.1. Experiment with Colors
The colors you choose for your butterfly can drastically change its look. You can create a realistic butterfly by choosing colors that resemble those found in nature, such as vibrant oranges, blacks, and blues. Alternatively, you can experiment with pastel shades or even neon colors for a more whimsical design.
3.2. Add Embellishments
To make your crochet butterfly even more special, consider adding embellishments. Use beads, sequins, or thread to create a sparkling effect on the wings. This adds an extra layer of detail and elegance to your butterfly.
3.3. Use Different Yarn Textures
Mixing yarn textures can give your butterfly a unique appearance. Try using sparkly yarn, variegated yarn, or fluffy yarn to add dimension and texture to the wings. Different yarn textures can enhance the overall look of your butterfly and make it stand out.
3.4. Attach a Pin or Magnet
If you’d like to wear your crochet butterfly as an accessory, you can easily attach a pin to the back. Simply sew a small brooch pin or magnet to the back of the butterfly to turn it into a wearable piece of art.
3.5. Create a Butterfly Garland
To make a beautiful decoration, crochet multiple butterflies and string them together to form a butterfly garland. This is a lovely addition to any room, especially in the spring and summer. You can mix and match colors for a vibrant, playful garland.
3.6. Experiment with Sizes
Don’t be afraid to experiment with different sizes for your crochet butterflies. Make small butterflies to attach to greeting cards or larger ones to use as centerpieces in crochet projects. Adjusting the yarn size and hook size can create butterflies of various scales.
4. Ways to Use Your Crochet Butterfly – PATTERN
Once your crochet butterfly is complete, you can use it in a variety of ways. Here are some ideas for incorporating your butterfly into different projects:
4.1. Hair Accessories
Crocheted butterflies make lovely hairpins, clips, or headbands. Attach your butterfly to a plain hair clip or headband to create a charming hair accessory. It’s a great way to add a personalized touch to your hairstyle.
4.2. Home Decor
Crocheted butterflies can also be used as decorative elements in your home. Sew them onto pillows, curtains, or blankets to create a whimsical, nature-inspired look. They also make great additions to seasonal decor, especially for spring or summer.
4.3. Gift Embellishments
Add a crochet butterfly to your gift wrapping or greeting cards for a creative and personalized touch. It’s a small detail that will make your gifts stand out and feel extra special.
4.4. Clothing Embellishments
Sew your crochet butterfly onto clothing items like jackets, t-shirts, or sweaters for a unique and stylish embellishment. It can add a pop of color and texture to any outfit.
4.5. Jewelry
Use small crochet butterflies to create beautiful jewelry. Attach them to earrings, necklaces, or bracelets to add a delicate, handmade element to your accessories.
4.6. Garden Decor
Crochet butterflies can even be used outdoors as part of garden decorations. Attach them to a garden stake or use them in a hanging mobile to bring a touch of color to your outdoor space.
FAQ (Frequently Asked Questions)
Q1: Can I make a crochet butterfly as a beginner?
A1: Yes, creating a crochet butterfly is a great project for beginners! If you are new to crochet, choose a simple pattern and start with basic stitches like single crochet and double crochet. With practice, you’ll soon be able to create beautiful butterflies.
Q2: How do I make the wings of the butterfly more textured?
A2: You can make the wings of the butterfly more textured by using different crochet stitches, such as shell stitches or bobble stitches. These stitches will create more depth and a three-dimensional effect on the wings.
Q3: How do I attach the wings to the body of the butterfly?
A3: To attach the wings, simply use a yarn needle and carefully stitch them onto the body. Make sure both wings are aligned symmetrically before securing them in place.
Q4: What types of yarn are best for crocheting butterflies?
A4: Cotton yarn is ideal for creating delicate butterflies, as it provides structure and holds its shape. However, you can also use other types of yarn, such as wool or acrylic, depending on your preferred texture and appearance.
Q5: Can I add beads or sequins to the butterfly?
A5: Absolutely! Adding beads or sequins can make your crochet butterfly sparkle and add extra detail to the wings. Sew them on carefully for a professional finish.
Q6: How do I block my crochet butterfly to shape the wings?
A6: To block your butterfly, gently wet the wings and shape them by pinning them to a blocking mat. Let them dry completely before removing the pins to keep the wings in the desired shape.
Conclusion
In this article, we explored the process of crocheting a beautiful and delicate crochet butterfly – pattern. From gathering the materials to following the step-by-step instructions, you can now create your own stunning butterfly design. Experiment with colors, embellishments, and sizes to personalize your butterfly and use it in various projects. Whether you want to wear it as a hair accessory, decorate your home, or add it to a gift, this crochet pattern offers endless possibilities. We hope you enjoyed this guide—leave us a comment with your thoughts and any suggestions for future crochet projects!