A seahorse quilt is a beautiful and unique project that can add a touch of elegance and creativity to your home.
Whether you are a quilting enthusiast or a beginner looking for a fun challenge, a seahorse quilt is a great choice.
The pattern’s intricate design, which features the graceful seahorse, is not only eye-catching but also symbolic of beauty, grace, and the ocean.
In this article, we will explore how you can create a stunning seahorse quilt using a simple pattern that will bring the ocean’s charm right into your home.
Creating a seahorse quilt – PATTERN can be a rewarding experience. It allows you to showcase your quilting skills while expressing your love for the ocean and its creatures. From selecting fabrics that represent the ocean to sewing the pieces together, this pattern allows for creative freedom. Quilts have long been a staple of home décor, and with a seahorse theme, you can make your quilt stand out in a truly unique way.
In this article, we will walk you through the process of creating your own seahorse quilt, including the materials you’ll need, a step-by-step guide on how to follow the pattern, and tips to help you achieve the perfect result. Whether you plan to use the quilt as a bedspread, wall hanging, or a gift for a loved one, a seahorse-themed quilt will surely bring a smile to anyone who sees it.
1. Materials Needed for the Seahorse Quilt – PATTERN
To create a beautiful seahorse quilt – PATTERN, you’ll need to gather a few essential materials. The right fabrics, quilting tools, and accessories will help you achieve the perfect result. Here’s a list of what you’ll need:
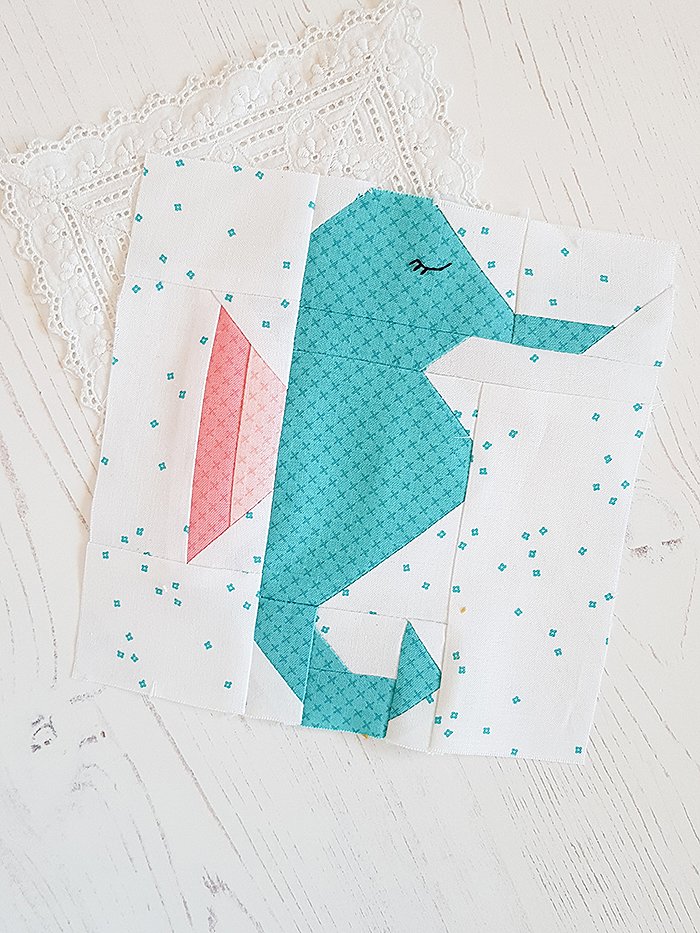
- Fabric: The fabric you choose will play a major role in bringing your quilt to life. For the seahorse, shades of blue, teal, and aqua will mimic the ocean’s calming colors, while beige, white, or light brown fabric will work well for the seahorse’s body. You can also add prints with ocean waves, coral, and seaweed for extra texture and detail.
- Quilting Cotton: Choose high-quality quilting cotton fabric for durability and easy stitching. It comes in a variety of prints and solids, allowing you to choose fabrics that suit your theme perfectly. You’ll need fabric for the seahorse, background, borders, and backing.
- Quilt Batting: Batting provides the quilt with thickness and warmth. Choose a cotton or polyester batting that will complement the quilting design and give the quilt a nice, soft feel.
- Quilting Thread: You will need quilting thread in matching colors for the seahorse and the background. Opt for cotton thread, which is strong and blends well with quilting cotton.
- Quilting Ruler and Rotary Cutter: To achieve clean, precise cuts, a quilting ruler and rotary cutter are essential. These tools help in cutting fabric pieces accurately according to the pattern’s measurements.
- Needles and Pins: Use sewing needles that are specifically designed for quilting. Straight pins are also essential to keep the fabric in place as you sew each piece together.
With these materials in hand, you are ready to begin creating your seahorse quilt – PATTERN. The next step is to follow the pattern and begin stitching the quilt blocks together.
2. How to Follow the Seahorse Quilt – PATTERN Step by Step
Following a seahorse quilt – PATTERN is not as difficult as it may seem, even for beginners. The key is to take your time, measure accurately, and sew carefully. Here’s a simple step-by-step guide to get you started:
- Cut the Fabric: Begin by cutting the fabric pieces according to the pattern. If your pattern includes several blocks, such as the seahorse, background, and border, ensure that each piece is cut according to the specified measurements. The precise cutting of fabric pieces is crucial for a successful quilt.
- Sew the Blocks Together: Start with the seahorse block. Follow the pattern’s instructions to stitch the pieces of the seahorse together. You may need to piece together several sections, such as the head, body, and tail, before combining them to form the full seahorse. Take your time to align the edges neatly as you sew.
- Assemble the Quilt Top: Once you have completed the seahorse block, start assembling the quilt top by stitching the blocks together. Arrange the blocks to your liking, ensuring that the seahorse is the focal point of the design. Consider adding decorative borders around the blocks to enhance the overall appearance.
- Join the Quilt Layers: After the quilt top is finished, it’s time to join the quilt layers. Lay out the quilt backing, batting, and quilt top on a flat surface. Using quilting pins, secure the three layers together. Make sure the layers are smooth and free of wrinkles.
- Quilt the Layers: Begin quilting by sewing through all three layers. You can use a simple straight stitch or more decorative stitching, depending on the style of quilt you want. Some quilters prefer to quilt along the lines of the seahorse and other shapes within the pattern, while others choose to create free-motion quilting designs to enhance the ocean theme.
- Finish the Quilt: Once the quilting is complete, trim any excess batting or backing fabric and add a quilt binding around the edges. This finishing touch helps give the quilt a neat and polished appearance. Use your quilting thread to stitch the binding securely, and you are done!
By following these simple steps, you will have created a beautiful seahorse quilt – PATTERN that captures the charm and grace of the seahorse, making it a wonderful addition to your home décor.
3. Tips for Perfecting Your Seahorse Quilt – PATTERN
While creating a seahorse quilt – PATTERN can be an enjoyable and creative project, there are several tips that can help ensure your quilt turns out beautifully. Here are some expert tips to keep in mind as you work through the pattern:
- Pre-Wash Your Fabric: Before cutting and sewing, it’s a good idea to pre-wash your fabric. This prevents any shrinking or color bleeding after the quilt is completed. It also helps to remove any chemicals or sizing from the fabric, making it easier to sew.
- Use a Quilting Foot: If you are using a sewing machine, make sure to attach a quilting foot. This specialized foot helps you sew evenly and smoothly through multiple layers of fabric and batting, resulting in neat, consistent stitches.
- Press Your Seams: Press each seam carefully after you sew it. This ensures that your blocks stay flat and prevents any puckering. Use a hot iron with steam to press the seams open or to the side, depending on the pattern’s instructions.
- Use a Design Wall: If you have a design wall or large flat surface, lay out your quilt blocks to get a sense of how they will look together before sewing them. This gives you an opportunity to rearrange the blocks and experiment with the layout.
- Take Your Time: A quilt is a project that requires patience. Take your time with each step to ensure everything is lined up properly. Don’t rush through the cutting or sewing; the effort you put into the details will pay off in the final result.
- Consider Machine Quilting: If hand quilting is too time-consuming, consider machine quilting for a quicker finish. Machine quilting can still produce beautiful results, especially when using decorative stitching that complements the seahorse design.
By incorporating these tips into your quilting process, you can improve your skills and create a stunning seahorse quilt – PATTERN that will be admired by all who see it.
4. Why Choose a Seahorse Quilt – PATTERN for Your Next Project
The seahorse quilt – PATTERN is a perfect choice for many reasons. Whether you are a seasoned quilter or a beginner, this project offers plenty of creative opportunities. Here are a few reasons why you should consider making a seahorse quilt:
- Unique Design: The seahorse is an elegant and graceful creature, making it an excellent subject for a quilt. The flowing shape and intricate details lend themselves to creative quilting and offer an eye-catching result.
- Versatile for Different Spaces: A seahorse quilt – PATTERN can be used in many different spaces. Whether you are making a bedspread, wall hanging, or throw for your couch, the ocean-inspired theme adds a peaceful and serene touch to any room.
- Great Gift Idea: A handmade quilt is always a thoughtful and personal gift. The seahorse quilt is perfect for someone who loves the ocean or marine life, making it a wonderful gift for birthdays, holidays, or special occasions.
- Fun to Customize: One of the best things about quilting is the ability to customize the design. With a seahorse quilt – PATTERN, you can experiment with different fabrics, colors, and stitching techniques to create a quilt that is uniquely yours.
- Learn New Skills: If you’re new to quilting or want to improve your skills, a seahorse quilt provides a great opportunity to learn new techniques. From appliqué to quilting the layers, you can gain experience and develop your skills with each step.
- Timeless Appeal: Ocean-themed quilts have a timeless charm. A seahorse quilt – PATTERN can be a beautiful addition to your home for years to come. The natural beauty of the seahorse never goes out of style, and it will remain a cherished piece of your collection.
FAQ
1. What fabrics are best for a seahorse quilt?
The best fabrics for a seahorse quilt – PATTERN are quilting cottons in shades of blue, teal, and aqua for the ocean, as well as beige or light brown for the seahorse. Adding prints with waves or sea motifs can also enhance the ocean theme.
2. How long does it take to make a seahorse quilt?
The time it takes to make a seahorse quilt depends on your experience and the complexity of the design. For an average quilter, the project can take anywhere from a few days to a couple of weeks to complete, depending on the size and level of detail.
3. Can I make the seahorse quilt in other colors?
Absolutely! While the pattern typically uses ocean-inspired colors like blue and teal, you can customize the quilt with any colors you like. Experiment with different fabric combinations to create a unique look.
4. Is the seahorse quilt pattern beginner-friendly?
Yes, the seahorse quilt – PATTERN is suitable for beginners, although some experience with basic quilting techniques is recommended. The pattern is manageable, and you can always add your own creative touches as you gain confidence.
5. Can I machine quilt my seahorse quilt?
Yes, machine quilting is a great option for speeding up the process. You can use decorative stitches or straight lines to quilt the layers, or you can opt for free-motion quilting if you’re comfortable with that technique.
6. What size should I make the quilt?
The size of the seahorse quilt – PATTERN can be customized based on your preferences. A small throw quilt may be ideal for a cozy accent, while a larger quilt can be made for a bedspread or wall hanging.
Conclusion
A seahorse quilt – PATTERN is a creative and fun project that adds a beautiful, ocean-inspired touch to any home. From selecting the right fabrics to sewing the quilt top and finishing with machine quilting, each step is a chance to express your creativity and improve your quilting skills. By following the tips and instructions in this article, you can create a unique and stunning quilt that will be cherished for years to come.
If you’ve enjoyed this guide, please leave a comment with your thoughts and suggestions for future projects. We’d love to hear your experiences with the seahorse quilt – PATTERN and any creative ideas you’ve incorporated into your quilts!