The Tulip Time Table Top is a beautiful and timeless design that adds a fresh, floral touch to any home.
Whether you’re an experienced quilter or just beginning your journey into the world of quilting, this pattern offers both a challenge and a delightful final product.
The vibrant tulips, paired with intricate stitching, bring the essence of spring to life on your table, making it the perfect project to brighten up your space.
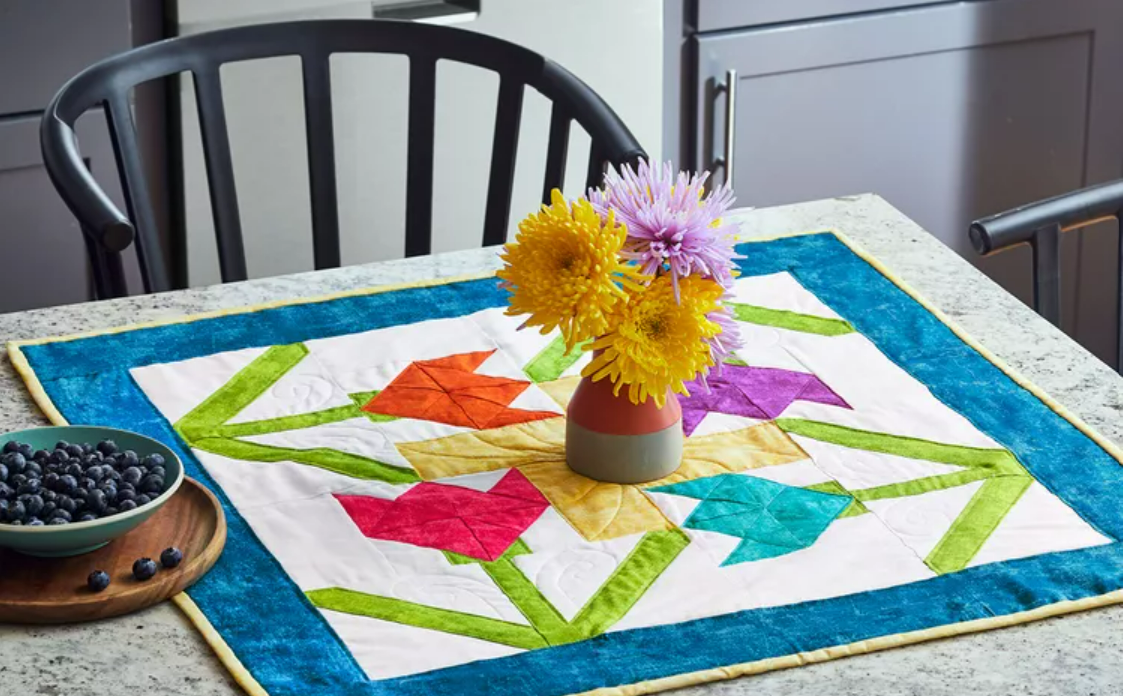
This pattern is versatile and can be adjusted to fit various table sizes, from a small side table to a larger dining table centerpiece. The use of bold, beautiful tulips creates an eye-catching effect that can be enjoyed year-round, even when the flowers aren’t in bloom. In this article, we will guide you through the steps of creating your own Tulip Time Table Top, offering insights into materials, techniques, and design tips.
As you dive into this project, you’ll be able to explore different fabric options, learn how to master the technique of appliqué, and discover how to give your table top a polished and professional finish. Let’s dive into the details of what makes this pattern so special and how you can recreate it at home.
1. Materials Needed for the Tulip Time Table Top – PATTERN
Before you begin creating the Tulip Time Table Top – PATTERN, it’s important to gather all the necessary materials. Having everything ready and organized will make the process smoother and more enjoyable. Here’s a list of the materials you’ll need to get started:
- Fabric: Choose a variety of fabrics for the tulips, leaves, and background. Cotton fabric works best for quilting projects due to its durability and ease of use. You’ll need several different colors for the tulips, typically red, pink, yellow, or purple, along with greens for the leaves. You can also use neutral tones for the background.
- Thread: Select a high-quality cotton quilting thread that matches your fabric. You’ll need different colors for sewing the tulips and leaves as well as a neutral color for the background stitching.
- Quilt Batting: The batting is essential for providing structure and thickness to your table top. Opt for a medium-weight batting to achieve the perfect balance between softness and durability.
- Quilting Needles: Use quilting needles that are designed to go through multiple layers of fabric and batting. This will make your quilting process easier and prevent any unwanted snags.
- Appliqué Template: For a precise tulip shape, an appliqué template is necessary. You can either purchase one or create your own by tracing a tulip design onto paper and cutting it out.
- Rotary Cutter and Mat: These tools are essential for cutting fabric into precise shapes. They help achieve clean lines, which is important when creating the tulip shapes.
With these materials in hand, you’re ready to start bringing your Tulip Time Table Top – PATTERN to life. Make sure to choose fabrics and threads that suit your style and the aesthetic you wish to achieve. Whether you prefer traditional prints or more modern designs, the tulip motif will look stunning in any color scheme.
2. Step-by-Step Guide to Creating the Tulip Time Table Top
Now that you have your materials ready, let’s go through the step-by-step process of creating your Tulip Time Table Top – PATTERN. This pattern involves appliqué techniques, quilting, and finishing touches that will come together to create a beautiful centerpiece for your table. Follow these steps to complete your table top:
- Cutting the Fabric: Begin by cutting the background fabric to the desired size of your table top. For a standard table, you might want to cut it to 36 x 36 inches. Next, cut out the tulip shapes using your appliqué template. You’ll need several tulip shapes, as well as leaves and stems.
- Preparing the Tulip Appliqué: For each tulip, place the appliqué pieces (petals, stems, and leaves) onto the background fabric. Use a fabric adhesive or fusible webbing to temporarily hold the shapes in place. Once the shapes are arranged as desired, iron them to bond them to the fabric.
- Sewing the Appliqué: After the tulips and leaves are secured to the fabric, it’s time to stitch them down. Use a small zigzag or satin stitch around the edges of the appliqué pieces to secure them. Be careful to sew closely to the edges to avoid any fraying.
- Adding Quilting Details: Once the appliqué is complete, it’s time to add quilting details. Use a quilting stitch to outline the tulips and leaves, adding texture to the design. You can also add decorative stitches in the background to enhance the overall look.
- Assembling the Quilt Layers: Lay the background fabric, quilt batting, and backing fabric on top of each other. Pin them together, ensuring that the layers are aligned properly. Begin quilting through all layers, stitching through the quilt batting and backing fabric. You can choose to quilt in a simple grid pattern or add more intricate designs.
- Binding the Edges: After quilting, trim any excess batting and fabric from the edges. Next, add a quilt binding to finish off the edges of your table top. This will give your quilt a clean, professional look. Choose a fabric that complements the tulip design for the binding.
Following these steps will result in a stunning Tulip Time Table Top that will brighten up your home. The appliqué technique adds a personal touch, while the quilting ensures the design is both beautiful and functional.
3. Tips for Success When Making the Tulip Time Table Top
Creating the Tulip Time Table Top – PATTERN is an enjoyable process, but there are a few tips and tricks that can help ensure your project turns out beautifully. Here are some helpful tips for success:
- Use High-Quality Fabric: The quality of your fabric will significantly impact the finished product. Opt for 100% cotton fabrics, as they are easy to work with and will hold up well over time.
- Take Your Time with Appliqué: Appliqué can be tricky, especially if you’re new to it. Don’t rush through this part of the process. Take your time to carefully align the pieces and sew them down securely.
- Press the Fabric Often: Pressing your fabric regularly with an iron will help eliminate wrinkles and ensure that your stitching looks neat. Pressing after each step will give your table top a crisp, professional appearance.
- Consider Quilting Designs: If you want to add more personality to your table top, consider quilting unique designs in the background. This could include floral motifs, geometric patterns, or simple lines to complement the tulips.
- Choose a Complementary Backing Fabric: The backing fabric doesn’t just serve a functional purpose; it also adds to the overall look of the quilt. Choose a fabric that complements the tulips without overpowering them.
- Use the Right Batting: The type of batting you choose affects the texture and feel of your quilt. For a table top, opt for a medium-weight batting to keep it soft yet sturdy. This will provide enough structure for the quilt without making it too thick.
These tips will ensure that your Tulip Time Table Top turns out beautifully, with each stitch adding to the charm and elegance of your creation.
4. Creative Variations and Customizations for Your Tulip Time Table Top
One of the best things about quilting is the ability to customize designs to suit your personal style. Here are some creative variations you can consider for your Tulip Time Table Top
- Experiment with Color: While tulips are often depicted in red, pink, and yellow, feel free to experiment with different color combinations. You can use bold, bright colors or soft pastel shades to match your existing decor.
- Add Embellishments: Consider adding embellishments like beads or embroidery to your tulips for extra detail. These small touches can give your table top a unique, personalized look.
- Change the Shape of the Tulips: Instead of traditional tulip shapes, try experimenting with abstract or whimsical versions. This can make the design more modern or playful.
- Incorporate Seasonal Elements: Add other seasonal elements, like butterflies or birds, to the quilt. This would work particularly well if you plan to use the table top as a centerpiece for spring or summer.
- Try a Larger Design: If you have a larger table, consider scaling up the pattern to make a bigger table top or even a full quilt. This can create a stunning, large-scale floral display.
- Create Matching Sets: For a coordinated look, create matching potholders, placemats, or a table runner using the same tulip design. This will tie the entire dining area together beautifully.
These creative variations will allow you to personalize your Tulip Time Table Top – PATTERN, making it truly one-of-a-kind.
FAQ: Frequently Asked Questions
1. What type of fabric is best for the Tulip Time Table Top pattern?
Cotton fabric is the best option as it is durable, easy to work with, and holds its shape well. It also gives a soft and smooth finish to your quilt.
2. Can I use this pattern for other projects besides a table top?
Yes, you can use the tulip design for various other projects, such as wall hangings, pillow covers, or even a full-sized quilt.
3. How do I make my quilt top more durable?
Use a medium-weight quilt batting and high-quality cotton fabric for durability. Proper quilting and finishing techniques will also enhance the longevity of the table top.
4. Can I change the size of the table top?
Yes, you can easily adjust the size by adding or subtracting rows of tulips and adjusting the background fabric to fit your desired dimensions.
5. How do I choose the right quilting thread?
Choose a high-quality cotton quilting thread that matches the fabric you are using for a smooth finish. For decorative stitching, you can opt for a contrasting color to highlight the tulips.
Conclusion
The Tulip Time Table Top is a beautiful and versatile quilting project that can add a vibrant, floral touch to your home. By following the steps and tips provided in this guide, you’ll be able to create a stunning piece that showcases your quilting skills. Whether you opt for a traditional color scheme or experiment with your own creative variations, this table top will bring the beauty of tulips into your space. We’d love to hear your thoughts and any suggestions you may have. Please share your feedback and let us know how your project turned out! Happy quilting!