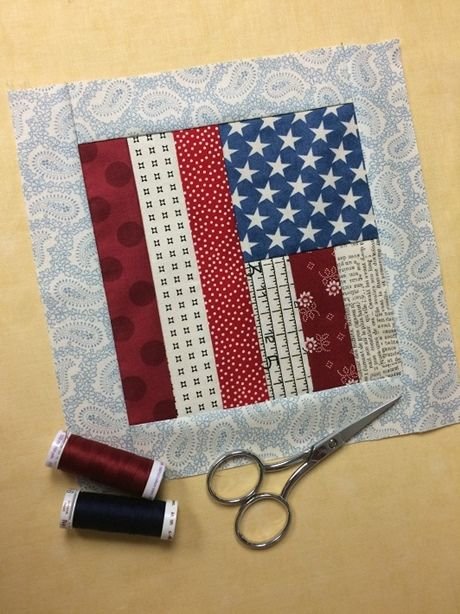
If you’re looking for a fun and creative way to enhance your quilting projects, the Scrappy Flag Quilt Block is a fantastic option.
This pattern combines the beauty of a traditional flag design with the charm of scrappy quilting, making it a versatile choice for various quilt projects.
Whether you’re new to quilting or an experienced quilter, the Scrappy Flag Quilt Block pattern is easy to follow and offers plenty of room for creativity.
The Scrappy Flag Quilt Block allows you to incorporate various fabrics, creating a unique and colorful design that’s perfect for patriotic quilts, home decor, or even as a fun gift. By using leftover fabric scraps from previous projects, this block is not only practical but also an eco-friendly way to reuse fabric. Plus, it’s a great way to show off your quilting skills while making something meaningful and visually striking.
In this article, we’ll walk you through the steps of making a Scrappy Flag Quilt Block, covering everything from fabric selection to assembling the block. We’ll also discuss helpful tips and tricks to make the process as smooth as possible. Let’s get started and learn how to create this beautiful and charming quilt block!
1. Materials Needed for the Scrappy Flag Quilt Block
Before diving into the steps of creating your Scrappy Flag Quilt Block, it’s important to gather all the necessary materials. Having everything ready will make the quilting process easier and more enjoyable. Below is a list of the key supplies you’ll need to get started:
Fabrics
For the Scrappy Flag Quilt Block, you’ll need fabric in various colors and patterns. The main colors traditionally used for the flag design are red, white, and blue, but don’t be afraid to get creative! The beauty of the scrappy style is that you can mix and match fabrics from your scrap stash to create a unique and colorful block. You can use solid fabrics, floral prints, stripes, or any other pattern you like.
Make sure to have a good selection of fabric for the flag’s stripes, stars, and background. Typically, you’ll need around 10-15 different fabric pieces, depending on how large you want your block to be. For a more cohesive look, try to select fabrics that complement each other, but feel free to mix up the colors and patterns for a more eclectic look.
Quilting Tools
The basic quilting tools you’ll need are your rotary cutter, cutting mat, and ruler. These tools will help you cut your fabric into precise strips and squares to create the flag design. A sewing machine is also necessary, along with thread that matches or contrasts with your fabric, depending on the look you want to achieve.
Additionally, you may want a design wall or a flat surface to lay out your fabric pieces as you assemble the block. This will help you visualize the final product and make any necessary adjustments before sewing the pieces together.
Iron
An iron is essential for pressing your seams. It ensures that your fabric lies flat, helping to achieve crisp and neat seams. Pressing your fabric at each step is crucial for a well-made quilt block, so make sure your iron is ready to go before you start.
2. Steps to Create a Scrappy Flag Quilt Block
Now that you have your materials ready, it’s time to start making your Scrappy Flag Quilt Block. The process is broken down into several key steps to make sure your block turns out just right. Follow these easy-to-understand instructions to create your very own flag quilt block.
Step 1: Cut the Fabric
Start by cutting your fabric into strips. For the stripes of the flag, cut strips of red and white fabric, each measuring about 2.5 inches wide. You’ll need seven strips in total for the stripes, alternating between red and white. For the blue section of the flag, cut a square or rectangle from your blue fabric that measures approximately 5.5 inches by 6 inches, depending on the size of the block you’re creating.
Step 2: Assemble the Stripes
Once your fabric strips are cut, it’s time to sew them together. Start by placing a red strip and a white strip right sides together, then sew along the edge using a quarter-inch seam allowance. Continue alternating red and white strips until you have a set of 7 strips. Press the seams after each sewing step to ensure they lie flat.
Step 3: Attach the Blue Section
Next, take the blue fabric and sew it onto the top of the striped section. You can align the blue section so it covers the upper left corner of the block. Be sure to match the edges carefully, and sew along the seam, making sure that the blue section is securely attached to the striped area. Press the seam for a neat finish.
Step 4: Add Stars (Optional)
If you’d like to add the stars to your flag block, you can either hand-embroider small stars onto the blue section or use star-shaped appliqué pieces. These stars can be made using white fabric or any contrasting fabric to stand out against the blue background. The number of stars will depend on the specific design you’re following, but typically, a starry pattern in the upper left corner of the block is a nice touch.
Step 5: Trim the Block
After sewing all the pieces together, use your ruler and rotary cutter to trim the edges of the block. Trim it to the desired size, ensuring that all of your seams are straight and even. If necessary, you can square up the block to make sure the edges are perfectly aligned.
Step 6: Press and Set Aside
Once your block is assembled and trimmed, give it a final press with your iron to set the seams and remove any wrinkles. Your Scrappy Flag Quilt Block is now complete! You can repeat these steps to create more blocks for your quilt, or you can begin incorporating this block into your larger quilt project.
3. Tips for Perfecting Your Scrappy Flag Quilt Block
Creating a Scrappy Flag Quilt Block is a rewarding process, and with a few tips, you can make sure your blocks come out beautifully. Here are some helpful suggestions for perfecting your flag block.
Tip 1: Use Consistent Seam Allowances
One of the most important things to keep in mind when quilting is using a consistent seam allowance. A quarter-inch seam allowance is commonly used in quilting, so make sure you measure and stitch carefully to ensure that your pieces fit together perfectly.
Tip 2: Choose Contrasting Fabrics
To make your Scrappy Flag Quilt Block stand out, choose fabrics with good contrast. For example, pairing light-colored fabrics with darker ones will help the pieces pop and make the design more striking.
Tip 3: Press, Don’t Iron
When you press your seams, avoid the temptation to move the iron back and forth. Instead, press straight down on the fabric, lifting the iron between each section. This helps to avoid shifting the fabric and results in a flatter, more professional-looking block.
Tip 4: Mix and Match Scraps
The beauty of a scrappy quilt lies in its variety. Feel free to mix and match scraps from different projects to create an interesting and colorful design. Don’t worry if your fabric choices don’t “match” perfectly—the more variety, the more character your block will have.
Tip 5: Make Sure Your Block Is Square
When trimming the edges of your block, take extra care to ensure that the block is square. This is essential for a neat and professional-looking finished quilt. If necessary, trim a little off each side to square up the block.
Tip 6: Add a Border for a Finished Look
To give your Scrappy Flag Quilt Block a polished look, you might consider adding a border around the block. A simple border using a coordinating fabric can help frame the block and make it stand out even more.
4. Creative Ways to Use Your Scrappy Flag Quilt Block
The Scrappy Flag Quilt Block is versatile and can be used in many different ways. Here are a few ideas for incorporating this block into larger projects.
Idea 1: Quilted Pillow Covers
Make a patriotic or festive quilted pillow cover by creating a few Scrappy Flag Quilt Blocks. You can combine several blocks to make a fun and colorful accent for your couch or bed.
Idea 2: Wall Hangings
Turn your flag block into a wall hanging for holidays like the Fourth of July or Memorial Day. Simply stitch the block to a larger backing, add a hanging sleeve, and display it in your home for a festive touch.
Idea 3: Table Runners
For a patriotic table runner, combine multiple Scrappy Flag Quilt Blocks to create a long, eye-catching design. Add some coordinating fabric for the borders and backing, and you’ll have a beautiful addition to your dining table.
Idea 4: Quilts
Of course, the Scrappy Flag Quilt Block can be used as part of a larger quilt project. Whether you’re making a lap quilt, baby quilt, or even a bedspread, this block can be arranged in rows or grids for a stunning design.
Idea 5: Mini Quilts
For a quick and easy project, create a small mini quilt featuring one or more Scrappy Flag Quilt Blocks. This can be a fun way to try out new techniques and create a beautiful, small-scale quilt.
Idea 6: Holiday Decorations
Create holiday-themed decorations for your home or office by making several Scrappy Flag Quilt Blocks and incorporating them into your décor. Whether it’s for Independence Day or Veterans Day, these blocks add a personal touch to your celebrations.
Frequently Asked Questions
1. How do I make a Scrappy Flag Quilt Block? To make a Scrappy Flag Quilt Block, cut strips of red and white fabric, sew them together to form the flag’s stripes, and add a blue section with stars. Then trim and press the block for a neat finish.
2. What fabrics are best for a Scrappy Flag Quilt Block? For a Scrappy Flag Quilt Block, use red, white, and blue fabrics, along with any scraps you have on hand. The more variety in patterns and textures, the better!
3. Can I make the block any size? Yes! The Scrappy Flag Quilt Block can be customized to any size, depending on your project. Adjust the fabric measurements as needed to suit your quilt.
4. Can I hand-quilt my block? Absolutely! While a sewing machine is often faster, hand quilting adds a personal touch and a unique texture to your Scrappy Flag Quilt Block.
5. How do I make the stars on the flag? You can either embroider small stars by hand or use appliqué techniques to add star shapes to the blue section of the flag.
Conclusion
In conclusion, the Scrappy Flag Quilt Block is a fun, creative project that allows you to incorporate fabric scraps into a beautiful and meaningful design. Whether you’re making a large quilt or a small decorative piece, this pattern can be adapted to suit your needs. We hope this guide has provided you with all the information you need to get started on your own Scrappy Flag Quilt Block. Don’t forget to leave a comment with your thoughts, ideas, and suggestions for future projects. Happy quilting!