The Courthouse Steps and Sliced Courthouse Steps Quilt Blocks – Pattern is a timeless design that has been cherished by quilters for generations.
This pattern consists of blocks that resemble steps, with layers of fabric sewn together to create a stunning visual effect.
It’s a versatile pattern that offers endless opportunities for creativity, making it a favorite among both beginner and seasoned quilters.
The design is not only beautiful but also easy to learn, providing quilters with a perfect project to practice their skills.
Quilters have adapted this pattern in many ways, incorporating a wide variety of fabrics, colors, and techniques to make their Courthouse Steps quilts unique. The Courthouse Steps and Sliced Courthouse Steps Quilt Blocks – Pattern is particularly popular because of its symmetrical, yet slightly off-center layout, which creates a striking movement in the quilt design. Whether you’re making a quilt for yourself, as a gift, or as part of a community project, this pattern offers flexibility and charm.
In this article, we will explore how to create the Courthouse Steps and Sliced Courthouse Steps Quilt Blocks – Pattern step-by-step. We will also share tips and tricks on fabric choices, cutting techniques, and assembly methods, ensuring you can complete your quilt with ease. Let’s dive into the world of Courthouse Steps quilting!
1. Understanding the Courthouse Steps Quilt Block Pattern
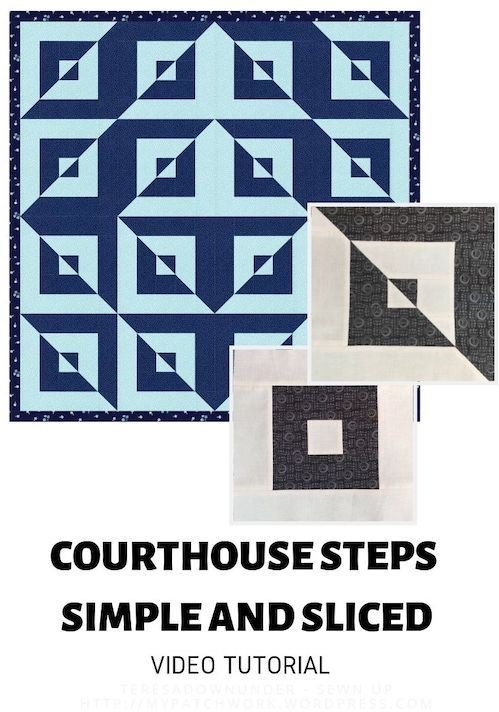
The Courthouse Steps Quilt Block is one of the most iconic quilt patterns in the quilting world. The design gets its name from the layers of fabric arranged around a central square, resembling the steps of a courthouse. These steps form a rectangular shape, with each layer increasing in size as you work outward from the center.
- Basic Construction: The Courthouse Steps block is traditionally constructed with a center square that is surrounded by rectangular strips of fabric. The key to this block is the gradual increase in strip size, which creates a “stair-step” effect. Each strip is sewn around the central square, and the process is repeated until the block reaches the desired size.
- Fabric Choices: One of the joys of this pattern is the opportunity to experiment with color. While traditional Courthouse Steps blocks are made with contrasting fabrics for each step, you can choose to create a monochromatic design or use various patterns and textures to create a modern twist. Solid colors and floral prints are both popular choices for this block.
- Block Size: The size of your Courthouse Steps block will depend on the width of your fabric strips. You can adjust the strip width to make the block larger or smaller, depending on your project’s needs. It’s important to plan your strip sizes ahead of time to ensure that your blocks are uniform in size and fit together properly.
- Design Variations: There are many ways to customize your Courthouse Steps quilt blocks. For example, you can create a log cabin effect by using lighter fabrics in the center and gradually adding darker fabrics as you work outward. Alternatively, you could create a scrappy design by using a mix of fabrics from your fabric stash for a more eclectic look.
- Layout Options: When assembling your Courthouse Steps blocks, consider different layout options to create a visually appealing quilt. You can arrange the blocks in a traditional grid pattern or experiment with different orientations, such as placing the blocks diagonally or in a circular layout.
- Sliced Courthouse Steps: The Sliced Courthouse Steps block is a variation of the traditional design, where the block is “sliced” into smaller sections. The fabric strips are sewn around the center as in the original pattern, but instead of being left as a whole block, it is cut into two or more pieces. These slices can then be rearranged in different ways to create a more dynamic, modern design.
Understanding the basics of the Courthouse Steps Quilt Block is the first step in creating this pattern. With a little creativity, you can adapt the block to suit your personal style and design preferences.
2. How to Make the Courthouse Steps and Sliced Courthouse Steps Blocks
Creating the Courthouse Steps and Sliced Courthouse Steps Quilt Blocks – Pattern requires precision and attention to detail. The process involves cutting fabric strips, sewing them together, and then assembling the blocks. Follow these steps to create your own Courthouse Steps blocks:
- Cutting the Fabric: Begin by cutting fabric strips for the Courthouse Steps block. You will need a center square (usually 2.5 inches), and strips that are slightly wider than your center square (typically around 1.5 to 2 inches). These strips will be sewn around the center, one at a time, in a specific order.
- Sewing the Strips: Start by sewing the first strip to one side of the center square. Press the seam open, then add another strip to the opposite side. Continue adding strips around the center, one at a time, alternating sides. Make sure to press each seam after you sew it to keep the fabric smooth and even.
- Building Up the Layers: Continue adding strips around the center, making sure each layer is slightly larger than the previous one. This is the key to creating the “step” effect that defines the Courthouse Steps block. The strips should be sewn carefully to avoid any puckering or shifting.
- Trimming the Block: Once you’ve added enough strips to create the desired size for your Courthouse Steps block, trim the edges to ensure that the block is square and even. Use a rotary cutter and ruler for the most accurate results.
- Slicing the Block: For the Sliced Courthouse Steps variation, once your block is complete, cut it into two or more sections. You can cut the block horizontally, vertically, or diagonally, depending on the design you want to achieve. Be sure to leave enough seam allowance when slicing to ensure the block can be reassembled properly.
- Rearranging the Pieces: Once your block is sliced, you can rearrange the sections to create a new, dynamic pattern. This is where the real fun begins – experiment with different placements of the slices to find a layout that works for you. The sliced block can be rearranged in many ways, giving you the flexibility to create a unique design.
With a little practice and patience, you’ll be able to create beautiful Courthouse Steps and Sliced Courthouse Steps Quilt Blocks that will be the centerpiece of your quilt.
3. Tips for Success with the Courthouse Steps Quilt Blocks
The Courthouse Steps and Sliced Courthouse Steps Quilt Blocks – Pattern may seem straightforward, but there are a few tips that can help you achieve the best results and ensure your quilt comes out looking professional:
- Accuracy is Key: One of the most important aspects of quilting is accuracy. When cutting fabric strips and sewing the blocks together, take extra care to measure carefully and sew straight seams. Accurate cuts and seams will help your blocks fit together seamlessly.
- Pressing Your Seams: Always press your seams as you go along. Pressing helps set the stitches and ensures that your blocks stay flat. It’s especially important to press your seams open to reduce bulk and create a smooth surface for sewing.
- Choosing the Right Fabrics: The Courthouse Steps and Sliced Courthouse Steps Quilt Blocks look best when you choose fabrics that contrast well with each other. If you’re making a traditional Courthouse Steps block, opt for contrasting light and dark fabrics. For a more modern look, try using bold prints or a mix of textures.
- Use Chain Piecing: To save time, consider using chain piecing when assembling your blocks. This technique involves sewing multiple pieces together without cutting the thread in between. Chain piecing helps speed up the process and ensures that your blocks are uniform in size.
- Work with a Design Wall: A design wall is a helpful tool when piecing together your quilt blocks. It allows you to lay out your blocks and rearrange them before sewing them together. This will give you a better idea of how the finished quilt will look and help you make adjustments as needed.
- Practice Makes Perfect: If you’re new to the Courthouse Steps and Sliced Courthouse Steps Quilt Blocks – Pattern, take some time to practice on scrap fabric. This will allow you to get comfortable with the technique and perfect your skills before starting on your main quilt project.
With these tips in mind, you’ll be able to tackle the Courthouse Steps and Sliced Courthouse Steps Quilt Blocks – Pattern with confidence and achieve stunning results.
4. Assembling Your Courthouse Steps Quilt
Once you’ve completed your Courthouse Steps and Sliced Courthouse Steps Quilt Blocks, the next step is to assemble the blocks into a finished quilt. Here are some tips for successfully putting your quilt together:
- Layout the Blocks: Before sewing the blocks together, take some time to lay them out on a flat surface or design wall. Experiment with different arrangements to see which one works best for your quilt. You can alternate between traditional and sliced Courthouse Steps blocks for a more dynamic look.
- Sew the Blocks Together: Once you’re happy with the layout, start sewing the blocks together. Be sure to match the seams carefully and press them flat after each row is added. This will help prevent puckering and ensure that the quilt lays flat.
- Add Borders: After the main quilt top is assembled, consider adding a border around the edges. This will give the quilt a finished look and help frame the design. You can choose a simple border or a more decorative one, depending on your personal style.
- Quilt the Layers: Once the quilt top is complete, it’s time to quilt the layers together. You can quilt by hand or use a sewing machine, depending on your preference. Choose a quilting design that complements the Courthouse Steps blocks, such as straight-line quilting or a more intricate free-motion design.
- Bind the Quilt: The final step in finishing your quilt is to add the binding. This is the fabric strip that wraps around the edges of the quilt, giving it a neat, professional finish. Hand-sew the binding to the back of the quilt for a polished look.
- Enjoy Your Finished Quilt: Once the quilt is complete, take a moment to admire your hard work. Your Courthouse Steps and Sliced Courthouse Steps Quilt Blocks – Pattern is now a beautiful, unique piece that you can proudly display or gift to someone special.
FAQ
Q1: How do I know what size to cut my fabric strips for the Courthouse Steps block?
A1: The width of your fabric strips will determine the size of your block. A common width is 1.5 to 2 inches, but you can adjust this based on the desired final block size.
Q2: Can I use pre-cut fabric for this pattern?
A2: Yes, pre-cut fabric strips or charm squares can be used for the Courthouse Steps and Sliced Courthouse Steps Quilt Blocks. Just ensure that the fabric pieces are the correct size for the pattern.
Q3: How can I make my quilt more modern?
A3: To make your Courthouse Steps quilt more modern, consider using bold prints, asymmetrical layouts, and contrasting colors. The sliced Courthouse Steps technique is also a great way to add a modern twist.
Q4: Can I make a larger or smaller version of the Courthouse Steps block?
A4: Yes, you can easily adjust the size of the Courthouse Steps block by changing the width of the strips. Make sure to keep the strips consistent in size for a uniform block.
Conclusion
The Courthouse Steps and Sliced Courthouse Steps Quilt Blocks – Pattern is a versatile and beautiful design that allows quilters to experiment with color, layout, and fabric choices. Whether you’re new to quilting or an experienced quilter, this pattern offers an excellent opportunity to practice and refine your skills. By following the steps outlined in this article, you can create a stunning quilt that is both classic and modern. We hope you found this guide helpful! Please share your thoughts and suggestions in the comments below. Happy quilting!