The crochet summer bucket hat – pattern is a trendy and practical accessory perfect for protecting your face from the sun while adding a stylish touch to your summer wardrobe.
Crocheting your own summer bucket hat is not only a fun project, but it also allows you to customize the design to suit your personal taste.
Whether you’re an experienced crocheter or just getting started, this pattern is accessible and can be tailored to fit any size or color preference.
In this article, we will guide you through the steps to create your very own crochet summer bucket hat, offering tips, tricks, and inspiration to help you along the way.
A crochet summer bucket hat is perfect for warm weather, as it provides both shade and style. This pattern is versatile, allowing you to experiment with different yarns and stitches to achieve the desired look. Bucket hats have made a huge comeback in recent years, becoming a fashionable and functional accessory for both men and women. Crocheting your own allows you to create something unique and personal, while saving money compared to buying ready-made versions.
If you’re looking for a fun crochet project that’s both fashionable and practical, the crochet summer bucket hat – pattern is an excellent choice. Whether you’re new to crochet or have been crocheting for years, this project is both enjoyable and rewarding. Let’s dive into the steps to create your own stylish bucket hat!
1. Materials Needed for Your Crochet Summer Bucket Hat
Before beginning your crochet summer bucket hat, it’s essential to gather the right materials. Having the right supplies will ensure that your project goes smoothly and that your finished hat is comfortable and durable.
Yarn: For a summer bucket hat, choose a lightweight cotton or cotton-blend yarn. These fibers are breathable, making them ideal for warmer weather. Opt for yarn in the color of your choice, keeping in mind that lighter colors can reflect sunlight, while darker colors may absorb more heat.
Crochet Hook: The size of your crochet hook depends on the yarn you’re using. Typically, a 3.5mm to 5.5mm hook works well for most cotton yarns, but check the yarn’s label for recommended hook sizes. A comfortable hook will make the process easier and more enjoyable.
Measuring Tape: To ensure that your hat fits correctly, you’ll need a measuring tape to take your measurements. This is especially important if you’re making the hat for a specific size, like a child or an adult.
Stitch Markers: These will help you keep track of your rounds and stitches, ensuring that your pattern remains consistent and neat throughout the process.
Tapestry Needle: A tapestry needle is necessary for weaving in the ends after you’ve finished your project. This will give your hat a clean, professional look.
Scissors: A pair of sharp scissors is essential for cutting the yarn once your project is complete.
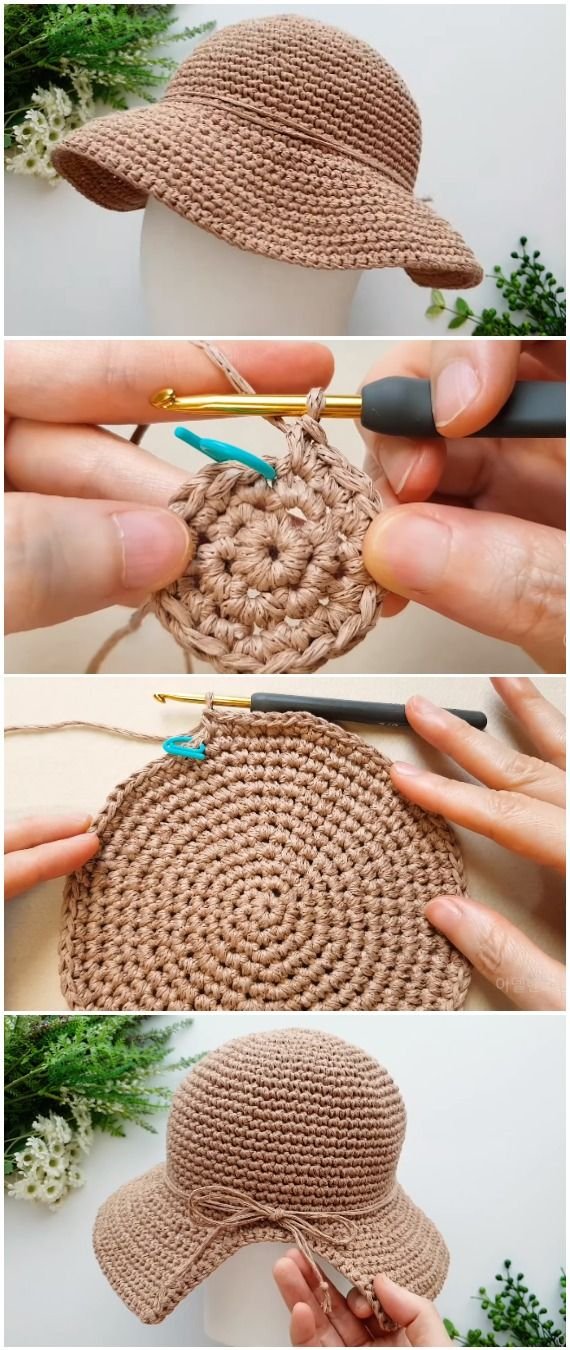
2. Step-by-Step Guide to Crocheting Your Summer Bucket Hat
Now that you have your materials ready, it’s time to start crocheting your summer bucket hat. Follow these simple steps to create a perfect hat for your summer outings.
Step 1: Make a Foundation Ring: Start by creating a slip knot and making a foundation ring. Chain 4, then join with a slip stitch to form a circle. This is the base of your hat.
Step 2: Crochet the Crown: To build the crown of the hat, work single crochets or half double crochets into the ring. Continue in rounds, increasing evenly every few stitches to make the crown of the hat expand. Typically, you will work in a spiral, without joining the rounds, to avoid a seam.
Step 3: Work the Sides of the Hat: Once the crown of your hat has reached the desired diameter, begin working the sides of the bucket hat. Continue crocheting without increasing to create the straight sides. This part is important for giving the hat its structure and shape.
Step 4: Add the Brim: The brim is what gives the bucket hat its classic look. To create the brim, work in a round, increasing the number of stitches to widen the brim. Depending on the pattern, you may work several rounds of increases to create a wider brim.
Step 5: Fit and Adjust: Try the hat on as you go to ensure it fits your head comfortably. If necessary, adjust the length of the crown or the width of the brim to get the right proportions. A well-fitting hat will be both stylish and practical.
Step 6: Finish the Hat: Once you’ve completed the brim, finish off your work by cutting the yarn and pulling it through the last loop. Use a tapestry needle to weave in any loose ends and secure them neatly.
3. Customizing Your Crochet Summer Bucket Hat
One of the best things about crocheting your own summer bucket hat is the ability to customize it to your liking. You can experiment with different colors, textures, and embellishments to create a truly unique piece.
Adding Stripes or Patterns: To make your hat stand out, consider adding stripes or other patterns. You can alternate colors or use textured stitches like shell stitches or puff stitches to add dimension and interest to the hat’s design.
Embellishments: Once you’ve completed your bucket hat, you can further personalize it by adding embellishments. Consider attaching a decorative flower, button, or small pom-pom to the front for a playful touch.
Size Adjustments: If you are crocheting for a child, simply adjust the size by reducing the number of stitches in the crown and the height of the brim. For a larger adult size, add a few extra rows or rounds for a looser fit.
Experimenting with Yarn: While cotton yarn is ideal for a summer bucket hat, feel free to experiment with different types of yarn. A soft wool blend can add a different texture, or you can choose a variegated yarn for a multi-colored effect.
Adding a Lining: If you prefer a more polished look, consider adding a fabric lining to the inside of the hat. This can provide extra comfort, as well as give your hat a more finished appearance.
Crochet a Matching Set: If you’re feeling extra crafty, you could crochet a matching scarf or bag using the same yarn and color scheme as your summer bucket hat. This creates a coordinated look that’s perfect for sunny vacations or day trips.
4. Tips for Maintaining Your Crochet Summer Bucket Hat
Once you’ve finished your crochet summer bucket hat, it’s essential to take good care of it so that it lasts through many summer seasons.
Washing Instructions: Most cotton yarns are machine washable, but it’s a good idea to hand wash your bucket hat to preserve its shape. Use a gentle detergent and cool water to avoid damaging the fibers.
Avoid Overexposure to Sun: While your bucket hat is great for protecting your face from the sun, overexposure to sunlight can cause the yarn to fade. Try to keep your hat in a shaded area when not in use to maintain its color.
Storage: When not wearing your hat, store it in a cool, dry place. Avoid cramming it into a drawer or bag, as this can cause the shape to become misshapen. Instead, hang it up or store it in a spacious container.
Repairs: If you notice any wear or loose stitches, repair your crochet summer bucket hat as soon as possible to prevent further damage. A small hole can be easily fixed by crocheting a few extra stitches or patching it with a small piece of yarn.
Drying: After washing, always allow your hat to air dry. Avoid using a dryer, as high heat can cause the yarn to shrink or lose its shape.
Stretching: If your hat becomes too tight over time, gently stretch it by hand or wet it and allow it to dry in a stretched position. This can help maintain the original size and fit of your bucket hat.
FAQ – Frequently Asked Questions
- What type of yarn is best for a crochet summer bucket hat?
The best yarn for a crochet summer bucket hat is a lightweight cotton or cotton-blend yarn. Cotton is breathable and comfortable for warm weather, making it an ideal choice.
- How do I adjust the size of the bucket hat?
To adjust the size, simply add or subtract stitches from the crown and adjust the height of the brim accordingly. Make sure to measure your head before starting to ensure the correct fit.
- Can I crochet a bucket hat for kids?
Yes! To make a crochet summer bucket hat for kids, just reduce the size of the crown and brim. Follow the same pattern but with fewer stitches to fit smaller heads.
- How long does it take to make a crochet bucket hat?
The time it takes to make a crochet summer bucket hat depends on your skill level and the complexity of the design. On average, it can take anywhere from 3 to 6 hours to complete a basic bucket hat.
- Can I crochet a bucket hat without a pattern?
Yes! While a pattern helps guide you, you can create a custom crochet summer bucket hat by experimenting with stitches and sizes. Just remember to check your fit as you go.
- Can I add embellishments to my crochet bucket hat?
Absolutely! You can add flowers, buttons, or other decorations to make your crochet summer bucket hat even more unique. Get creative and personalize it to fit your style.
Conclusion
In this article, we’ve covered everything you need to know about creating your own crochet summer bucket hat, from the materials and tools required to step-by-step instructions. Whether you’re an experienced crocheter or just starting, this project allows you to showcase your creativity while crafting a stylish, functional accessory for the summer. We hope this tutorial has inspired you to try your hand at making your own bucket hat!
If you enjoyed this article, feel free to leave a comment with your thoughts or suggestions for other crochet projects you’d like to learn about. Happy crocheting!