The Yankee Puzzle Quilt Block is a popular and intricate design that has gained attention among quilters due to its unique combination of geometric shapes and vivid color contrasts.
It’s a versatile pattern that can be customized for any project, whether you’re making a small wall hanging, a lap quilt, or a larger bedspread.
The beauty of the Yankee Puzzle Quilt Block lies in its ability to combine multiple fabric colors, creating a visually appealing and dynamic quilt.
This quilt block, though it may seem complex at first glance, is manageable even for quilters who are relatively new to the craft. By breaking down the pattern into simple steps, anyone can successfully create this quilt block. Whether you’re a seasoned quilter or a beginner, understanding the basic techniques and following the instructions carefully will lead you to create a beautiful and harmonious piece of quilt art. Let’s explore how to approach the Yankee Puzzle Quilt Block – Pattern.
This pattern is not just a quilting project; it’s an opportunity to experiment with fabric choices, colors, and stitching techniques. The Yankee Puzzle Quilt Block can be the centerpiece of any quilt, or it can be used as a part of a larger design. It’s a perfect project for those who love to play with patterns and want to create something truly unique. In the following sections, we’ll guide you through the essential steps to successfully complete this quilt block.
1. Materials Needed for the Yankee Puzzle Quilt Block
Before you begin your Yankee Puzzle Quilt Block – Pattern, it’s essential to gather all the necessary materials. Having the right supplies will help you complete the quilt block efficiently and ensure that the finished product is of high quality.
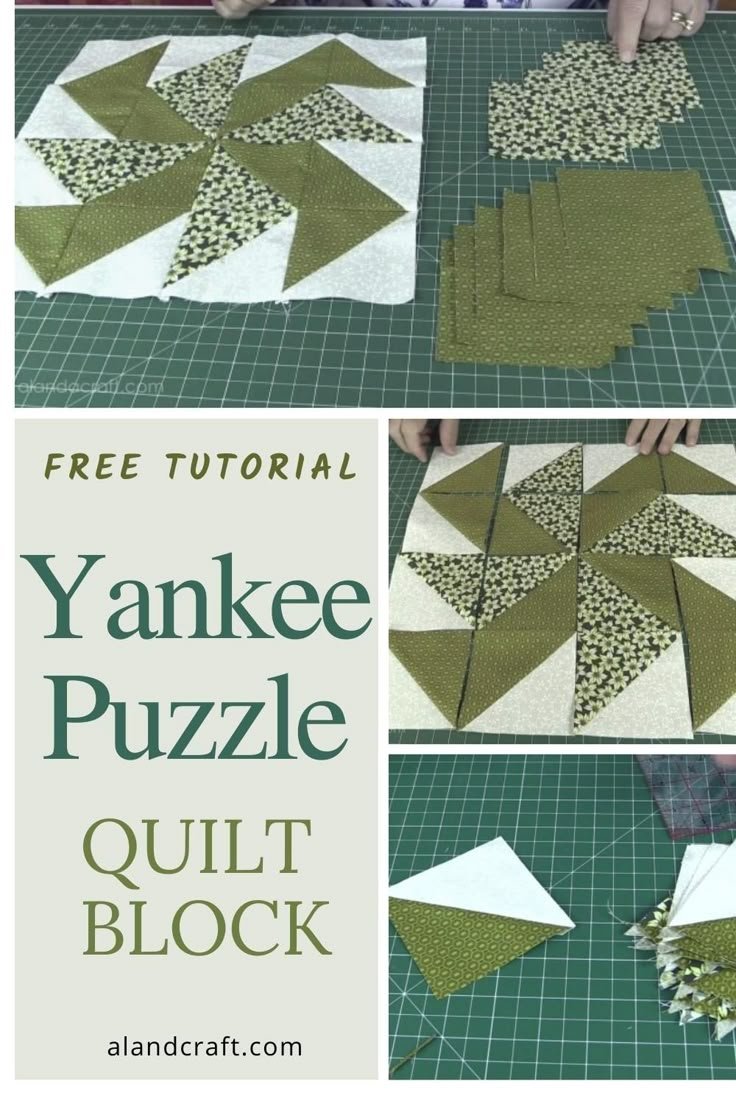
Fabric: The first step is choosing your fabric. This pattern typically uses two contrasting fabrics – one for the background and one for the puzzle pieces. Cotton fabric is the most commonly used for quilt blocks because of its versatility, ease of handling, and availability in many designs and colors. You can choose solid fabrics, prints, or even batiks to give your block a personal touch.
Quilt Batting: Batting is the padding that gives your quilt its softness and warmth. For this quilt block, a medium-weight batting is usually ideal. This provides enough structure while still allowing the quilt to feel soft.
Quilting Thread: Select a quilting thread that matches the color of your fabric. It’s important to choose a thread that is strong and durable, as quilting can involve multiple layers of fabric.
Rotary Cutter and Mat: A rotary cutter and cutting mat are essential for cutting precise shapes for the Yankee Puzzle Quilt Block. This tool helps you cut fabric pieces accurately and efficiently, ensuring that your quilt block looks neat and professional.
Quilt Ruler: A quilt ruler is a helpful tool to measure your fabric pieces and ensure they are cut to the correct size. It allows you to make straight, precise cuts with ease.
Sewing Machine: While some quilters prefer to hand-sew their blocks, a sewing machine will save you time and provide a uniform stitch. Make sure your sewing machine is equipped with the right needle for quilting.
2. How to Piece Together the Yankee Puzzle Quilt Block
The Yankee Puzzle Quilt Block – Pattern consists of several smaller pieces that must be sewn together. Although it may seem daunting at first, breaking the process into manageable steps will make the task easier.
Step 1: Cut Your Fabric Pieces
Start by cutting your fabric into the necessary shapes and sizes. This will include squares, triangles, and rectangles. Use a rotary cutter, quilting ruler, and cutting mat to ensure precise and clean cuts.
Step 2: Lay Out the Pieces
Before you start sewing, it’s a good idea to lay out your pieces in the desired arrangement. This will help you visualize the final design and make adjustments as needed before committing to sewing.
Step 3: Sew the Puzzle Pieces
Begin by sewing the smaller pieces together. It’s recommended to use a quarter-inch seam allowance for consistency. Focus on matching the edges and ensuring that the pieces are aligned properly as you sew them.
Step 4: Press the Seams
After each seam, press the fabric pieces to remove any wrinkles. Pressing helps to flatten the seams, making it easier to sew subsequent pieces together. Pressing also ensures that your Yankee Puzzle Quilt Block lays flat and evenly.
Step 5: Join the Rows
Once you’ve sewn the smaller units, it’s time to join them into larger rows. Match up the seams of each row carefully to maintain the integrity of the design. Sew each row together with a consistent seam allowance.
Step 6: Assemble the Entire Block
After completing all the rows, it’s time to sew them together to form the complete Yankee Puzzle Quilt Block. Once everything is joined, press the seams once again to make sure the block lays flat and smooth.
3. Tips for Customizing the Yankee Puzzle Quilt Block
The Yankee Puzzle Quilt Block – Pattern is highly customizable, offering you the opportunity to personalize it in a variety of ways. Here are some tips to make your quilt block unique:
1. Experiment with Color Combinations
While the traditional Yankee Puzzle Quilt Block often uses contrasting fabrics for the puzzle pieces and the background, you can experiment with different colors and patterns. For example, you might opt for a monochromatic look or use bright, bold prints to make the block pop.
2. Play with Fabric Textures
Using a mix of fabric textures can add interest and depth to your quilt block. For instance, you can combine solid cotton with textured fabrics like flannel or corduroy to create contrast in both color and feel.
3. Add Decorative Stitching
Once the quilt block is pieced together, consider adding decorative stitching along the seams. A simple zigzag stitch, for example, can help secure the seams and add a unique finishing touch to your block.
4. Create Variations in the Layout
Instead of sticking with the traditional design, try rotating or flipping some of the blocks to create a more dynamic pattern. A slight change in arrangement can give the quilt a completely different look and feel.
5. Combine with Other Quilt Blocks
The Yankee Puzzle Quilt Block can be combined with other blocks to create a larger quilt. Experiment with mixing and matching different blocks to create a cohesive quilt design.
6. Use a Different Border
Once you’ve completed the quilt block, consider adding a decorative border to frame the block. This can be done by sewing additional fabric pieces around the edges of the block to give it a finished appearance.
4. Finishing Your Yankee Puzzle Quilt Block
After you’ve sewn together the Yankee Puzzle Quilt Block, it’s time to finish it up and get it ready for use. Here’s what you’ll need to do:
1. Trim the Edges
Trim any excess fabric from the edges of the block to ensure it is even and square. This will help the block fit seamlessly into the overall quilt layout.
2. Add a Quilt Top
If you’re making a full quilt, this is the time to attach the quilt block to the quilt top. Arrange your blocks in the desired layout, and sew them together.
3. Quilt the Layers
To add structure and durability, layer your quilt block with batting and a quilt backing. Sew through all layers using your desired quilting pattern. This step helps secure the fabric layers together and adds dimension to your quilt.
4. Bind the Quilt
Once all the quilting is complete, bind the edges of your quilt block or the entire quilt with fabric strips. This gives the quilt a neat, polished edge.
5. Wash and Press
After binding, wash the quilt to remove any excess fabric or thread. Once dry, press the quilt to ensure all seams are crisp and even. This step also helps to soften the fabric.
6. Enjoy Your Finished Quilt
Finally, you can now admire your beautiful Yankee Puzzle Quilt Block and the hard work that went into making it. Whether it’s displayed as a single block or part of a larger quilt, your creation is sure to be a source of pride.
FAQ – Frequently Asked Questions
- What size should I cut my fabric for the Yankee Puzzle Quilt Block?
The fabric size depends on the pattern’s instructions, but a typical Yankee Puzzle Quilt Block will require a variety of sizes. Usually, you will cut squares and rectangles of 3-6 inches for the puzzle pieces and background.
- Can I make a quilt using only Yankee Puzzle Quilt Blocks?
Absolutely! A quilt made entirely of Yankee Puzzle Quilt Blocks can create a beautiful, cohesive design. You can use different color combinations for each block or keep the same design throughout the quilt for consistency.
- What is the best way to arrange the blocks for a cohesive quilt?
For a cohesive design, you can arrange the blocks in a grid pattern or rotate some of the blocks for a more dynamic look. Try laying the blocks out before sewing them to find a layout you love.
- Can I use other quilt blocks in the same quilt?
Yes, you can mix and match Yankee Puzzle Quilt Blocks with other blocks to create a diverse quilt. Just make sure the sizes of the blocks are consistent for a harmonious finish.
- Is it necessary to use quilting thread?
While quilting thread is recommended for durability, you can use regular sewing thread if that’s all you have available. Just ensure it’s strong enough to handle multiple layers of fabric.
- How do I make the block larger or smaller?
To adjust the size of the Yankee Puzzle Quilt Block, simply increase or decrease the number of pieces or adjust the size of the individual squares and triangles.
Conclusion
In this article, we explored the steps to create a Yankee Puzzle Quilt Block – Pattern, from gathering the right materials to finishing the block with a quilt top. This pattern offers great versatility and can be customized to suit a variety of color schemes and personal styles. Whether you’re a seasoned quilter or just starting, the Yankee Puzzle Quilt Block is an exciting and rewarding project.
We hope this guide helps you in your quilting journey! Please leave a comment with your thoughts and suggestions, and don’t hesitate to share your own experiences with this beautiful pattern. Happy quilting!