The Cat quilt block – pattern is an adorable design that’s perfect for quilting enthusiasts who want to add a bit of fun and whimsy to their projects.
Whether you’re an experienced quilter or just starting, this pattern offers a playful way to incorporate the theme of cats into your quilts.
The beauty of this pattern lies in its simplicity, making it easy to follow while still yielding a stunning result.
It’s a great choice for anyone looking to make a quilt for a cat lover or create a unique, themed piece for a nursery or child’s room.
Cat-themed quilts are a timeless design choice, as they bring warmth, personality, and a touch of humor to any space. The Cat quilt block – pattern can be customized in numerous ways by choosing different fabric colors and patterns for each piece of the cat block. Whether you want a bright and colorful design or a more subdued, neutral one, the possibilities are endless. This article will take you through the steps of creating your own cat quilt blocks, offer tips for fabric selection, and provide inspiration for putting your blocks together.
If you’ve never worked with a Cat quilt block – pattern before, don’t worry! This guide is here to help you understand each step in the process, making it easy for you to create your own charming cat quilt. Let’s explore this delightful pattern and bring some feline fun into your quilting project.
1. Understanding the Basics of the Cat Quilt Block Pattern
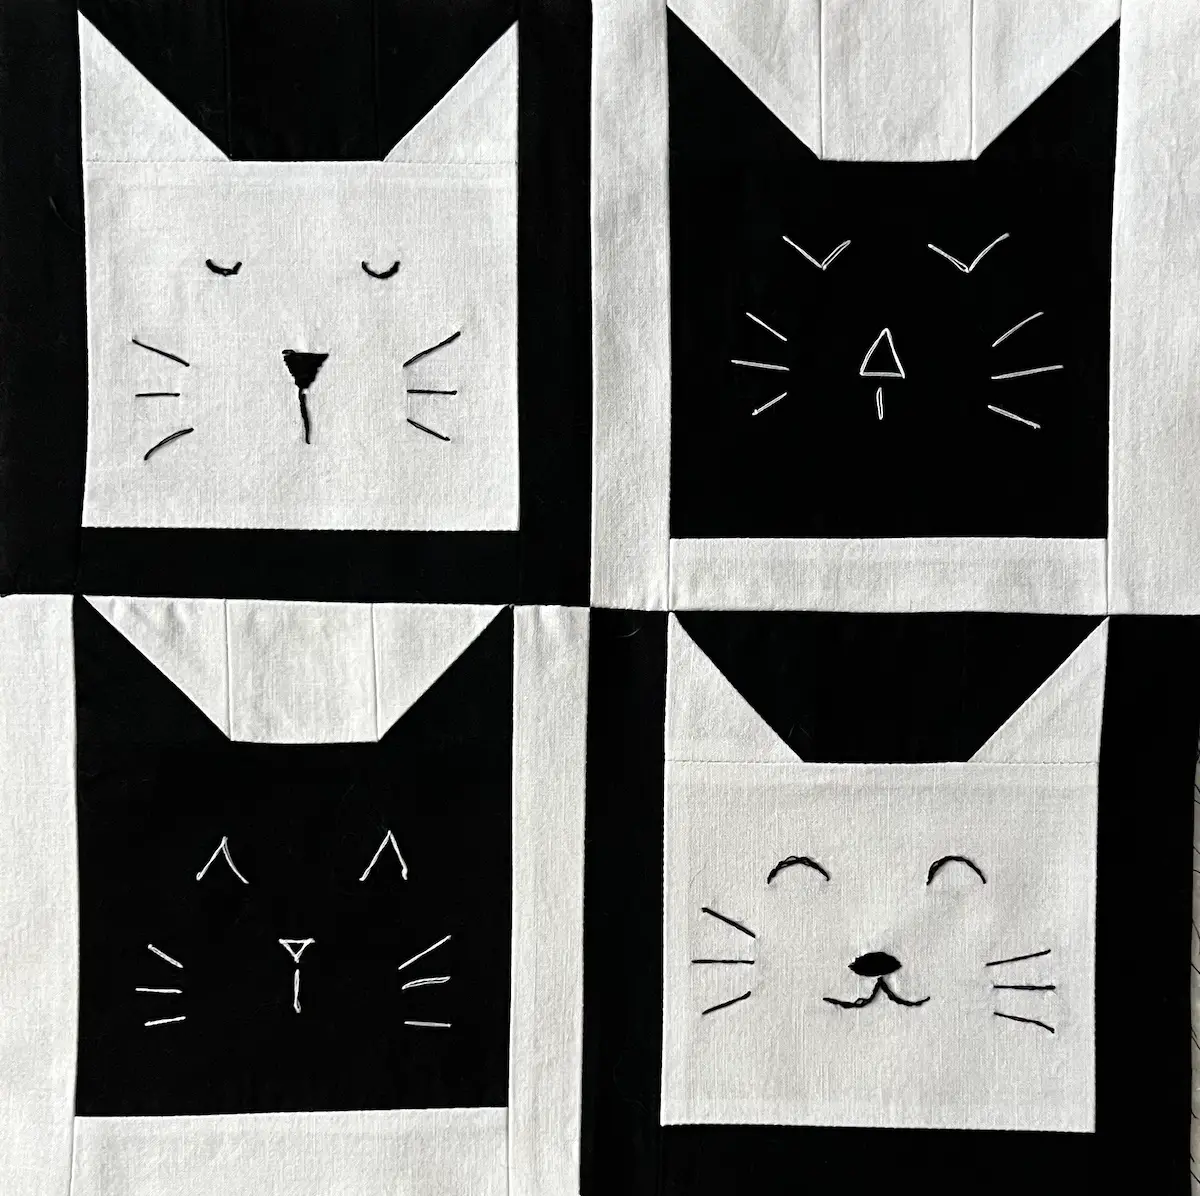
The Cat quilt block – pattern is made up of simple shapes like squares, triangles, and rectangles that come together to form the image of a cat. It’s a versatile design that can be adjusted for any skill level. This pattern is particularly ideal for quilters who want to add a bit of character to their quilts without getting overwhelmed by overly complicated designs.
At the heart of the Cat quilt block is the cat’s face, often depicted with ears, eyes, and whiskers. The simplicity of the design makes it easy to personalize the look of the cat by varying the fabric choices. For example, you can choose a fabric with a cute pattern for the cat’s body, or go for solid colors that make the block stand out.
The block itself is typically made up of a combination of piecing techniques and appliqué. Piecing involves sewing together smaller pieces of fabric to create a larger block, while appliqué is the process of stitching fabric shapes (like the cat’s face and ears) onto the quilt block. With this pattern, you can decide whether you want to do all piecing, all appliqué, or a combination of both, depending on your personal preference.
Once you understand the basic elements of the Cat quilt block – pattern, the next step is deciding how many blocks you’ll need to create the full quilt. This will depend on the size of your quilt and how large or small you want the cat blocks to be.
2. Materials Needed for the Cat Quilt Block
Before getting started with your Cat quilt block – pattern, it’s important to gather all the necessary materials to ensure a smooth and successful quilting experience. Below is a list of the basic supplies you’ll need:
Fabric
The fabric choices for your cat quilt block are one of the most exciting parts of the project. You’ll need fabric in several colors to complete the cat’s face, body, ears, and eyes. For the background, you can choose a neutral fabric or something that complements the cat’s design. You can use a variety of fabric types, including cotton, which is the most commonly used fabric for quilting projects due to its softness and ease of use.
Rotary Cutter and Mat
A rotary cutter is an essential tool for cutting your fabric pieces accurately. Pair it with a self-healing cutting mat to protect your surfaces and ensure clean cuts. This will help you achieve the precise shapes needed for the Cat quilt block – pattern.
Sewing Machine
A sewing machine is crucial for piecing together the different elements of the quilt block. If you don’t own a sewing machine, hand stitching can be an option, but using a machine will save you time and create even, consistent stitches.
Quilt Batting
To give your quilt blocks some body and thickness, quilt batting is used between the top layer of fabric and the backing. It provides warmth and softness to the quilt. You can find various types of batting, such as cotton or polyester, each offering different levels of thickness and comfort.
Thread
Choose thread that complements the color of your fabrics. It’s a good idea to select a thread that matches your background fabric so that stitches are less noticeable. A good-quality cotton or polyester thread will work well for quilting.
Quilt Ruler and Pins
Using a quilt ruler ensures that your fabric pieces are cut to the correct dimensions. Pins are helpful for holding the fabric pieces together while you stitch, especially if you’re doing appliqué work.
3. Step-by-Step Guide to Creating the Cat Quilt Block
Creating the Cat quilt block – pattern is a fun and rewarding project. Follow these simple steps to make your own adorable cat blocks for your quilt:
Step 1: Prepare Your Fabric Pieces
Start by cutting your fabric into the required shapes. For the cat’s face, you’ll need a square for the head, triangles for the ears, and smaller circles or ovals for the eyes. The body of the cat can be made from rectangular or square pieces of fabric.
If you’re doing appliqué work for the cat’s face, you’ll need to cut out shapes for the eyes, nose, and whiskers as well. These can be done using fusible webbing, which allows you to iron the fabric pieces onto your block before stitching them into place.
Step 2: Assemble the Cat’s Face
Once your fabric pieces are cut, begin by sewing the triangle pieces to the top corners of the head square to form the ears. If you’re using an appliqué method, you’ll need to iron the fabric pieces into place and then sew around the edges.
For the eyes and nose, you can either sew them directly onto the head square or use appliqué to attach them. Remember to leave space between the facial features for the whiskers, which can be stitched later.
Step 3: Attach the Body
Now, attach the body of the cat to the head. Depending on the design, the body can be a simple rectangular piece or a more complex shape. Sew the body to the bottom of the head square, making sure everything lines up neatly.
Step 4: Finish the Block
Once all the pieces are attached, finish off the block by adding any details like whiskers, paws, or a tail. This is a good time to use embroidery or hand stitching to add smaller details to the block.
Step 5: Press and Trim
Once the block is complete, press it with an iron to remove any wrinkles and to set the seams. Trim any excess fabric around the edges to ensure that the block is the correct size.
Step 6: Repeat and Assemble
Repeat the process to create multiple cat blocks for your quilt. Arrange the blocks in a pleasing layout, and then sew them together to form the quilt top. After all the blocks are sewn together, add quilt batting and a backing fabric, then finish the quilt by quilting and binding it.
4. Tips for a Successful Cat Quilt Block Project
Here are a few tips to ensure that your Cat quilt block – pattern turns out beautifully:
1. Choose the Right Fabric
Select fabric that complements the cat theme, and don’t be afraid to experiment with different patterns and colors. You could even use fabric with a playful or whimsical print for the cat’s body, such as a cat print fabric or something with paw prints.
2. Use Fusible Webbing for Appliqué
If you’re doing appliqué work, fusible webbing is a great tool to help your fabric pieces stick to the quilt block before sewing. This makes the stitching process much easier and cleaner.
3. Consider the Quilt Layout
Before you start sewing, lay out your blocks in different configurations to see what looks best. You can go for a traditional grid layout or try something more dynamic like a diagonal arrangement.
4. Add Embellishments
Adding small details like embroidery for the whiskers, buttons for the eyes, or even fabric paint for a textured effect can make your cat blocks stand out and add a personal touch.
5. Use a Consistent Seam Allowance
When piecing together your quilt blocks, make sure to use a consistent seam allowance. This ensures that your blocks are all the same size, which is crucial for the final assembly.
6. Take Your Time
Quilting is an enjoyable craft, so don’t rush the process. Take your time with each block, especially if you’re new to quilting, and enjoy the creative process.
FAQ: Common Questions About the Cat Quilt Block Pattern
Q1: Can I make a smaller or larger cat quilt block?
A: Yes! The size of the cat quilt block can be adjusted by altering the size of the individual fabric pieces. Just make sure that the proportions stay consistent.
Q2: Can I use hand stitching instead of a sewing machine?
A: Absolutely! Hand stitching works well for smaller projects or if you prefer a more traditional approach. However, a sewing machine will speed up the process.
Q3: How do I make my quilt blocks all the same size?
A: Be sure to measure and cut your fabric pieces carefully. Using a quilt ruler can help you achieve precise measurements, and always use a consistent seam allowance when piecing together your blocks.
Q4: What fabric is best for quilting?
A: Cotton is the most popular fabric for quilting because it’s easy to work with and comes in a wide variety of prints and colors. However, you can experiment with other fabrics, such as linen or polyester blends, depending on your preference.
Q5: How do I join the blocks together?
A: The most common method for joining quilt blocks is by sewing them together using a simple straight stitch. You can join them in rows and then sew the rows together to create the full quilt top.
Conclusion
The Cat quilt block – pattern is a delightful and creative project that allows you to bring some personality and charm to your quilting creations. By following the step-by-step instructions and using the right materials, you can create a beautiful and unique quilt that features adorable cat blocks. Whether you’re making a small wall hanging or a large quilt, this pattern is sure to bring joy to your quilting experience. We hope this guide has inspired you to start your own cat-themed quilt, and we’d love to hear your thoughts and suggestions in the comments below!