The Granny square in plaid crochet – pattern is a stunning way to bring together two timeless crochet elements: the traditional granny square and the classic plaid design.
Combining the simple, yet versatile granny square with the intricate plaid pattern creates a beautiful and cozy piece of art for your crochet collection.
Whether you’re working on a blanket, pillow, scarf, or even a bag, this pattern offers endless possibilities to showcase your crochet skills.
One of the most appealing aspects of this pattern is its versatility. You can play around with color combinations to create a unique design that suits your style, whether you want bold and vibrant colors or soft, muted tones. The Granny square in plaid crochet – pattern allows you to experiment with various plaid looks, making it a perfect project for both beginners and experienced crocheters.
If you’re already familiar with the classic granny square but want to try something fresh and exciting, the Granny square in plaid crochet – pattern is the perfect challenge. In this article, we’ll break down the steps to creating this beautiful design, explore tips for customizing the pattern, and share ideas on how to incorporate it into your projects.
1. What is a Granny Square in Plaid Crochet Pattern?
The Granny square in plaid crochet – pattern is a creative variation of the traditional granny square, incorporating plaid elements into the design. Instead of the typical multi-color stitches used in standard granny squares, the plaid crochet pattern relies on a series of horizontal and vertical color changes to mimic the familiar crisscrossed look of plaid fabric.
To make a Granny square in plaid crochet – pattern, you’ll need to work in rows rather than in the typical spiral, as you would with traditional granny squares. The key to the plaid effect is to switch colors in a way that creates the intersecting lines that define plaid fabric. The colors are often chosen to reflect the typical shades seen in plaid, such as red, black, and white or earthy tones like brown, green, and beige.
The shape of the square remains consistent with the classic granny square: typically a 4-round square, although you can adjust the size depending on the project you’re working on. The difference lies in how you incorporate the plaid pattern into each round. By creating horizontal and vertical lines through intentional color changes, you get a unique, textured design that adds depth and interest to your crochet work.
The Granny square in plaid crochet – pattern can be used for a variety of projects, such as blankets, pillows, or even clothing. The beauty of the plaid design lies in its ability to fit into many different styles, from rustic and cozy to more modern, geometric looks.
2. Materials Needed for the Granny Square in Plaid Crochet Pattern
Before you start working on your Granny square in plaid crochet – pattern, it’s essential to gather the right materials. Here’s a list of what you’ll need to ensure a smooth and successful crochet experience:
Yarn
Choosing the right yarn is crucial for any crochet project, and for this pattern, you’ll want a yarn that is easy to work with and holds color well. Worsted weight yarn is a great option for the Granny square in plaid crochet – pattern. It’s versatile, readily available in various colors, and has the perfect thickness for this project. You can also experiment with different types of yarn, such as cotton or acrylic, depending on the texture and feel you’re aiming for.
Crochet Hook
The recommended crochet hook size for worsted weight yarn is typically an H/8 (5mm) or I/9 (5.5mm) hook. However, always check the yarn label for guidance, as different yarns may require slightly different hook sizes.
Stitch Markers
While not essential, stitch markers can be very helpful in keeping track of your rounds and color changes, especially if you’re working on a large project. They can ensure your plaid pattern stays aligned and consistent throughout the squares.
Scissors and Yarn Needle
Once you’ve completed your squares, you’ll need scissors to cut the yarn and a yarn needle to weave in the ends. This step is essential to make sure your crochet work looks polished and neat.
Pattern Chart or Written Instructions
If you’re working from a Granny square in plaid crochet – pattern that you found online or in a crochet book, it’s always helpful to have a chart or written instructions on hand. Some plaid designs can be complex, so a clear visual guide will assist in following the steps and creating a consistent look.
3. Step-by-Step Instructions for Creating the Granny Square in Plaid Crochet Pattern
Creating the Granny square in plaid crochet – pattern is a fun and rewarding project that allows you to showcase your crochet skills. Below, we’ll walk through the process of making your first plaid granny square.
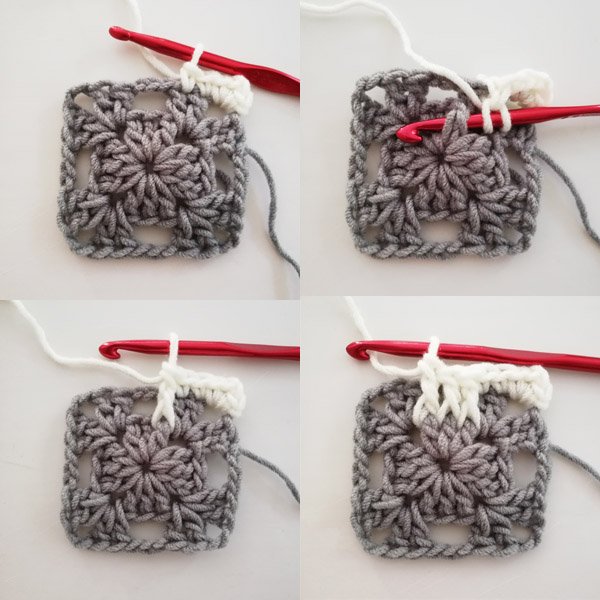
Step 1: Start with the Center of the Square
Begin by making a magic ring or a chain 4, then join to form a circle. This is the foundation for your granny square. For the first round, crochet a set of double crochet stitches into the ring. Typically, you’ll work around the ring to create a set of stitches that will form the basic square shape.
Step 2: Work the First Color
For the Granny square in plaid crochet – pattern, you’ll start by working with your first color. Crochet your double crochet stitches as usual, making sure to change color at the end of each round. For the plaid effect, the first round is often a solid color.
Step 3: Add the Horizontal Stripes
For the second round, you’ll begin adding the horizontal lines that create the plaid effect. To do this, crochet your stitches with your second color, but stop short of completing the stitch to allow for a color change. This method will result in the characteristic plaid lines.
Step 4: Work the Vertical Stripes
Now, it’s time to add the vertical plaid lines. Change your color again and crochet a new set of double crochet stitches, making sure to create vertical stripes that intersect with the horizontal ones from the previous round.
Step 5: Continue with Color Changes
Keep alternating between colors as you continue crocheting each round, following the pattern and adjusting the placement of the horizontal and vertical lines. By the end of your final round, your Granny square in plaid crochet – pattern should have a distinctive plaid design with alternating colors.
Step 6: Finish Off and Weave in Ends
Once your square is complete, finish off the yarn and weave in all the loose ends using a yarn needle. Be sure to trim any excess yarn for a neat finish.
4. Tips and Tricks for Perfecting the Granny Square in Plaid Crochet
Creating a Granny square in plaid crochet – pattern can be a bit challenging, but with the right techniques, you’ll be able to master it in no time. Here are some tips to help you along the way:
1. Choose Contrasting Colors
To make the plaid pattern stand out, it’s best to use contrasting colors for the horizontal and vertical stripes. Bold color combinations like red and black or blue and white can create a striking effect, but softer hues can give your square a more subtle, cozy look.
2. Keep Track of Your Color Changes
It’s important to track your color changes to keep your plaid lines uniform. Using a stitch marker to mark where each color change occurs can help maintain consistency in your design.
3. Use a Tighter Tension
For the plaid effect to come out clearly, try using a slightly tighter tension than usual. This will help your stitches stay crisp and defined, giving the plaid pattern a cleaner, more polished look.
4. Experiment with Different Plaid Sizes
Don’t be afraid to play around with the size of your plaid squares. You can make smaller squares for a more intricate design or larger ones for a bolder effect. Adjusting the number of color changes in each round can also impact the overall look of the plaid.
5. Combine Different Crochet Patterns
If you’re feeling adventurous, try combining the Granny square in plaid crochet – pattern with other crochet techniques, like shell stitches or popcorn stitches, to add texture and dimension to your work.
6. Practice Makes Perfect
As with any crochet project, practice is key. If your first few plaid granny squares don’t turn out exactly as you hoped, don’t get discouraged. Keep working at it, and you’ll soon perfect the technique.
FAQ: Common Questions About the Granny Square in Plaid Crochet
Q1: How do I make the plaid effect more noticeable in my granny square?
A: To make the plaid effect more noticeable, use high-contrast colors for the horizontal and vertical stripes. Additionally, working with a tighter tension can help make the stitches more defined.
Q2: Can I make a larger granny square with the same pattern?
A: Yes! You can adjust the size of the square by increasing the number of rounds. Just be sure to continue following the color change pattern for consistency.
Q3: How can I join multiple plaid granny squares together?
A: You can join your squares using various techniques such as whip stitch, slip stitch, or the mattress stitch. The most popular method is the whip stitch, which allows for a seamless join.
Q4: What other projects can I use the Granny square in plaid crochet for?
A: In addition to blankets and pillows, you can use this pattern to create bags, scarves, hats, or even wall hangings. It’s a versatile design that works for many types of projects.
Q5: Can I use this pattern for both small and large projects?
A: Absolutely! This pattern works well for both small projects like coasters or larger ones like blankets. Simply adjust the number of squares you make to suit your project.
Conclusion
The Granny square in plaid crochet – pattern is a fun and creative way to add a modern twist to the classic granny square design. By incorporating plaid elements into your crochet, you can create a piece that’s both beautiful and functional. Whether you’re making a cozy blanket, a cute pillow, or something else entirely, this pattern offers endless possibilities for personalization. We hope you’ve found this guide helpful and inspiring, and we’d love to hear your thoughts and suggestions in the comments!