The Crochet Pig Potholder – Pattern is a delightful way to add a touch of whimsy and charm to your kitchen.
Whether you’re an experienced crocheter or a beginner, creating this cute and functional potholder is a fun way to practice your skills while making something useful.
Potholders are essential kitchen accessories, and when they feature a fun design like a pig, they become even more enjoyable to use.
This Crochet Pig Potholder – Pattern is designed to be both practical and decorative, making it an excellent addition to your kitchen décor. The pig shape adds a playful element to an otherwise simple item, and the colors and textures you choose will allow you to personalize it to match your kitchen theme. Plus, since potholders are used regularly, this crochet project offers both a creative and functional result.
In this article, we’ll guide you step-by-step through the process of creating your own Crochet Pig Potholder – Pattern, from gathering materials to finishing the final product. We’ll also offer tips for customizing your potholder and answer some frequently asked questions to ensure your project goes smoothly. Let’s dive into the world of crochet and explore how to make this adorable pig potholder!
1. Materials Needed for the Crochet Pig Potholder
Before diving into the Crochet Pig Potholder – Pattern, it’s important to gather the necessary materials to ensure the process goes smoothly. Having the right tools and yarn will make the project more enjoyable and give you the best results.
Yarn
The yarn you choose plays a crucial role in the final outcome of your Crochet Pig Potholder – Pattern. Since potholders need to withstand heat and frequent use, opt for a durable, heat-resistant yarn such as cotton. Cotton yarn is highly absorbent, making it perfect for kitchen items like potholders. You can choose a solid color for a more classic look or experiment with various colors to make the pig design even more vibrant.
Crochet Hook
The size of the crochet hook you use will depend on the yarn you choose. For worsted weight cotton yarn, an H/8 (5mm) or I/9 (5.5mm) hook is a good choice. You want to use a hook that’s the right size to create tight stitches so the potholder can hold up to heat and wear. Check your yarn’s label for hook size recommendations to ensure a perfect fit.
Stitch Markers
Stitch markers will help you keep track of your rounds, especially when working on the pig’s head and body. Using a stitch marker at the beginning of each round helps maintain consistent stitch counts and ensures your potholder’s shape remains even throughout the project.
Scissors and Yarn Needle
Once you’ve finished crocheting your potholder, you’ll need scissors to cut the yarn and a yarn needle to weave in any loose ends. This is an important step to ensure that your potholder looks polished and doesn’t have any stray yarn sticking out.
Optional: Embellishments
To make your pig potholder even more adorable, you can add some embellishments like small black buttons for the eyes, a pink felt snout, or a loop at the top for easy hanging. These little details will give your potholder more character and charm.
2. Step-by-Step Instructions for the Crochet Pig Potholder
Creating a Crochet Pig Potholder – Pattern is a fun and straightforward project. Below are the steps you’ll need to follow to bring this cute creation to life.
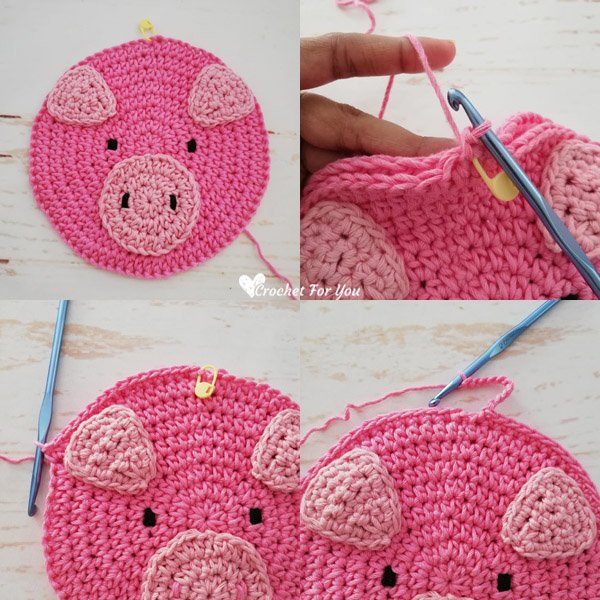
Step 1: Begin with a Circle
Start by crocheting a circle to form the body of the pig. To do this, make a magic ring, chain 2, and crochet several single crochet stitches into the ring. You will work in rounds to build the body of the pig, gradually increasing the number of stitches to expand the circle. Make sure to keep your tension consistent to ensure a nice, even round.
Step 2: Build the Pig’s Shape
As you continue to crochet in rounds, gradually increase the stitches to shape the pig’s body. Make sure to follow the pattern closely, increasing only when necessary to maintain the round shape. Once the body is complete, it’s time to start shaping the pig’s head.
Step 3: Create the Pig’s Snout
To create the pig’s snout, use a small amount of pink yarn and crochet a small circle. You can create the snout by crocheting a simple round shape, and then attach it to the front of the pig’s face. You can also stitch small nostrils onto the snout using a darker yarn color for added detail.
Step 4: Add the Ears
Crochet two small pig ears using pink yarn. These can be simple triangles, which you can then attach to the top of the pig’s head. The ears should be positioned symmetrically to give the pig a cute, balanced look.
Step 5: Finish the Body and Attach the Head
Once you have finished crocheting the snout and ears, you can complete the rest of the pig’s body. Continue working in the round until the body is the desired size. Attach the head to the body, making sure it is securely fastened and properly aligned. You can use slip stitches or a yarn needle to sew the head to the body.
Step 6: Add the Potholder Loop and Finish
The last step is to add a loop for hanging your potholder. Crochet a small chain and attach it to the top of the pig’s head, or create a separate loop at the back of the body. Once the loop is in place, weave in any loose ends, and your Crochet Pig Potholder – Pattern is complete!
3. Customizing Your Crochet Pig Potholder
One of the best things about crochet is the ability to customize your projects. The Crochet Pig Potholder – Pattern is no exception, offering plenty of opportunities for creativity. Here are a few ways you can personalize your pig potholder:
Experiment with Color Combinations
While traditional pigs are typically pink, you can experiment with other colors to make your potholder unique. Try using a pastel color scheme for a soft, charming look, or opt for bold, bright colors to make your pig stand out. You could even make a pig in different colors for each season or holiday.
Add Facial Features
Although the basic pattern includes a simple snout and ears, you can enhance the pig’s facial features by adding embroidered eyes, a mouth, or rosy cheeks. This will give the pig a more expressive and playful look.
Make It Larger or Smaller
If you want to make a larger potholder, simply add more rounds to the body and adjust the size of the snout and ears accordingly. Conversely, you can make a smaller potholder by reducing the number of rounds.
Use Different Textures
You can experiment with different crochet stitches to add texture to the pig. For example, you could use a bobble stitch for the pig’s cheeks to create a fun and tactile feature.
Personalize with a Name
To make your potholder even more unique, consider adding a name to it. You can stitch a name or a cute phrase onto the back or front of the potholder, creating a personalized gift for a friend or family member.
Add Accessories
To take your potholder to the next level, try adding little accessories like a bowtie, a flower, or even a tiny apron. These embellishments will make your Crochet Pig Potholder – Pattern even more charming and fun.
4. Tips for Success with the Crochet Pig Potholder
To ensure your Crochet Pig Potholder – Pattern turns out well, here are some tips for success:
1. Keep Your Tension Even
Make sure to maintain even tension throughout the project. Uneven tension can cause your potholder to become lumpy or misshapen. If you notice that your stitches are too tight or too loose, adjust accordingly.
2. Use a Cotton Blend Yarn
Cotton yarn is the best option for potholders because it is heat-resistant and durable. Consider using a cotton blend to ensure your potholder can withstand frequent use in the kitchen.
3. Pay Attention to the Pig’s Shape
When crocheting the pig’s head and body, be sure to pay attention to the shaping. If the pig looks uneven, gently adjust the stitches to create a symmetrical design.
4. Attach the Snout Securely
Make sure the snout is securely attached to the pig’s face. If it’s too loose, it could come undone with use, which would diminish the functionality of the potholder.
5. Block the Potholder
Blocking your potholder after finishing it can help even out the stitches and give it a polished, professional look. Gently steam or spray the potholder with water, then shape it and let it dry.
6. Choose a Strong Joining Method
When attaching the head, ears, and snout, make sure to use a strong joining method to prevent them from coming loose. Use a yarn needle and secure the pieces with a whip stitch or slip stitch for durability.
FAQ: Common Questions About the Crochet Pig Potholder
Q1: What is the best yarn for making a potholder?
A: Cotton yarn is the best choice for potholders because it is heat-resistant, absorbent, and durable.
Q2: Can I make this potholder in different sizes?
A: Yes, you can adjust the size of the potholder by adding or reducing the number of rounds in the body or snout.
Q3: How do I add facial features to the pig?
A: You can embroider eyes, a mouth, or use felt for the snout to add more detail to the pig’s face.
Q4: Is this pattern beginner-friendly?
A: Yes, this pattern is beginner-friendly, but it does require some basic knowledge of crochet stitches like single crochet, increases, and working in the round.
Q5: Can I give this potholder as a gift?
A: Absolutely! The Crochet Pig Potholder – Pattern makes an adorable and functional gift for anyone who loves unique kitchen accessories.
Conclusion
The Crochet Pig Potholder – Pattern is a fun and practical crochet project that adds a playful touch to your kitchen. By following the simple steps outlined above, you can create a charming pig potholder that is both cute and functional. Customize it with colors, facial features, and accessories to make it your own. Whether you’re a seasoned crocheter or just starting out, this pattern will bring joy to your crafting experience. If you’ve enjoyed this article, we’d love to hear your thoughts and suggestions! Please share your feedback in the comments.