The Butterfly Block is a stunning and timeless design that can bring a touch of elegance and charm to any quilting project.
With its intricate shapes and vibrant colors, this pattern adds both movement and grace to quilts, making it a popular choice for quilters of all skill levels.
Whether you’re creating a cozy lap quilt, a bedspread, or a decorative wall hanging, the Butterfly Block will surely make a statement.
The beauty of the Butterfly Block lies not only in its delicate butterfly shape but also in its versatility. It can be adapted to a variety of quilting styles, from traditional to modern, and can be used in various projects. This pattern allows quilters to explore different fabric combinations and color schemes, creating unique quilts that reflect their personal style. If you’re ready to dive into this beautiful design, this article will guide you through the essential steps of making a Butterfly Block .
Creating a quilt with Butterfly Block patterns can be a rewarding experience. From the initial planning stages to the final stitches, you’ll learn how to piece together each section of the block, choose the right fabrics, and assemble the quilt. By the end of this article, you will have a clear understanding of how to work with the Butterfly Block – Quilt pattern and how to incorporate it into your next quilt project.
1. Understanding the Butterfly Block Quilt Pattern
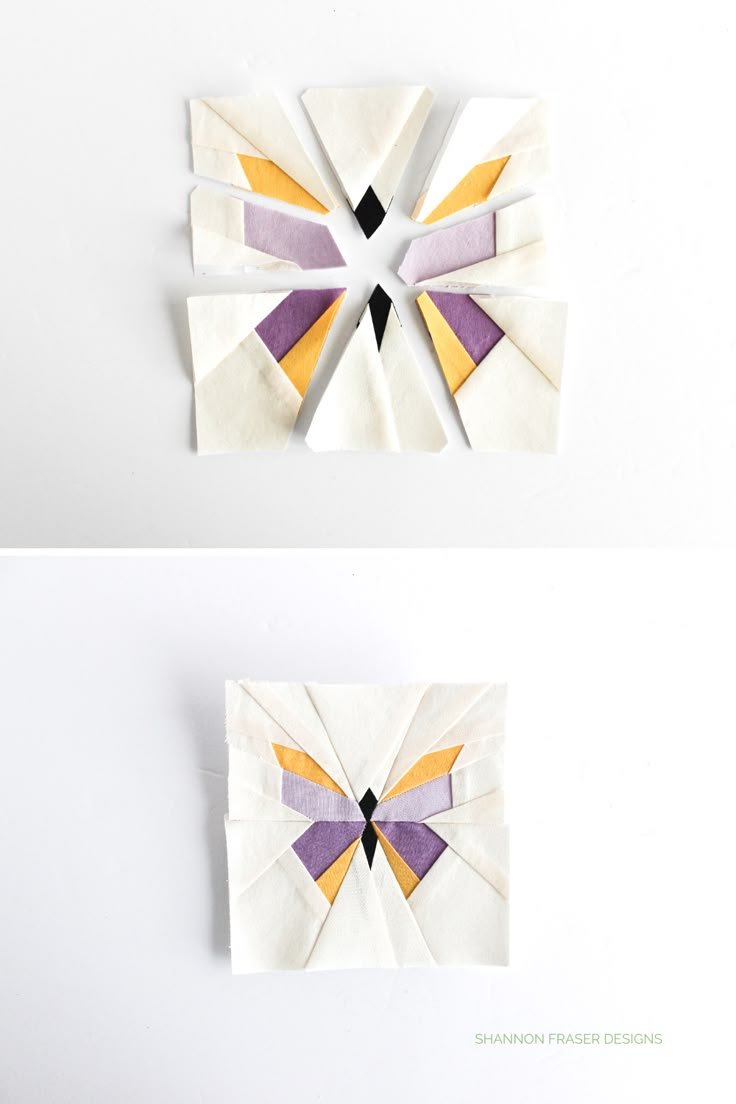
The Butterfly Block – Quilt pattern is a beautiful and symbolic design that features a butterfly shape made up of various geometric pieces. The block is typically constructed using a combination of half-square triangles, rectangles, and squares. These pieces come together to form the butterfly’s wings, with the body of the butterfly often made from a simple rectangle or a square in the center of the block.
The Butterfly Block is not only visually appealing but also a great way to practice basic quilting techniques. It offers a fun challenge for quilters looking to work with geometric shapes while still achieving a recognizable and elegant design. The blocks can be made in many different sizes, and the design can be customized by changing the colors and fabric patterns used in the wings and body.
One of the great things about the Butterfly Block is its flexibility. Whether you are making a single block for a decorative piece or combining multiple blocks to create a full quilt, the design works in both small and large-scale projects. This versatility makes it an excellent choice for a variety of quilting projects, from wall hangings to full-size quilts.
2. Materials Needed to Create a Butterfly Block Quilt
Before you can begin piecing together the Butterfly Block – Quilt pattern, it’s important to gather the right materials. Having the right tools and fabrics will ensure that your quilt is both beautiful and durable. Below is a list of the materials you’ll need to create your Butterfly Block:
- Fabric: The primary fabric for your quilt will include fabric for the wings, the butterfly body, and the background. Choose high-quality cotton fabric, which is ideal for quilting. For the butterfly wings, select contrasting fabrics to make the design pop. You can opt for vibrant colors, pastels, or even a mix of floral prints, solids, and patterns to give your quilt a unique touch.
- Rotary Cutter and Mat: A rotary cutter is essential for cutting fabric pieces accurately and efficiently. Pair it with a cutting mat to protect your work surface and ensure straight cuts.
- Quilting Ruler: A quilting ruler is an important tool for measuring and cutting your fabric pieces to the correct size. It will help you cut precise squares and triangles to form the butterfly’s wings and body.
- Thread: Use a high-quality quilting thread in a color that blends well with your fabrics. A neutral thread often works best to allow the fabric design to stand out.
- Sewing Machine: A sewing machine is necessary to stitch the pieces of the Butterfly Block together. Make sure to use a quarter-inch seam allowance, which is standard in quilting.
- Iron and Ironing Board: Pressing your fabric pieces as you go is essential for ensuring clean seams and a polished finish. An iron and ironing board are vital tools for this step.
Having all your materials prepared before starting will make the process much smoother. Now that you have your supplies ready, it’s time to dive into the step-by-step process of creating your Butterfly Block.
3. Step-by-Step Guide to Creating the Butterfly Block Quilt
Creating the Butterfly Block – Quilt pattern is a fun and rewarding process that requires precision and patience. Here’s a step-by-step guide to help you craft the perfect butterfly block for your quilt:
1. Cutting the Fabric
Start by cutting the fabric pieces for the Butterfly Block. You’ll need to cut triangles for the wings, squares for the body, and rectangles for any other parts of the design. Use your quilting ruler and rotary cutter to ensure each piece is the right size. The exact measurements will depend on the size of the block you are making.
2. Sewing the Half-Square Triangles
Next, you’ll create the half-square triangles that make up the butterfly’s wings. To do this, take two squares of fabric, place them right sides together, and draw a diagonal line across the center. Sew along both sides of the line, then cut along the line to create two half-square triangles. Press the seams open to create clean edges.
3. Assembling the Butterfly Wings
Once the half-square triangles are made, arrange them to form the top and bottom wings of the butterfly. Place the triangles next to each other, making sure they align to form the shape of the wings. Sew them together, pressing the seams after each step to keep everything aligned.
4. Adding the Butterfly’s Body
The body of the butterfly is usually made from a square or rectangular piece of fabric. Center it in the middle of your block. This piece serves as the center of your butterfly block and ties the design together.
5. Sewing the Block Together
Now, sew all the pieces of the Butterfly Block together. Start with the wings, and then add the body of the butterfly. Make sure each section aligns properly to create a symmetrical block. Press the seams as you go for a neat and professional finish.
6. Final Touches and Trimming
Once the block is fully sewn, trim any excess fabric to create clean edges. You can also square up the block if necessary, ensuring that the final result is even and neat. Your Butterfly Block is now ready to be incorporated into your quilt top.
4. Creative Ways to Use the Butterfly Block Quilt Pattern
The Butterfly Block is not only a beautiful quilting design but also incredibly versatile. Here are a few creative ways to use this pattern in your quilting projects:
- Wall Hangings: A quilt made with Butterfly Blocks makes for a stunning wall hanging. Choose fabric with bright and bold patterns to create a striking visual statement.
- Baby Quilts: The butterfly pattern is perfect for creating whimsical baby quilts. You can use soft, pastel fabrics and customize the quilt with playful designs that will appeal to little ones.
- Lap Quilts: A smaller version of the Butterfly Block can be used to create a cozy lap quilt. This is a perfect project for beginners or anyone looking to create a smaller, more manageable quilt.
- Table Runners: Add a touch of elegance to your dining room with a butterfly-themed table runner. Arrange the Butterfly Blocks in a line, adding borders to create a sleek, sophisticated design.
- Throw Pillows: Use the Butterfly Block design to make decorative throw pillows for your sofa or bedroom. This can be a quick and easy way to bring a fresh, lively touch to your home décor.
- Full-Size Quilts: Of course, you can always go big and create a full-size quilt with the Butterfly Block pattern. Mix and match different colors for the wings and background to create a quilt that truly reflects your personal style.
FAQ – Butterfly Block Quilt Pattern
1. What is a Butterfly Block Quilt pattern? The Butterfly Block – Quilt pattern is a design that features a butterfly shape made up of geometric fabric pieces. The pattern uses half-square triangles, squares, and rectangles to form the butterfly’s wings and body.
2. Is the Butterfly Block pattern suitable for beginners? Yes, the Butterfly Block – Quilt pattern can be adapted for beginners. Although it involves creating half-square triangles and working with multiple pieces, the design is relatively simple and a great way to practice basic quilting techniques.
3. Can I make a Butterfly Block with different fabrics? Absolutely! The Butterfly Block is highly customizable. You can choose different fabrics for the wings, body, and background to create a quilt that reflects your personal style.
4. How do I join the Butterfly Blocks together? You can join the Butterfly Blocks together using a variety of techniques, such as whip stitch, slip stitch, or the quilt-as-you-go method. Be sure to sew the blocks together with consistent seam allowances for a neat finish.
5. What size is the Butterfly Block? The size of the Butterfly Block depends on the measurements you choose for each piece. Typically, the block can range from 6 inches to 12 inches, but it can be adjusted to fit your desired quilt size.
Conclusion
In conclusion, the Butterfly Block is a beautiful, versatile design that adds a touch of elegance and creativity to any quilting project. Whether you’re making a baby quilt, a table runner, or a full-size bedspread, the butterfly block is a perfect choice for creating something special. By following the step-by-step guide and using the materials listed, you’ll be able to create stunning butterfly-themed quilts that are sure to impress.
We hope this guide has inspired you to try out the Butterfly Block – Quilt pattern in your next project. Please feel free to leave a sincere opinion and any suggestions you may have. Happy quilting!