The Lombard Curves Quilt – Pattern is an exquisite example of how traditional quilting techniques can be transformed into something modern and visually striking.
This pattern draws inspiration from curved lines, offering a dynamic and fluid design that adds elegance and movement to any quilt.
It’s a perfect project for quilters who want to experiment with curves and create something uniquely beautiful.
Quilting has been a craft that spans generations, and while many quilts rely on straight lines and geometric patterns, incorporating curves can breathe new life into your designs. The Lombard Curves Quilt – Pattern combines precise curvatures with traditional quilting, resulting in a quilt that not only looks stunning but also feels like a work of art. It’s a wonderful project for those looking to add variety to their quilting portfolio.
Whether you are a seasoned quilter or a beginner, understanding the Lombard Curves Quilt – Pattern will provide you with valuable skills and techniques to advance your quilting journey. In this article, we will explore the ins and outs of the Lombard Curves Quilt – Pattern, breaking it down into manageable steps, and offering tips and tricks for successfully tackling this beautiful design.
1. What Makes the Lombard Curves Quilt – Pattern Unique?
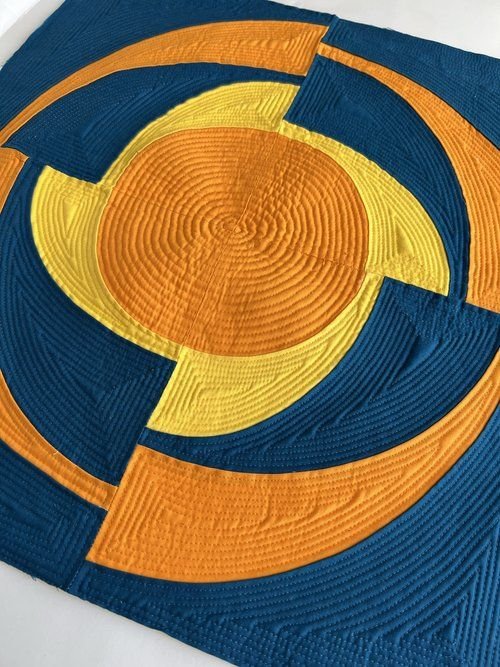
The Lombard Curves Quilt – Pattern stands out because of its use of graceful curves and the way these curves interact with the quilt’s overall design. Unlike traditional quilts with rigid straight lines or geometric shapes, the curves in the Lombard pattern offer a sense of fluidity and softness, making it perfect for creating more organic, free-flowing designs.
- Curved Piecing: The most notable feature of the Lombard Curves Quilt – Pattern is the curved piecing technique. Rather than sewing straight lines, quilters use a method known as “piecing curves,” which involves sewing together curved fabric pieces. This process requires a bit more precision but offers a fantastic visual result.
- Complementary Curves: The curves in the Lombard pattern complement one another, often creating a sense of movement across the quilt. This can make the quilt appear dynamic and filled with energy. These curves flow in different directions and often lead the viewer’s eye from one section to the next.
- Intricate Design: Unlike traditional block quilts, which are often made up of squares or rectangles, the Lombard Curves Quilt – Pattern incorporates intricate, rounded shapes. This level of detail brings a modern touch to an otherwise classic quilting technique.
- Symmetry and Balance: Despite the curvy lines, the Lombard Curves Quilt – Pattern is carefully designed to maintain symmetry and balance. The curved lines are arranged thoughtfully to create a cohesive design that is both harmonious and visually appealing.
- Variety in Fabric Choices: One of the advantages of working with curved patterns is the ability to play with different fabric combinations. You can create a stunning contrast by using bold colors or even introduce texture by using different types of fabric. The Lombard Curves Quilt – Pattern allows you to explore different fabric choices, making it versatile and customizable.
- Challenging but Rewarding: The Lombard Curves Quilt – Pattern is considered a more advanced technique because it requires careful cutting, stitching, and pressing. However, for those willing to embrace the challenge, the results are worth the effort. It’s a rewarding project that enhances your quilting skills while producing a beautiful finished product.
The uniqueness of the Lombard Curves Quilt – Pattern lies in how it combines elegance and complexity. It challenges quilters to step outside of their comfort zone, while offering a chance to create something truly remarkable.
2. How to Make the Lombard Curves Quilt – Pattern
If you’re excited to create your own Lombard Curves Quilt – Pattern, understanding the essential steps will help you along the way. While this pattern might look intricate, with the right instructions and a bit of patience, it’s entirely achievable.
- Choose Your Fabric: Start by selecting fabrics that will bring your Lombard Curves Quilt – Pattern to life. Opt for a variety of colors that complement each other. Some quilters prefer using a limited color palette, while others embrace bold, contrasting fabrics for a more dramatic effect.
- Cut the Curves: For this pattern, it’s important to carefully cut the fabric pieces to ensure that the curves are precise. Many quilters use a rotary cutter and quilting rulers to achieve clean, accurate curves. If you are using a template for the curves, make sure to follow the pattern’s instructions closely.
- Piecing the Curves: The key to a successful Lombard Curves Quilt – Pattern is mastering the technique of curved piecing. You’ll sew the curved fabric pieces together using a careful pinning and stitching technique. Take your time when aligning the curves to prevent puckering or uneven seams.
- Pressing Seams: Pressing the seams as you go is crucial in achieving a smooth finish. Press each seam carefully to set the stitches and ensure that the curves lie flat. Avoid pulling on the fabric, as this can distort the curve.
- Assembling the Quilt Top: Once the individual curved blocks are pieced together, you’ll begin assembling them into the quilt top. This is where you can play with the layout, experimenting with how the blocks are arranged. You may choose to align the curves in a uniform fashion, or you may prefer a more random arrangement.
- Quilting and Finishing: After assembling the quilt top, it’s time to quilt and finish your Lombard Curves Quilt – Pattern. Quilting can be done by hand or machine, depending on your preference. Once quilted, add the quilt backing and binding to complete your quilt.
The process of creating the Lombard Curves Quilt – Pattern may take time, but each step is rewarding, especially as the curves start to come together into a stunning design.
3. Tips for Perfecting Your Lombard Curves Quilt
Working with curves can be a bit tricky, but with some practice and a few helpful tips, you can perfect your Lombard Curves Quilt – Pattern and create a beautiful finished piece.
- Pinning Is Essential: When working with curves, pinning the fabric before sewing is essential. This will help ensure that the curves match up evenly and prevent any puckering in the fabric.
- Use a Walking Foot: If you are machine quilting, a walking foot can help guide the fabric through the machine evenly, especially when sewing curves. This foot is designed to prevent the fabric from shifting as you sew.
- Take It Slow: Curved piecing requires patience. Take your time and don’t rush through the process. Slow, steady stitching will give you the best results and help ensure that the curves are accurate.
- Practice First: If you’re new to curved piecing, practice on scrap fabric before beginning your quilt. This will help you get comfortable with the technique and build your confidence.
- Trim the Seams: After piecing the curves, be sure to trim the seams to reduce bulk. This will help the quilt lie flat and prevent any awkward lumps or bumps in the final product.
- Use a Good Iron: Pressing is just as important as piecing in the Lombard Curves Quilt – Pattern. Use a good iron with steam to press the seams flat. This will help set the stitches and ensure a neat, professional-looking quilt.
With these tips, you’ll be well on your way to mastering the Lombard Curves Quilt – Pattern and creating a piece you’ll be proud to display.
4. Common Challenges and How to Overcome Them
Like any quilting project, the Lombard Curves Quilt – Pattern can present challenges along the way. However, with the right approach, these obstacles can be easily overcome.
- Curves Not Matching: One of the most common challenges is when the curves don’t align properly. This can happen if the fabric is stretched during piecing. To avoid this, make sure to pin the curves carefully and sew slowly.
- Uneven Seams: Sometimes, the seams can end up uneven, especially if you’re new to curved piecing. If this happens, don’t be discouraged. You can use a seam ripper to carefully remove stitches and try again.
- Puckering Fabric: Puckering can occur if the fabric is pulled too tightly as you sew. To avoid this, use a gentle, consistent tension and avoid pulling on the fabric while stitching.
- Inconsistent Curves: If the curves aren’t as smooth as you’d like, practice is key. Try creating a few smaller test pieces to practice your curve-making skills before starting on your quilt top.
- Thread Tension Issues: Thread tension problems can affect the appearance of your quilt. If you’re experiencing tight or loose stitches, adjust your machine’s tension settings until you achieve the perfect stitch.
- Keeping Everything Flat: When working with curved pieces, it can be difficult to keep everything flat and even. Pressing as you go and trimming excess fabric will help you maintain a smooth and professional-looking quilt.
By addressing these common challenges with patience and attention to detail, you’ll find that working with the Lombard Curves Quilt – Pattern becomes a more enjoyable and rewarding experience.
FAQ
1. What is curved piecing in quilting?
Curved piecing is a technique in which fabric pieces with curved edges are sewn together. It’s used in quilts like the Lombard Curves Quilt – Pattern to create smooth, flowing shapes and designs.
2. Is curved piecing difficult for beginners?
Curved piecing can be challenging for beginners, but with practice, it becomes easier. Starting with small projects and using tips like pinning and pressing carefully can help.
3. Can I use any fabric for the Lombard Curves Quilt?
Yes, you can use any fabric, but it’s recommended to choose fabrics that are medium-weight and have a bit of give. Stiff fabrics may be harder to work with when piecing curves.
4. How do I make my curves more precise?
To make your curves more precise, take your time, use plenty of pins, and stitch slowly. It’s also helpful to practice on scrap fabric before working on your main project.
5. Can I machine quilt the Lombard Curves Quilt?
Yes, you can machine quilt the Lombard Curves Quilt – Pattern. A walking foot can be very helpful in ensuring even stitches when quilting curves.
Conclusion
The Lombard Curves Quilt – Pattern is an exciting project that allows quilters to explore the beauty of curved piecing. By following the steps outlined in this article and using the tips provided, you can create a stunning quilt that blends tradition with modern design. While it may present a few challenges, the end result is worth the effort. We’d love to hear your thoughts on this pattern, so please share your opinions and suggestions in the comments below!