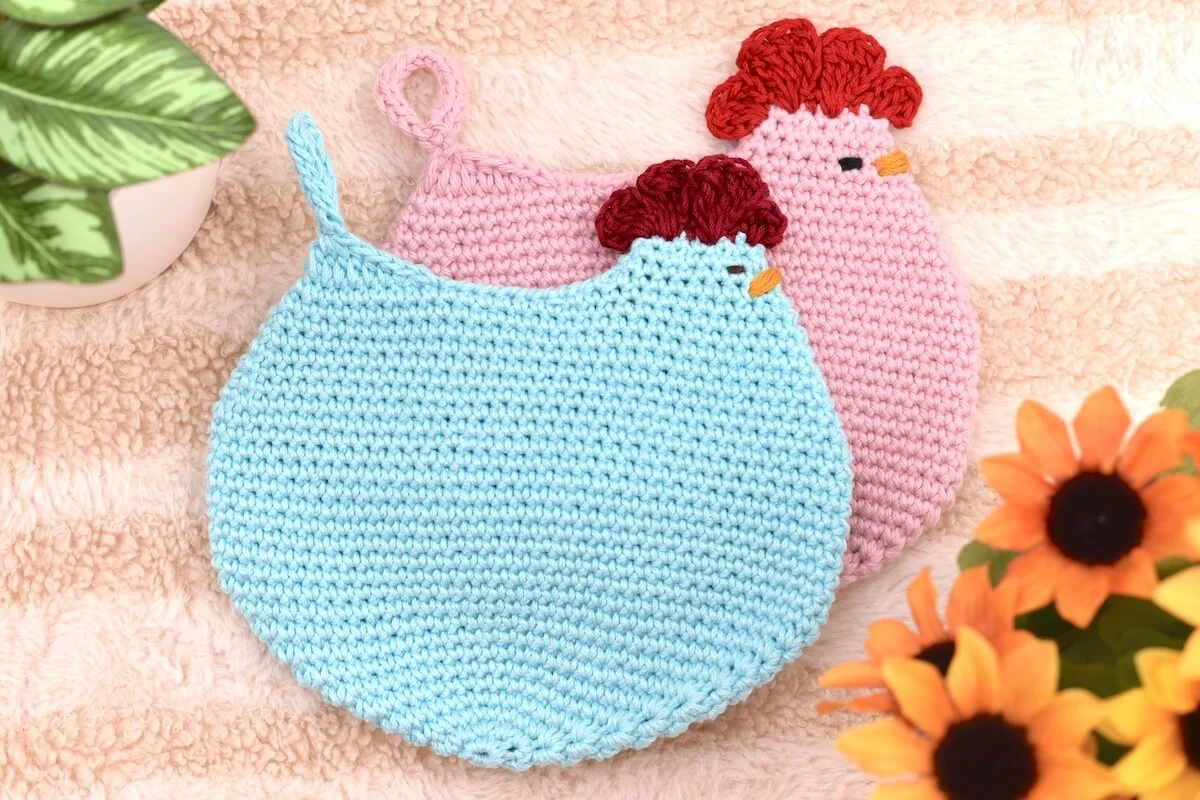
If you’re looking for a creative and fun way to add charm to your kitchen, this Crochet Chicken Potholder Easy – Pattern is just what you need.
Perfect for both beginner and experienced crocheters, this pattern combines functionality with farmhouse-style cuteness.
Not only is it a practical accessory for your cooking space, but it also makes a thoughtful handmade gift for friends and family who appreciate a touch of handmade flair.
The great thing about this easy crochet chicken potholder is that it doesn’t require advanced skills or complicated stitches. It’s a quick project that allows you to use up your yarn scraps and experiment with different color combinations. With its charming chicken design, it’s a great addition to your kitchen decor—especially if you’re into rustic, country, or farmhouse themes. Plus, potholders like this one are durable and reusable, which makes them an eco-friendly alternative to disposable heat protectors.
In this article, we’ll walk through every step of the Crochet Chicken Potholder Easy – Pattern, from the materials you’ll need, to the exact steps to follow, to fun ways to customize your chicken. Whether you’re making it for your own home or as a special gift, this is a project that is sure to bring joy and a smile to anyone’s face.
1. What You Need to Start the Crochet Chicken Potholder Easy – Pattern
Before diving into this project, make sure you have everything you need to complete your Crochet Chicken Potholder Easy – Pattern with ease. Having all your supplies ready beforehand makes the process smoother and more enjoyable.
Choose the Right Yarn
For potholders, cotton yarn is the best choice. It’s heat-resistant and durable, which is exactly what you want for a kitchen item. Avoid acrylic yarns, as they can melt when exposed to high heat. Opt for 100% cotton in your favorite colors to give your chicken a lively and farmhouse-inspired look.
Pick an Appropriate Hook Size
Most Crochet Chicken Potholder Easy – Patterns use a 4.0mm to 5.0mm crochet hook (US sizes G or H), which works well with worsted weight cotton yarn. If your stitches are too loose, consider using a smaller hook to ensure the potholder is thick and safe for handling hot pots.
Additional Tools
Make sure you have scissors, a yarn needle for weaving in ends, and stitch markers if you like keeping track of your rows. You might also want a measuring tape to ensure your potholder ends up the right size.
Safety Eyes or Embroidery Thread
To add personality to your chicken, you can use small safety eyes or embroider simple eyes using black thread or yarn. This adds a fun, finished look to your potholder.
Optional Lining
For added durability and heat resistance, you can sew a fabric lining to the back of your potholder. This is optional but highly recommended if you plan to use it frequently.
Stuffing (Optional)
If you’d like to make your chicken potholder slightly puffy or more decorative than functional, you can add a thin layer of stuffing inside before closing it up. However, if you’re using it to handle hot dishes, it’s best to keep it flat.
2. How to Crochet the Chicken Potholder: Step-by-Step Instructions
Now that you’ve gathered your materials, it’s time to start crocheting. The Crochet Chicken Potholder Easy – Pattern is typically worked in flat pieces and then sewn or crocheted together to form the final shape.
Step 1: Begin with the Body
Start by crocheting a circle or oval for the chicken’s body. This can be done by working in the round using single crochet (sc) stitches. As you continue, increase evenly in each round to keep your shape flat and wide enough to serve as a potholder. You can make the body two layers thick for added protection.
Step 2: Create the Comb and Beak
Once the body is complete, crochet the chicken’s comb and beak. These are usually small pieces made with basic stitches like chain (ch), single crochet (sc), or half-double crochet (hdc). The comb sits on the top of the head and the beak can be sewn near the center front of the face.
Step 3: Add Wings and Tail Feathers
The wings and tail are simple additions that can be crocheted separately and sewn onto the body. For a rustic farmhouse look, use natural tones like cream, brown, or tan. You can add texture by using shell stitches or picots for the feathers.
Step 4: Assemble and Decorate the Face
Attach the safety eyes or embroider eyes directly onto the top layer of the chicken body. Then, sew on the beak and any additional decorative features like a wattle or small bow tie. This is where your Crochet Chicken Potholder Easy – Pattern can really come to life.
Step 5: Add a Hanging Loop
To make it easy to hang your potholder, add a loop to the top of the head or on one corner. This can be done by chaining 10–12 stitches and securing it with a slip stitch. It’s both practical and decorative, especially if you plan to display your potholder when not in use.
Step 6: Join the Layers
Finally, if you made two body pieces, join them together using single crochet stitches around the edges. This makes your potholder thicker and more durable. Make sure to align all pieces carefully before joining, and leave an opening if you plan to add stuffing.
3. Customization Ideas for Your Crochet Chicken Potholder
One of the best things about the Crochet Chicken Potholder Easy – Pattern is how customizable it is. You can make each one unique by adding your own creative touches.
Choose Your Favorite Color Themes
Get playful with your color palette. Try using bright yellows and reds for a traditional barnyard chicken look, or go neutral with beige and white for a minimalist farmhouse vibe. Don’t be afraid to mix colors that complement your kitchen decor.
Add a Personal Touch
You can personalize your chicken potholder by adding initials, small hearts, or other embellishments. Use embroidery or small crochet appliqués to make your potholder one-of-a-kind.
Make Holiday Versions
Change up the color and accessories to match the seasons or holidays. Think red and green for Christmas, pastel tones for Easter, or autumn colors like orange and brown for Thanksgiving. It’s a fun way to decorate your kitchen year-round.
Use Different Textures
Add interest to your chicken by combining different stitch textures. Try alternating rows of single crochet and bobble stitches for the body, or use puff stitches for the wings. Texture not only looks great but also adds thickness for better heat resistance.
Create a Matching Set
If you enjoy this project, consider creating a full kitchen set with matching chicken-themed items. Make coordinating dishcloths, coasters, or even a tea cozy to go with your Crochet Chicken Potholder Easy – Pattern.
Turn It Into a Gift
Handmade gifts are always appreciated. Wrap up a few crochet chicken potholders with a jar of homemade jam or a fresh loaf of bread, and you’ve got the perfect farmhouse-style gift set for a friend or loved one.
4. Tips for Success and Safe Use of Your Crochet Chicken Potholder
While making the Crochet Chicken Potholder Easy – Pattern is straightforward, there are a few helpful tips and reminders to make sure your project is both beautiful and functional.
Use 100% Cotton Yarn
This can’t be stressed enough—cotton yarn is heat-safe and doesn’t melt like synthetic yarns do. Using the right material ensures your potholder will actually protect your hands from heat and last longer.
Make It Thick Enough
Double-layer your potholder or use thicker stitches to make sure it’s safe to handle hot cookware. You can also sew a heat-resistant liner between the layers for extra protection.
Secure All Pieces
When attaching the beak, comb, or wings, be sure they are sewn or crocheted on tightly. This prevents them from coming loose with use or after washing.
Wash Before Use
Give your finished potholder a gentle wash and block it before using it in the kitchen. This helps the yarn settle into place and ensures there are no loose fibers.
Keep It Flat
Avoid overstuffing or using high-relief stitches if you want the potholder to stay flat and functional. A puffy or heavily textured potholder may look cute but might not sit well under a hot dish.
Store Safely
Hang or store your chicken potholder away from direct heat sources like stove burners. It’s designed for short-term contact with heat, not prolonged exposure to flames or extremely hot surfaces.
FAQ
- Is the Crochet Chicken Potholder Easy – Pattern suitable for beginners?
Yes! This pattern uses basic stitches and simple shaping techniques, making it great for beginners who want to try their hand at functional crochet projects. - Can I wash the chicken potholder?
Absolutely. Use gentle detergent and cold water. Lay flat to dry to preserve its shape. If you used safety eyes, make sure they are securely attached before washing. - What kind of yarn should I use?
Always use 100% cotton yarn for potholders. It’s heat-resistant and durable, making it the safest choice for kitchen items. - How big should the potholder be?
A typical size is around 6 to 8 inches in diameter, but you can adjust the pattern to make it larger or smaller depending on your needs. - Can I sell potholders made from this pattern?
Yes, you can sell finished products made from the **Crochet Chicken Potholder
Easy – Pattern**, but it’s courteous to credit the original designer if you’re using someone else’s pattern.
Conclusion
The Crochet Chicken Potholder Easy – Pattern is a charming, practical, and fun project for crocheters of all levels. It brings together rustic farmhouse charm and kitchen functionality in a way that’s both delightful and useful. From gathering your supplies to adding those final details, this pattern offers a satisfying crochet experience that results in a beautiful handmade piece.
We hope you enjoyed this tutorial and found it helpful! If you’ve made your own chicken potholder, we’d love to hear how it turned out. Please leave a comment with your honest opinion or any suggestions to improve this guide. Happy crocheting!