The Log Cabin Quilt – Pattern is one of the most iconic and beloved quilt designs in history.
Known for its simple yet powerful layout, it has been passed down through generations and remains popular among modern quilters.
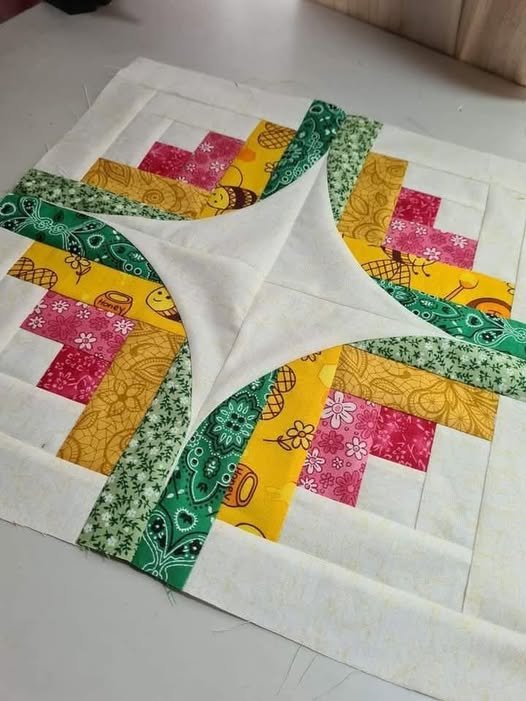
With its signature design—blocks composed of light and dark fabric strips radiating from a central square—the Log Cabin quilt tells a story with every stitch, often symbolizing warmth, home, and community.
This pattern is versatile, allowing for endless creativity in layout and color combinations. From traditional red centers symbolizing the hearth of the home, to modern minimalist renditions, the Log Cabin Quilt – Pattern adapts to every quilter’s style and skill level. Whether you’re making a cozy throw, a full-sized bed quilt, or a wall hanging, the Log Cabin offers structure, flexibility, and timeless beauty.
In this article, we’ll explore everything you need to know to create your own Log Cabin Quilt – Pattern masterpiece. From a deeper look at its rich history to essential materials, layout variations, and creative tips, this guide will walk you through the entire process. If you’re searching for a rewarding and nostalgic project, look no further.
1. The History and Symbolism of the Log Cabin Quilt – Pattern
The Log Cabin Quilt – Pattern has roots that go back centuries, with designs appearing as early as the 1800s in North America. Its name and layout are inspired by the architecture of early log cabins—small, strong, and centered around a hearth.
Traditionally, the center square of a Log Cabin block is red, representing the hearth or heart of the home. Surrounding strips, called “logs,” alternate between light and dark fabrics, symbolizing day and night, joy and hardship, or the duality of life. This subtle symbolism made the quilt more than just a blanket—it became a storytelling tool.
During the American Civil War, the Log Cabin Quilt – Pattern was also used symbolically. Some historians suggest that certain quilt patterns, including variations of the Log Cabin, were used to signal stops on the Underground Railroad. Quilts hanging on clotheslines may have been more than just drying linens—they were coded messages of safety and guidance.
Today, the pattern continues to resonate with quilters around the world, blending historical roots with contemporary creativity. Its structure allows quilters to express personal stories, themes, or moods through fabric choice and layout.
You’ll also find that the Log Cabin quilt has transcended borders, with variations appearing in cultures across Europe and Asia. Its universal appeal lies in its simplicity, flexibility, and deep connection to home and heritage.
Learning about the pattern’s history can deepen your appreciation for the art form and inspire you to make meaningful design choices in your own project.
2. Essential Materials and Tools for a Log Cabin Quilt
Creating a Log Cabin Quilt – Pattern starts with gathering the right materials and tools. While it’s one of the more beginner-friendly quilt patterns, preparation is key to achieving a polished final result.
First, you’ll need fabric in at least three categories: a center square color (traditionally red), a selection of light fabrics, and a collection of dark fabrics. These contrasts are what give the Log Cabin its striking visual design. Consider using fat quarters or jelly rolls for convenience and variety.
A rotary cutter and cutting mat are essential for accurately cutting your strips. Precision matters here, as uneven strips can throw off the symmetry of the entire quilt.
You’ll also need a quilting ruler for measuring and aligning your strips. A 6″ x 24″ ruler is ideal for strip cutting and squaring up blocks.
Choose a quality thread in a neutral tone that won’t show through your fabric. Cotton thread is a go-to for quilting due to its strength and compatibility with cotton fabric.
A sewing machine with a 1/4″ seam allowance foot is ideal, though you can also hand-piece if you prefer a traditional approach. Be consistent with your seam allowances to ensure that blocks align correctly.
Finally, gather your batting, backing fabric, and binding materials to complete the quilt. Depending on your quilt’s intended use (e.g., wall hanging vs. bed quilt), your batting thickness may vary.
3. Step-by-Step Construction of the Log Cabin Quilt – Pattern
Now let’s get into the fun part—making your Log Cabin Quilt – Pattern. The construction process is methodical and relaxing, making it a favorite among both new and seasoned quilters.
Start with the center square, usually 2.5″ x 2.5″ or 3″ x 3″. Sew your first strip (the shortest) to one side of the square, press it open, and continue adding strips in a clockwise or counterclockwise direction.
Each new “log” or strip is slightly longer than the previous one, creating a spiral effect. Alternate between light and dark strips to keep the contrast and definition between sections clear.
Once your block reaches the desired size—usually 12″ x 12″ finished—you can square it up using a ruler. Repeat this process for all blocks in your quilt. Most quilts are made with 16 to 64 blocks, depending on the size.
After all blocks are completed, lay them out and experiment with different layout variations like Barn Raising, Straight Furrows, Fields and Furrows, or Courthouse Steps (a variant of the Log Cabin).
Sew the blocks into rows, and then sew the rows together to complete the quilt top. Always press your seams as you go for a crisp, professional look.
Finally, layer your quilt top with batting and backing, quilt as desired (stitch-in-the-ditch is a popular choice for Log Cabin quilts), and finish with binding around the edges.
4. Creative Variations and Modern Takes
While the traditional Log Cabin Quilt – Pattern is beloved, quilters today are putting exciting modern spins on the design. Here are a few ways you can personalize and experiment with your own quilt.
Try a color gradient layout, where blocks gradually change from light to dark across the quilt. This creates a beautiful ombré or sunrise effect.
Use scrappy fabrics for a charming, eclectic quilt. Instead of matching light and dark fabrics, mix prints and textures for a unique, handmade look that feels warm and inviting.
Experiment with scale by using wider or narrower strips. Thin logs create a more intricate and refined look, while wider logs make a bold, graphic statement.
Incorporate modern quilting techniques like negative space, bold solids, or asymmetrical arrangements. Many modern quilters use white or grey backgrounds and high-contrast colors for a minimalist aesthetic.
Consider fussy cutting the center square or strip fabrics to feature specific prints or motifs. This technique adds personality and storytelling to your quilt blocks.
Add appliqué, embroidery, or labels to personalize your quilt. Whether it’s a message, date, or initials, these finishing touches can make your quilt an heirloom piece.
FAQ: Frequently Asked Questions About the Log Cabin Quilt – Pattern
Q1: Is the Log Cabin quilt good for beginners?
Absolutely. The Log Cabin Quilt – Pattern is considered one of the best starter patterns because it uses straight seams and repetitive construction. Just focus on accuracy and consistency with your cuts and seam allowances.
Q2: How many fabrics do I need for a Log Cabin quilt?
You’ll need at least one fabric for the center, a few light fabrics, and a few dark fabrics. More variety means more visual interest. Jelly rolls are especially handy for this pattern.
Q3: How large should each strip be?
Most quilters use 2.5″ wide strips, but you can adjust this depending on your desired block size. Just ensure consistency across your quilt for uniformity.
Q4: What are the most popular layouts for the Log Cabin?
Some classic layouts include Straight Furrows, Barn Raising, Chevron, and Courthouse Steps. Each layout dramatically changes the visual effect of the quilt.
Q5: Can I make a Log Cabin quilt without a sewing machine?
Yes, you can hand-piece a Log Cabin quilt. It takes more time but offers a deeply rewarding and traditional quilting experience.
Q6: How do I keep my strips from getting wavy or uneven?
Press each strip flat before adding the next one, and measure regularly to ensure consistent sizing. Using starch or pressing spray can also help maintain crisp seams.
Conclusion
The Log Cabin Quilt – Pattern is a true classic that combines structure with endless creative potential. Whether you’re preserving a tradition, telling your own story, or simply enjoying the calming rhythm of quilting, this pattern offers something for everyone. With just a few tools and some beautiful fabric, you can craft a quilt that’s rich in history and full of heart.
If this article helped you understand and get inspired to make your own Log Cabin Quilt – Pattern, we’d love to hear from you. Please leave a sincere opinion or share suggestions in the comments. Your feedback helps us grow and keeps the quilting community thriving!