The Tulip Quilt Block – pattern is one of the most charming and timeless designs in the world of quilting.
With its elegant floral shapes and vibrant color opportunities, it captures the essence of spring in every stitch.
Whether you’re an experienced quilter or just beginning your sewing journey, creating a quilt with this block can be both rewarding and creatively fulfilling.
Known for its graceful petal shapes and symmetrical design, the Tulip Quilt Block – pattern is versatile and perfect for various quilting projects—from baby quilts to wall hangings and full-size bed covers. This design brings life and warmth to any space, making it a favorite among quilters who want to add a floral touch to their handmade creations.
In this comprehensive guide, we’ll explore how to create the Tulip Quilt Block – pattern, what materials you need, variations of the design, and useful tips to make your quilting experience easier and more enjoyable. Whether you’re quilting for fun, gifting, or selling your work, this article will provide the foundation you need.
1. Understanding the Tulip Quilt Block – pattern
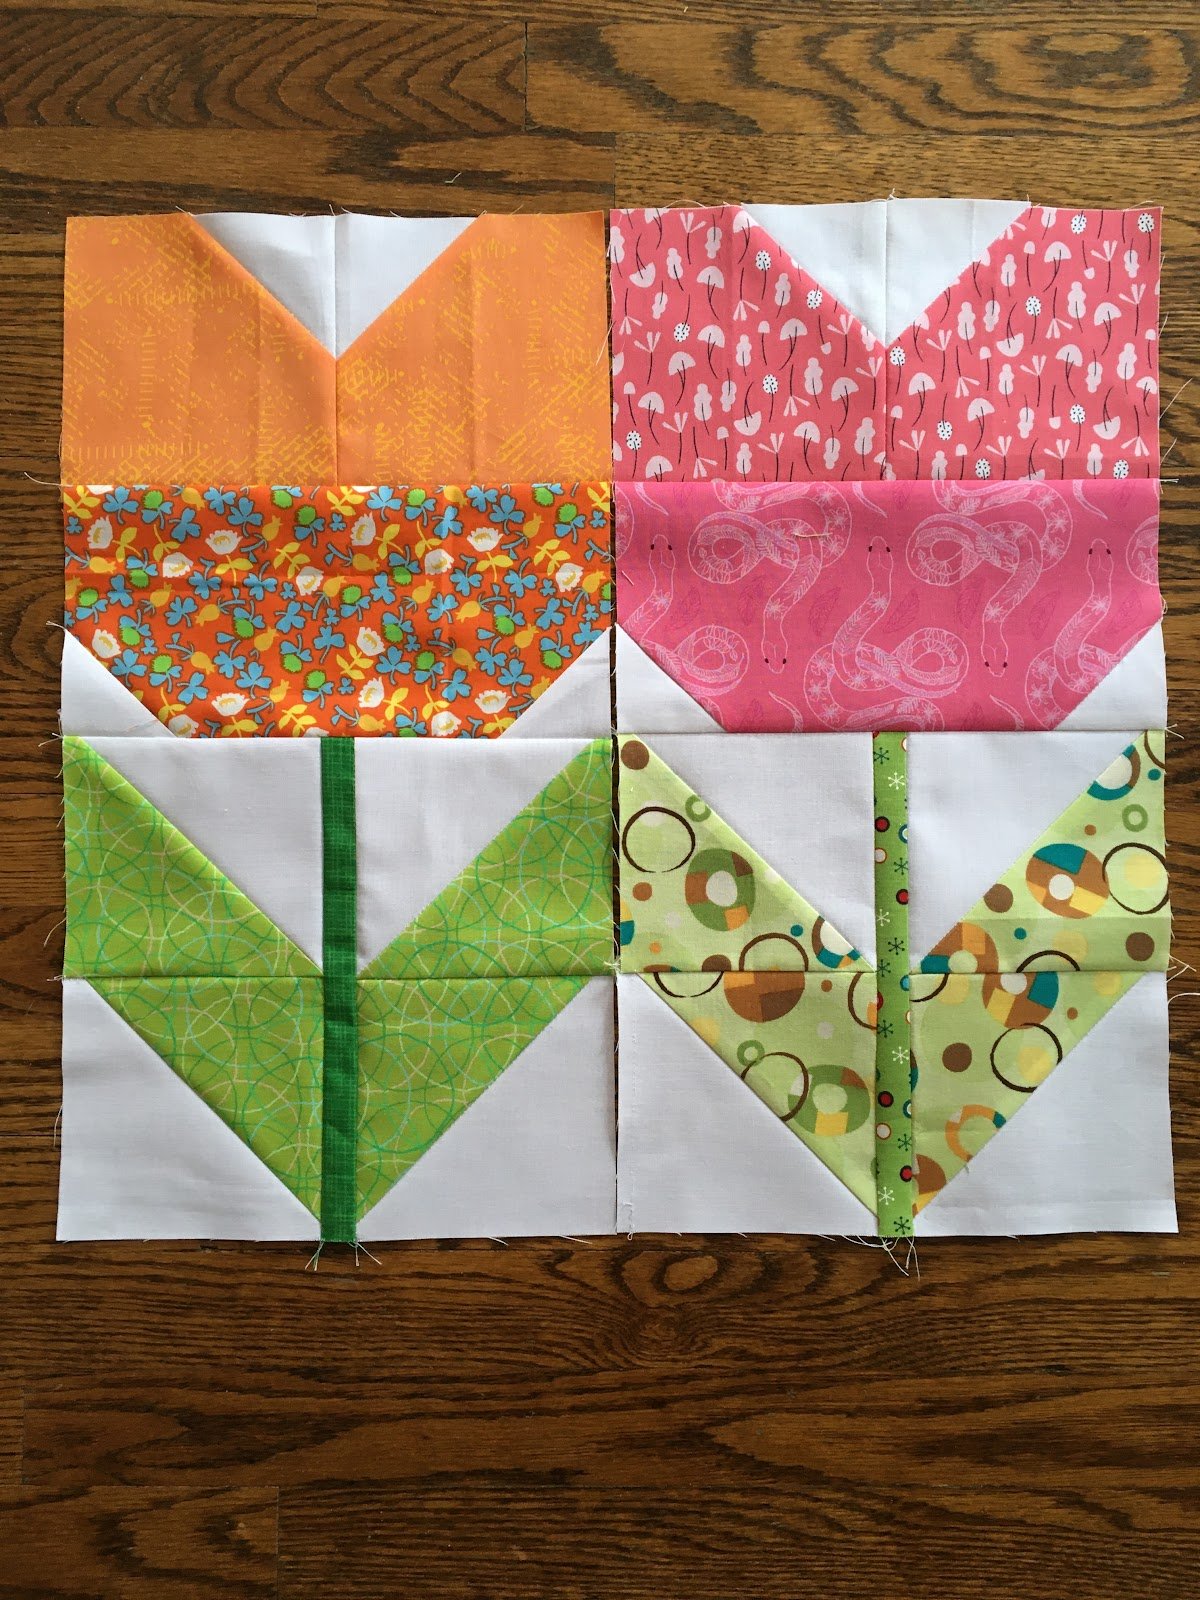
The Tulip Quilt Block – pattern typically features a stylized tulip flower made up of geometric shapes like squares, rectangles, and triangles. It’s a classic block with roots in traditional quilting but still feels modern thanks to its bold visual impact and endless customization options.
This block usually contains four main parts: the flower head, stem, leaves, and background. It’s often assembled using techniques like half-square triangles (HSTs) and flying geese units, which are popular in quilt construction.
There are multiple ways to piece this block, including traditional piecing, foundation paper piecing, and even appliqué for those who prefer more artistic freedom. Each method results in a unique version of the tulip, allowing for personalization through fabric choice and block arrangement.
Choosing fabrics for your tulip blocks is part of the fun. Bright reds, soft pinks, bold oranges, or even whimsical blues can represent the tulip, while green prints or solids are perfect for stems and leaves. Neutral or contrasting backgrounds help the flower stand out.
The size of the block can vary. Common dimensions range from 6” to 12” squares, though you can easily resize the pattern to fit your overall quilt design. Many patterns also offer layouts where several tulip blocks are arranged together to form a bouquet-like quilt top.
Because this pattern is both simple and elegant, it’s suitable for seasonal quilts (especially spring), gifts, or decorative accents. Even a single Tulip Quilt Block – pattern can be turned into a pillow cover, mini quilt, or framed textile art piece.
2. Materials and Tools You’ll Need
When beginning your journey with the Tulip Quilt Block – pattern, having the right tools and materials is essential for accuracy and satisfaction. Preparation is key to a smooth and enjoyable quilting experience.
Start with a rotary cutter, self-healing cutting mat, and a clear quilting ruler. These tools allow for precise cutting, which is crucial for clean seams and aligned blocks. An iron and ironing board will help you press your seams flat, improving overall block quality.
Next, gather your fabrics. Choose at least four: one for the tulip flower, one for the stem and leaves, and one or two for the background. Using 100% quilting cotton is ideal because it holds its shape well and is easy to sew.
You’ll also need coordinating thread, preferably cotton or polyester, and a sewing machine with a 1/4” foot, which helps maintain the standard seam allowance used in most quilt blocks.
If you’re using a printed Tulip Quilt Block – pattern, make sure you print it at 100% scale without resizing. Double-check that all templates or cutting guides match the measurements specified in your pattern instructions.
Optional tools include fabric marking pens, pins or clips, and a design wall or space to lay out your blocks before final assembly. These tools can help with planning your quilt layout and keeping pieces organized.
Finally, consider pre-washing your fabrics. This prevents shrinkage and color bleeding after your quilt is finished. It’s a small step that can save you trouble later, especially with vibrant or red-toned fabrics commonly used in tulip designs.
3. Piecing the Tulip Quilt Block – pattern
Now that you have everything ready, it’s time to start sewing your Tulip Quilt Block – pattern. There are many versions of this block, but we’ll outline a basic pieced version suitable for beginners and intermediates alike.
Start by cutting all your fabric pieces according to your pattern’s instructions. Typically, this includes squares and triangles that will make up the flower petals, stem, and background.
Begin assembling the flower portion by creating the petal units. These are usually made from half-square triangles, which involve sewing two fabric squares together diagonally and then cutting them apart. These give the petals their angled look.
Next, construct the stem and leaf portion. Often this involves narrower strips and a combination of half-square triangles and rectangles. The key is to maintain symmetry so your tulip looks balanced.
After assembling each section, press all seams to one side or open, depending on the complexity of the design. This helps the pieces lie flat and makes it easier to join them together.
Now, combine the flower top, stem, and background pieces into the final block. Take care to align corners and maintain your 1/4” seam allowance. Pinning can help prevent shifting as you sew.
Once your block is complete, give it a final press and check for square-ness. If needed, trim slightly to ensure all sides are even. Repeat this process to create additional tulip blocks for a larger quilt project.
4. Design Ideas and Creative Variations
The Tulip Quilt Block – pattern is highly adaptable, allowing for countless creative interpretations. You’re not limited to a single look—this block can reflect your unique quilting style and personality.
One idea is to create a monochrome quilt using different shades of a single color. This can give your tulips a soft, cohesive look while still offering visual interest through value changes.
For a more playful approach, use scrap fabrics to create tulips in every color of the rainbow. This works beautifully in children’s quilts or spring-themed wall hangings and makes each block a joyful surprise.
Mixing in other floral or geometric quilt blocks can also enhance your quilt. Try alternating tulip blocks with pinwheels, nine-patch blocks, or log cabins for a dynamic quilt top.
Consider using appliqué for the tulip flower while keeping the stem pieced. This hybrid technique adds texture and makes each block feel more artistic, especially if you use hand stitching or decorative machine stitches.
If you’re an advanced quilter, try a foundation paper pieced version of the tulip block. This method allows for ultra-precise points and modern, abstract shapes. It’s great for creating art quilts or gallery-style projects.
Finally, think about layout. You can rotate blocks, create diagonal rows, or add sashing and borders to give your quilt a polished, professional look. The Tulip Quilt Block – pattern works well in both traditional grid layouts and more contemporary, asymmetrical designs.
FAQ – Frequently Asked Questions
Q1: Is the Tulip Quilt Block – pattern good for beginners?
Yes, it’s an excellent pattern for beginners. Many versions use simple shapes like squares and triangles, making it approachable while still offering a beautiful result.
Q2: What size should my quilt blocks be?
Common block sizes are 6”, 9”, and 12”. You can scale the pattern based on your quilt layout, but ensure you maintain the correct proportions for the design to look right.
Q3: Can I use this pattern for a full-size quilt?
Absolutely. The Tulip Quilt Block – pattern can be repeated across an entire quilt. Just calculate how many blocks you’ll need based on your desired finished quilt dimensions.
Q4: What’s the best fabric to use for tulip quilt blocks?
100% cotton quilting fabric is ideal. It’s easy to work with and holds its shape well. Choose vibrant colors for the tulip petals and soft neutrals or greens for the stems and backgrounds.
Q5: Can I combine tulip blocks with other quilt block patterns?
Yes, mixing block patterns is a great way to personalize your quilt. Try combining tulip blocks with other floral or geometric blocks for added visual interest.
Q6: How do I keep my points and seams aligned?
Use a 1/4” foot on your sewing machine, press seams consistently, and pin carefully before stitching. Taking your time during assembly also helps maintain accuracy.
Conclusion
The Tulip Quilt Block – pattern is a delightful and rewarding project that combines creativity, tradition, and the joy of fabric artistry. Whether you’re crafting a cozy lap quilt or a decorative wall hanging, this floral block adds a touch of spring to any piece. We covered the essentials—from materials and assembly to creative ideas and expert tips—so you’re now ready to start your own tulip quilt.
We’d love to hear from you! Share your experiences with this pattern, offer tips of your own, or let us know what kind of quilting content you’d like to see next. Your honest feedback and suggestions help this community bloom like a field of tulips.