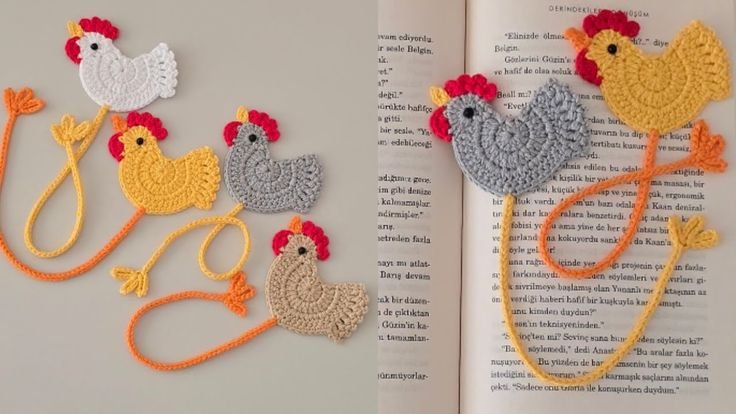
If you’re looking for a delightful, quick crochet project that’s both practical and adorable, the Crochet chick bookmark – Pattern is the perfect choice.
These bookmarks are not only great for marking your favorite pages but also make charming gifts, especially around Easter or springtime.
Crafted with simple stitches and bright yarn, these little chicks bring a smile to every reader’s face.
A handmade bookmark speaks volumes—it’s functional, thoughtful, and a fun way to showcase your crafting skills. The Crochet chick bookmark – Pattern is beginner-friendly and doesn’t require a lot of materials, making it an ideal stash-busting project. Whether you’re crafting for a child, teacher, or fellow book lover, this pattern is sure to be a hit.
In this article, we’ll guide you through everything you need to know to create your own crochet chick bookmark. We’ll cover materials, construction steps, customization options, and finishing touches. Whether you’re new to crochet or looking for a fresh project idea, you’ll find inspiration and clear instructions here.
1. Materials Needed for the Crochet Chick Bookmark
To begin crafting your Crochet chick bookmark – Pattern, you’ll need just a few basic supplies. This project is small in scale, which makes it fast and fun to complete—even in one sitting.
Start by selecting your yarn. Light worsted or DK weight yarn in yellow is perfect for the chick’s body. You’ll also need a bit of orange for the beak and feet, and black or safety eyes for the face. Acrylic or cotton yarn works well, depending on your preference.
You’ll need a crochet hook that corresponds with your yarn weight. For DK yarn, a 3.5mm to 4.0mm hook is usually ideal. A smaller hook will give you tighter stitches, which help maintain the bookmark’s shape.
Gather your notions: yarn needle for weaving in ends, scissors, stitch markers (optional), and safety eyes or black yarn for embroidery. Some crocheters like to add a ribbon tail or decorative charm—feel free to be creative!
If you’re giving this bookmark as a gift, consider having some cardstock and cellophane bags ready to package it nicely. Presentation goes a long way and adds a professional touch.
Before starting the actual pattern, it’s helpful to review basic stitches such as single crochet, slip stitch, and magic ring. These techniques are commonly used in small crochet projects and are the foundation of this pattern.
Lastly, clear a space to work and enjoy the process. One of the best parts of making a Crochet chick bookmark – Pattern is how relaxing and rewarding it is, especially once you see the cute chick come to life.
2. Step-by-Step Pattern Construction
Creating the Crochet chick bookmark – Pattern involves a few small components that come together to form the chick’s body and tail. Each part is crocheted separately and then sewn together.
Start with the chick’s head using a magic ring and single crochet stitches. Work in the round to create a small sphere. If you’re new to the magic ring technique, you can substitute with chain 2 and crochet into the first chain.
Next, crochet the body, which is slightly elongated compared to the head. The body should be flat enough to fit between book pages without damaging the spine or causing bulk.
For the wings and feet, use smaller pieces and minimal stuffing or no stuffing at all. Wings can be simple ovals attached to the sides of the body, while feet can be tiny “v” shapes or loops worked in orange yarn.
Attach a bookmark tail by creating a long chain (approximately 20–25 cm) that ends in a small heart, egg shape, or flower. This decorative tail peeks out from the book and adds extra charm.
Sew all the pieces together carefully with a yarn needle. Be sure the safety eyes are secure (or embroider them if giving to a child). Light stuffing can be used inside the head, but avoid overfilling to keep the bookmark flat.
Finish off by weaving in all ends, trimming excess yarn, and lightly blocking if needed. Your chick bookmark is now ready to be used or gifted!
3. Customization and Styling Options
One of the joys of working with the Crochet chick bookmark – Pattern is the ease with which you can personalize your design. These bookmarks are perfect for seasonal gifts, party favors, or themed book clubs.
Change the color scheme to match a favorite book or holiday. While yellow is traditional for chicks, pastel blues, purples, or pinks can work well for spring themes or to suit personal tastes.
Add fun accessories like a tiny bow tie, flower crown, or even a miniature graduation cap for a themed gift. These little details can make your bookmark even more special and personalized.
If you’re comfortable with embroidery, try adding a smiling face, rosy cheeks, or tiny eyebrows to give your chick more character. Facial expressions can drastically change the personality of your project.
Instead of a traditional yarn tail, attach a ribbon, lace, or beaded string. This is a great option if you want to make the bookmark even flatter and more elegant, especially for older readers.
Make a series of bookmarks using different animals! Once you’ve mastered the chick design, adapt the pattern to create a bunny, frog, or puppy bookmark using similar shapes and techniques.
Lastly, consider turning your chick design into a keychain or bag charm. With a few modifications to the tail, you can transform this project into a multipurpose accessory that kids and adults will love.
4. Tips for Gifting and Selling Crochet Chick Bookmarks
If you’re making Crochet chick bookmarks to give as gifts or sell online, presentation and attention to detail are key. These little items make excellent, marketable products when done thoughtfully.
Package your bookmark in a clear sleeve with a printed card behind it. Include your name, pattern inspiration, or a personal message. This adds value and a professional touch to your handmade gift.
For craft fairs or Etsy shops, offer bundles or themed sets (e.g., Easter trio, farm animals, or bookworm collection). Grouping bookmarks makes them feel more substantial and allows you to charge a higher price.
Include care instructions with your product. A simple note stating “Hand wash only. Lay flat to dry.” helps the recipient know how to maintain their new crochet gift.
Consider custom orders where buyers choose the color or add names. Personalization adds emotional value and makes your crochet work stand out from mass-produced items.
Stay organized with your pattern notes and yarn inventory. If you plan to make multiple chick bookmarks, having a template and material checklist will save time and ensure consistency.
Finally, take high-quality photos of your finished bookmarks in natural light. Capture close-up shots and images with books or props to show their size and purpose. Visual storytelling helps you connect with buyers.
FAQ – Crochet Chick Bookmark – Pattern
1. Is the Crochet chick bookmark beginner-friendly?
Yes! The Crochet chick bookmark – Pattern uses basic stitches like single crochet and simple shaping. It’s a great project for beginners looking to make something cute and quick.
2. What kind of yarn works best for chick bookmarks?
DK or light worsted weight yarn is ideal. Cotton yarn offers a firm finish, while acrylic is soft and forgiving. Choose yarn that holds shape well without stretching too much.
3. Can I sell bookmarks made from this pattern?
Yes, as long as the pattern you’re using allows for commercial use. Always credit the designer if required, and add your unique flair to stand out in the market.
4. How long does it take to make one chick bookmark?
Most crocheters can complete one in about 1 to 2 hours, depending on skill level. It’s a perfect evening project or weekend craft.
5. Is stuffing necessary in the bookmark?
A tiny amount of stuffing in the head is optional but not necessary. Avoid overstuffing, as you want the bookmark to remain flat between book pages.
6. What is a good tail length for the bookmark?
A tail of 20–25 cm is usually perfect for most book sizes. It’s long enough to mark your page but not so long that it tangles or gets in the way.
Conclusion
The Crochet chick bookmark – Pattern is a fun, heartwarming project that combines practicality with playful charm. With just a few supplies and some creative spirit, you can make a bookmark that brings joy to readers of all ages. Whether you’re creating a gift, stocking up for a craft fair, or just trying something new, this pattern is a delightful way to express your love for crochet and storytelling.
We hope this guide has inspired you to try your hand at making your own chick bookmark. If you’ve followed this pattern or customized it in any way, please share your honest opinion and suggestions in the comments below. Your feedback helps others in the crochet community and keeps the creativity flowing!