If you’re looking for a stylish and cozy DIY project, this Crochet Kimono – Pattern tutorial is just what you need.
A crochet kimono is a beautiful garment that combines the comfort of handmade fabric with a touch of bohemian fashion.
Whether you’re a beginner or an experienced crocheter, making your own crochet kimono allows you to customize color, fit, and texture while exploring your creative skills.
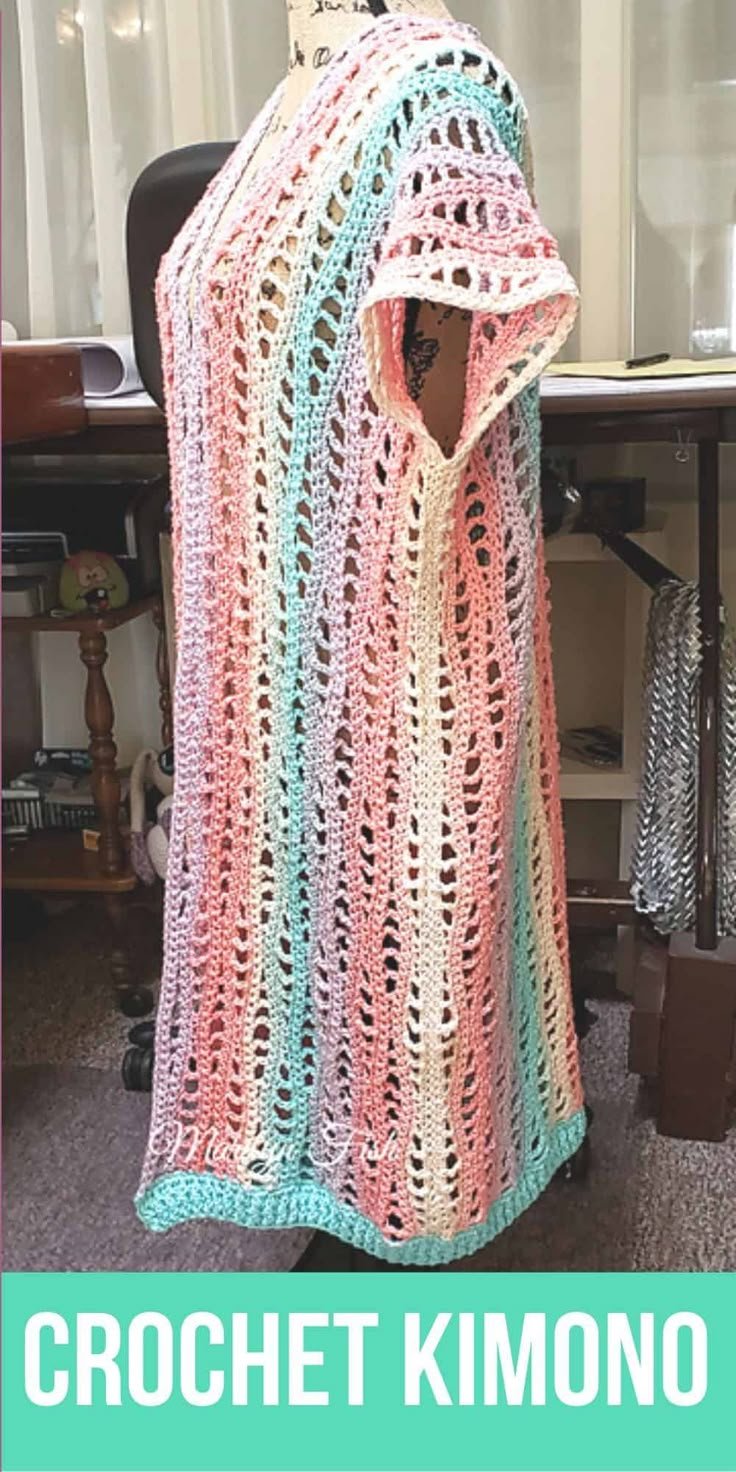
Wearing a handmade crochet kimono is not only fashionable—it’s meaningful. You get to wear something that you created with your own hands. These garments are versatile enough to be worn over swimsuits at the beach, layered with casual outfits, or even dressed up for a night out. Best of all, they can be made in any season using the right yarn and techniques.
In this comprehensive guide, you’ll learn how to choose the right yarn and tools, follow a crochet kimono – pattern, and personalize your creation to suit your style. With clear, structured steps and human-friendly instructions, this article is designed to be accessible, engaging, and optimized using Google AdSense-compliant SEO techniques.
1. Choosing the Right Materials for Your Crochet Kimono
The first step in creating your crochet kimono – pattern is selecting the right materials. This affects not just the appearance of your final piece but also its comfort, durability, and suitability for different seasons.
Start by choosing your yarn. For summer kimonos, opt for breathable yarns like cotton or bamboo. These fibers are soft and airy, making them ideal for warmer weather. For winter versions, consider using wool or acrylic blends to keep warm.
Next, think about color. Choose colors that complement your wardrobe or try something bold to make your kimono a statement piece. Variegated yarns can also add texture and dimension without much effort.
As for your crochet hook, the size depends on your chosen yarn. Most yarn labels recommend a hook size. However, you might want to size up slightly to achieve a loose, drapey fabric typical of a kimono.
You’ll also need other basic tools: scissors, stitch markers, a measuring tape, and a yarn needle for weaving in ends. Having these items on hand before you begin saves time and ensures a smooth workflow.
Don’t forget to swatch before starting. This means crocheting a small test square to check your gauge (how many stitches and rows per inch). It’s a simple step that helps ensure your kimono will fit as expected.
Lastly, choose a pattern that matches your skill level. Many free and paid crochet kimono – patterns are available online. Look for ones with clear instructions, photos, and sizing guides to make your journey easier.
2. Following the Crochet Kimono Pattern
Now that you’ve gathered your materials, it’s time to start following the crochet kimono – pattern. Understanding the layout of a typical kimono pattern will make the process much smoother.
Most crochet kimono patterns are constructed using rectangular panels. You’ll often make one large back panel and two front panels, which are later joined together. Some patterns also include sleeves, while others leave the arm openings loose and open.
Start by working the back panel. This is usually the largest piece. Follow the stitch instructions and row counts carefully. Use a stitch marker to help you keep track of the beginning and end of each row if you’re working in rows instead of rounds.
After the back, create the front panels. These are usually half the width of the back panel and of equal length. Again, maintain consistency in your stitch tension and row count to ensure both sides match perfectly.
If your pattern includes sleeves, they are often worked as separate rectangles and then attached later. Depending on the look you want, sleeves can be fitted or flowing. Take your time when attaching them to make sure they’re even and comfortable.
Once all panels are made, it’s time to assemble. Lay the pieces flat, then sew or crochet them together at the shoulders and sides, leaving armholes if your pattern requires. Use a yarn needle and matching yarn to seam them neatly.
Finally, many crochet kimono patterns include a border or edging. This is crocheted around the front openings and hemline for a finished look. Popular border stitches include single crochet, crab stitch, or picot edging.
3. Customizing Your Crochet Kimono
One of the most rewarding parts of working on a crochet kimono – pattern is the opportunity to personalize your creation. From stitch choice to fit and embellishments, there are endless ways to make your kimono unique.
Start by modifying the length. Want a dramatic, floor-length look? Add more rows to the back and front panels. Prefer something cropped or hip-length? Simply reduce the number of rows. Custom sizing ensures your kimono fits your body perfectly.
You can also experiment with different stitch patterns. While most beginner patterns use basic stitches like double crochet or half double crochet, more advanced kimonos may include lace, mesh, or textured stitches for a decorative effect.
Adding pockets is both stylish and functional. Crochet small square panels and attach them to the front sides. This can add personality and practicality to your design.
Color blocking or using gradient yarn can create beautiful visual effects. You can divide your panels into sections and switch colors, or use yarn that changes color gradually as you crochet.
Decorative elements like fringes, tassels, and embroidery are a great way to elevate your kimono. Add fringe to the hem for a boho vibe, or stitch some small floral patterns along the edges for a feminine touch.
Lastly, personalize your kimono by adding buttons, belts, or ties. These not only enhance the aesthetic but can also improve fit and versatility. A belt can give shape to an otherwise loose garment, allowing you to wear your kimono open or closed.
4. Caring for Your Crochet Kimono
After you’ve completed your crochet kimono – pattern, caring for it properly ensures it stays beautiful and functional for years to come. Handmade garments require a bit more attention than store-bought clothes, but it’s worth it.
The first rule of thumb is to check the yarn label. Each fiber type has different washing requirements. Cotton can usually be machine washed on gentle, while wool should be hand washed to avoid felting.
If in doubt, hand wash your crochet kimono in cold water using mild detergent. Gently squeeze (don’t wring) the fabric and lay it flat to dry. Avoid hanging it, as this can stretch the fabric out of shape.
To keep your kimono looking fresh, store it folded in a drawer or on a shelf. Avoid hanging it for long periods, especially if it’s heavy. If storing for a season, use a breathable fabric bag.
Over time, you may notice loose threads or small snags. Use a crochet hook to gently pull these back into place or secure them on the inside with a yarn needle. Regular maintenance will keep your kimono in top condition.
If your kimono needs reshaping, you can block it. This involves wetting the garment and laying it out flat, gently stretching it into shape. Pin it in place and let it dry completely before wearing.
With the right care, your handmade kimono can become a beloved wardrobe staple, lasting through countless wears and seasons. It’s one more reason why the crochet kimono – pattern project is so rewarding.
FAQ – Frequently Asked Questions
Q1: How long does it take to complete a crochet kimono?
A: For beginners, it may take 10–20 hours spread over several days. More experienced crocheters might finish in a weekend depending on the pattern complexity and yarn used.
Q2: Is a crochet kimono suitable for beginners?
A: Yes! Many patterns are beginner-friendly, using only basic stitches like double crochet and simple rectangular shapes.
Q3: What’s the best yarn for a summer kimono?
A: Lightweight, breathable yarns like cotton, bamboo, or linen are perfect for warm-weather kimonos.
Q4: How do I ensure my kimono fits properly?
A: Always make a swatch to check your gauge, follow pattern measurements carefully, and consider customizing panel lengths to suit your body.
Q5: Can I machine wash my crochet kimono?
A: It depends on the yarn. Most cottons are machine washable on a gentle cycle, but wool or delicate fibers should be hand washed.
Q6: Where can I find crochet kimono patterns?
A: Patterns are available on crafting websites like Ravelry, Etsy, or through free blogs and YouTube tutorials. Look for those that include sizing charts and photo guides.
Conclusion
In this complete guide to the Crochet Kimono – Pattern, we’ve explored every step of the process—from selecting the right yarn and tools, to following and customizing a pattern, and finally, caring for your finished garment. Whether you’re crafting for relaxation, fashion, or fun, a crochet kimono is a satisfying and stylish project.
You now have the knowledge and confidence to create a garment that’s not only beautiful but also uniquely yours. Crochet allows for endless creativity, and your kimono can be as simple or as elaborate as you like.
We would love to hear your thoughts! Please share your honest opinions and suggestions in the comments. What was your favorite part of the process? Did you customize your kimono? Your feedback helps us—and the crochet community—grow and improve!