The Flying Geese Quilt Block – Pattern is one of the most classic and versatile elements in traditional quilting.
Whether you’re a beginner exploring the basics or a seasoned quilter creating complex geometric designs, the flying geese block can add structure, motion, and visual interest to your quilt projects.
This timeless pattern is both functional and decorative, giving you endless creative potential.
Characterized by a triangle pointing upward, flanked by two smaller triangles forming a rectangular unit, the Flying Geese Quilt Block – Pattern represents not just precision but also elegance in simplicity. It is used extensively in borders, sashing, or to build more complex quilt patterns like stars or chevrons. Quilters appreciate how the design naturally guides the eye, making it perfect for adding directional flow to a quilt.
Throughout this article, we’ll explore what makes this block so beloved, how to construct it properly, creative ways to use it, and important tips for ensuring clean, crisp results. If you’re interested in improving your quilting skills while working with a historic and artistic pattern, the Flying Geese Quilt Block – Pattern is the perfect place to start.
1. Understanding the Flying Geese Quilt Block – Pattern
The Flying Geese Quilt Block – Pattern consists of a large triangle, called the “goose,” and two smaller triangles, known as the “sky.” When pieced correctly, the resulting unit forms a perfect rectangle that measures twice as wide as it is tall. This 2:1 ratio is what gives the flying geese block its distinct proportions and makes it a favorite in symmetrical and directional quilt designs.
One of the reasons this pattern has stood the test of time is its versatility. You can use flying geese units on their own or combine them with other blocks like half-square triangles or log cabins to create more complex layouts. The block lends itself well to repetition and symmetry, making it ideal for both minimalist and intricate quilts.
There are various methods to construct the Flying Geese Quilt Block – Pattern, including the traditional method, the no-waste method, and the stitch-and-flip method. Each technique has its advantages depending on your skill level and the final look you want to achieve. The no-waste method, for instance, is great for efficiency and conserving fabric.
One of the best things about this pattern is how well it adapts to both modern and traditional aesthetics. You can use bold colors and negative space for a modern quilt or stick to muted tones and floral prints for a vintage feel. Its adaptability ensures that this block never goes out of style.
The design is not just beautiful; it’s symbolic. Many quilters associate the Flying Geese Quilt Block – Pattern with freedom, guidance, and movement. The pattern, often used in Underground Railroad quilts, is said to have been a signal for the route north. Whether or not this is historically accurate, it adds a layer of storytelling that enriches the quilting experience.
Lastly, understanding this block sets the foundation for mastering other quilting techniques. From fabric cutting to accurate piecing and pressing, the skills learned with flying geese blocks transfer to almost every aspect of quilting.
2. How to Make a Flying Geese Quilt Block – Pattern
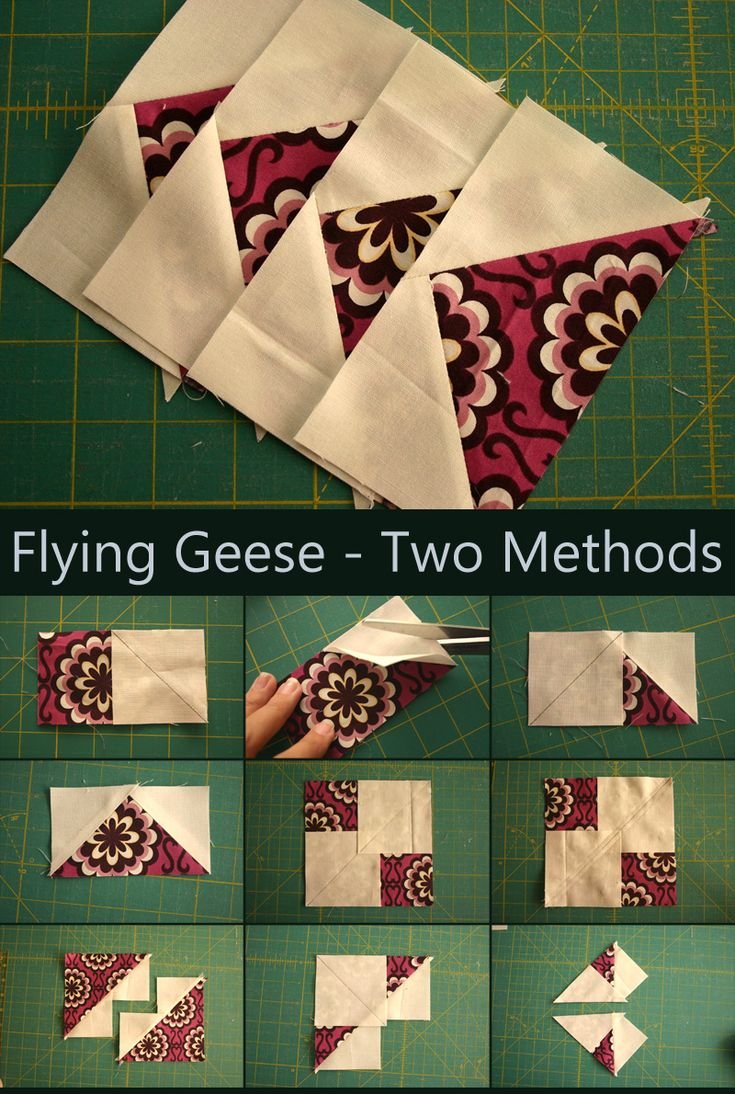
Creating a Flying Geese Quilt Block – Pattern can be a rewarding and straightforward process with a bit of practice. The most popular approach among quilters is the no-waste four-at-a-time method, which saves fabric and produces precise results. This method requires one large square for the “goose” and four smaller squares for the “sky.”
Begin by placing two smaller squares in opposite corners of the large square, right sides together. Draw a diagonal line through the smaller squares and sew a quarter inch on both sides of the line. Cut along the drawn line to create two units. Press the small triangles outward to form a heart-like shape.
Next, place another small square on each unit’s corner and draw another diagonal line. Sew a quarter inch on each side of this line, then cut along the line to reveal four perfect flying geese blocks. Press well, ensuring the blocks are flat and accurate.
Be sure to trim the blocks to size. The standard size is 2 inches high by 4 inches wide, but this can be scaled up or down depending on your project. Consistent trimming ensures that your blocks will align properly when sewn together.
For beginners, it might be helpful to start with the stitch-and-flip method. This involves sewing small squares onto the corners of a rectangle and trimming away excess fabric. While it’s not as fabric-efficient as the no-waste method, it’s easier for beginners to visualize and control.
Always press your seams carefully—whether open or to the side—depending on how the block will be assembled with others. Proper pressing ensures that your blocks lay flat, reducing bulk and making your quilt easier to assemble.
3. Creative Ways to Use the Flying Geese Quilt Block – Pattern
The beauty of the Flying Geese Quilt Block – Pattern lies in its flexibility. You can incorporate it into countless quilt layouts, from simple rows to dynamic, artistic arrangements. One of the most common uses is in borders, where flying geese units create a sense of movement and draw the viewer’s eye toward the center of the quilt.
You can also create full quilt tops using only flying geese units. Arranged in zigzag formations or mirrored patterns, these units can form striking chevrons or diamond effects. This works particularly well with high-contrast colors or gradient shading.
Many quilters enjoy using the Flying Geese Quilt Block – Pattern in sampler quilts. In these quilts, each block is different, showcasing a variety of skills and designs. The flying geese block fits beautifully into this context, adding both style and structure.
If you’re interested in wall art or mini quilts, flying geese make a fantastic design element. Their geometric appeal and clean lines can create modern or rustic looks, depending on your choice of fabric and color combinations.
Another popular idea is to incorporate these blocks into functional items like table runners, cushion covers, or tote bags. These smaller projects are a great way to experiment with the pattern without committing to a full quilt.
Finally, use flying geese units to create visual interest in larger star or medallion quilts. When placed around a central motif, these blocks add texture, depth, and a sense of energy to the overall composition.
4. Tips for Perfect Flying Geese Quilt Block – Pattern Every Time
Getting clean, accurate results with the Flying Geese Quilt Block – Pattern takes attention to detail. Start by cutting your fabric precisely. Use a rotary cutter, quilting ruler, and self-healing mat to ensure straight lines and perfect angles.
Use high-quality quilting cotton. Thicker or stretchy fabrics can distort easily, especially during pressing. Pre-wash your fabrics if you’re worried about shrinkage, and always press your fabric before cutting to avoid inaccurate measurements.
Chain piecing can help you sew multiple units efficiently. This technique not only saves time but also maintains consistency across blocks, which is crucial for larger projects where each piece needs to match.
Don’t skip trimming. Even if your blocks look fine, trimming ensures that they’re the exact size required, with clean edges and sharp corners. This makes it much easier to join blocks together with precision.
Starch can be a quilter’s best friend. Lightly starching your fabric before cutting helps prevent stretching and keeps pieces crisp during assembly. Just be careful not to oversaturate or iron too aggressively.
Finally, always test a few blocks before cutting fabric for your entire project. This gives you a chance to adjust for seam allowance or construction method and ensures that your Flying Geese Quilt Block – Pattern units will look perfect in the final piece.
FAQ – Flying Geese Quilt Block – Pattern
Q1: What is the ideal size for a Flying Geese Quilt Block?
The standard size is 2 inches high by 4 inches wide, but it can be scaled based on your project needs.
Q2: What’s the easiest method to make flying geese blocks?
The stitch-and-flip method is beginner-friendly, while the no-waste method is better for experienced quilters.
Q3: Why are my flying geese blocks coming out crooked?
This could be due to inaccurate cutting, inconsistent seam allowances, or pressing too hard.
Q4: Can I use pre-cuts like fat quarters or charm packs?
Yes, flying geese blocks can be made using pre-cuts, though you may need to adjust measurements.
Q5: How do I arrange flying geese in a quilt layout?
They can be laid out in rows, chevrons, diamonds, or incorporated into star and medallion blocks.
Q6: What is the no-waste method?
It’s a technique that allows you to make four flying geese units at once with minimal fabric waste.
Q7: Can flying geese blocks be made with paper piecing?
Yes, paper piecing can provide excellent accuracy, especially for smaller blocks.
Q8: How do I avoid fabric distortion?
Use starch, press carefully, and avoid pulling your fabric as you sew or iron.
Q9: What tools do I need?
Essential tools include a rotary cutter, quilting ruler, iron, cutting mat, and sewing machine.
Q10: What are common mistakes to avoid?
Common mistakes include inaccurate cutting, incorrect seam allowances, skipping trimming, and poor pressing habits.
Conclusion
The Flying Geese Quilt Block – Pattern is a cornerstone of quilting tradition. Its
classic structure, creative versatility, and symbolic beauty make it an essential pattern for quilters of all skill levels. From construction techniques to creative applications, mastering this block opens up endless design possibilities.
We hope this guide gave you the confidence and inspiration to try or refine your flying geese blocks. If you found this article useful, please leave your honest opinion and feel free to share your suggestions—we’re always looking to grow with the community!