If you’re looking for a bright, cheerful project to bring warmth into your crochet collection, the CROCHET GRANNY SQUARE SUNFLOWER – PATTERN is the perfect choice.
Combining the classic charm of granny squares with the beauty of sunflowers, this pattern is loved by beginners and seasoned crafters alike. Not only is it fun to create, but it also adds a touch of nature to your handmade pieces.
The CROCHET GRANNY SQUARE SUNFLOWER – PATTERN is ideal for various projects—from afghans and throw blankets to cushion covers and bags.
It’s a great way to practice color changes, layering techniques, and working in the round. Whether you want a cozy autumn-themed item or a summer-inspired design, sunflower granny squares are incredibly versatile.
In this guide, we’ll walk you through every step you need to create beautiful sunflower granny squares, including materials, instructions, variations, and practical uses. If you love crochet and want a pattern that’s joyful, easy to follow, and visually striking, this is the one for you. Let’s dive in and bring your garden of yarn to life.
1. Gathering Materials for Your Sunflower Granny Square
Before you begin your CROCHET GRANNY SQUARE SUNFLOWER – PATTERN, make sure you have all the necessary supplies. Choosing the right yarn and tools will make the process smoother and the final result more beautiful.
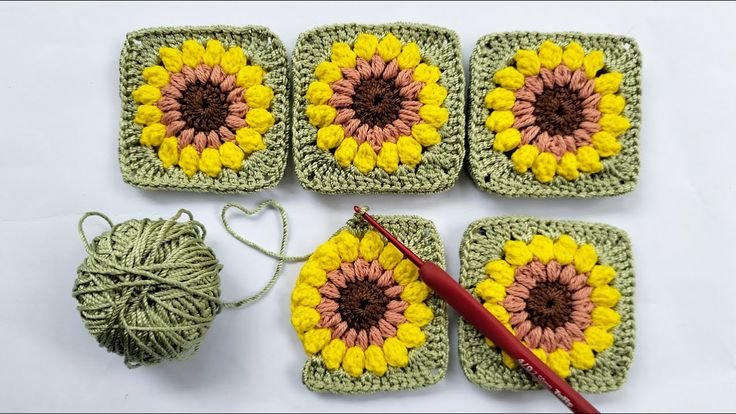
Start with yarn selection. For a traditional sunflower look, choose three colors: dark brown for the center, golden yellow for the petals, and green or cream for the background. Use medium weight (worsted) yarn, as it offers the right balance between stitch definition and ease of use.
Use a crochet hook size that matches your yarn. For worsted yarn, a 5.0 mm (H-8) hook works well. However, always check the yarn label for guidance and make a small swatch to ensure a comfortable stitch tension.
You’ll also need basic crochet tools: scissors, a yarn needle for weaving in ends, and stitch markers if you’re new to crocheting in the round. An optional blocking mat will help you shape your finished squares uniformly.
Keep a printed or digital version of your pattern instructions nearby. While the sunflower granny square is relatively simple, having step-by-step guidance is helpful, especially for beginners or when adjusting colors.
Choose a comfortable, well-lit space to work in. Crocheting sunflower petals can involve working into chain spaces or tight stitches, so good lighting helps reduce strain and improves accuracy.
Finally, prepare for creativity. Feel free to experiment with colors beyond the classic sunflower palette. Using pinks, purples, or blues for petals can give your square a unique twist while keeping the flower motif alive.
2. Step-by-Step Instructions for the Pattern
Now that you’re set up, it’s time to start crocheting your CROCHET GRANNY SQUARE SUNFLOWER – PATTERN. This square is created in layers: the flower center, the petals, and then the square base. Each round adds depth and structure to your design.
Begin by forming a magic ring or chaining four and joining into a ring. This is where your flower center will go. Use your dark brown yarn and work double crochets (dc) into the center to form a tight circle. Typically, you’ll create about 12 dc to start.
Next, switch to your yellow yarn for the sunflower petals. These are usually formed by chaining a small number of stitches (like chain 3 or 4), then making a combination of half-double and double crochets into the same stitch to create a petal shape. Repeat this around the circle.
After completing the petal round, join with a slip stitch and fasten off the yellow yarn. The result should look like a complete flower. Don’t worry if the petals curl slightly—this gives the flower texture and charm.
Now it’s time to square off the circle to form the granny square base. Attach your background color yarn into a space between petals and begin working chain spaces and double crochets in a traditional granny square layout. This will involve increasing at the corners to keep the square shape.
Continue for as many rounds as you’d like, depending on how large you want your sunflower square to be. For a more open, lacy look, keep the number of rounds small; for a fuller square, add a few extra rounds.
Finish by fastening off your yarn and weaving in all loose ends with your yarn needle. Block your square by pinning it to a flat surface and misting lightly with water. Allow it to dry to set the shape.
3. Creative Variations and Design Ideas
The CROCHET GRANNY SQUARE SUNFLOWER – PATTERN is highly adaptable, giving you the opportunity to play with textures, stitches, and color schemes. Whether you’re making one square or a full project, these variations can spark new inspiration.
Try using textured yarn such as a boucle or lightly variegated yarn for the petals to add a more natural, organic feel to your sunflower. The added texture mimics the softness of real flower petals and creates visual interest.
Use different stitch combinations to add depth. Instead of using standard double crochets for the center, try working front post double crochets to give a raised, dimensional effect that pops against the petals.
Vary the background colors for each square if you plan on joining multiple granny squares. This creates a dynamic patchwork appearance that can be especially beautiful in large-scale projects like throws or bedspreads.
Incorporate beads or embroidery to add extra detail to the flower’s center or petals. Just be sure that any embellishments are securely attached, especially if your project will be handled or washed frequently.
Play with size scaling. Use smaller hooks and finer yarn for tiny sunflower squares that can be made into coasters or embellishments, or use bulky yarn and a larger hook for oversized flower motifs that make bold decorative statements.
Finally, consider mixing your sunflower square with other floral or geometric granny square patterns. This allows you to create themed quilts or blankets with a variety of motifs while still keeping a cohesive overall look.
4. Projects You Can Make with Sunflower Granny Squares
Once you’ve mastered the CROCHET GRANNY SQUARE SUNFLOWER – PATTERN, you can use it in countless creative ways. This is not just a decorative square—it’s a building block for beautiful, functional handmade items.
Create a sunflower blanket by joining multiple granny squares. Alternate the sunflower blocks with solid-colored squares to create visual contrast, or place them in a repeating grid for symmetry.
Make decorative pillows by stitching together four or more sunflower granny squares. Back them with a soft fabric or another crochet square, add a zipper or buttons, and stuff with a pillow insert for a unique home accessory.
Craft market bags or totes by sewing squares together and adding sturdy handles. Lined with fabric, these sunflower-themed bags are great for groceries, books, or gifts and add a handmade touch to everyday life.
Turn your sunflower square into a wall hanging or art panel. Attach a single finished square to a wooden frame or embroidery hoop, and hang it in your kitchen, hallway, or workspace for instant charm.
Make seasonal table runners by connecting a row of sunflower granny squares. Perfect for fall or summer decor, these pieces bring warmth and color to your dining table or coffee table.
Even clothing can benefit from sunflower squares! Add them as pockets or accents on cardigans, vests, or skirts for a pop of color and handmade detail that stands out in the best way.
Frequently Asked Questions (FAQ)
Q1: Is the CROCHET GRANNY SQUARE SUNFLOWER – PATTERN beginner-friendly?
Yes! It uses basic stitches like chains, double crochets, and slip stitches. With a little practice, even a beginner can follow this pattern successfully.
Q2: How long does it take to make one sunflower granny square?
Depending on your speed, it usually takes between 30 minutes to 1 hour per square. This makes it a great project to do in small sessions.
Q3: Can I use different colors for the sunflower petals?
Absolutely! While yellow is traditional, you can use any color that fits your aesthetic. Pinks, purples, and even pastels work beautifully.
Q4: How do I join multiple sunflower squares together?
You can use the slip stitch join, whip stitch, or continuous join-as-you-go method. Choose based on how visible or invisible you want the seams to be.
Q5: What can I do if my square is curling or not flat?
Blocking your square can help reshape it. Pin it to a foam board or blocking mat, mist with water, and let it dry naturally to hold its shape.
Q6: Is this pattern suitable for yarn scraps?
Yes! Sunflower squares are perfect for using up leftover yarn. Just make sure your yarns are of similar weight for consistent sizing.
Conclusion
The CROCHET GRANNY SQUARE SUNFLOWER – PATTERN is a delightful project that combines the joy of color, the comfort of texture, and the satisfaction of creating something truly handmade. Whether you’re crafting a single block or an entire sunflower garden
in yarn, each square is a testament to your creativity and skill.
We hope this guide has given you all the tools and confidence to bring your sunflower squares to life. If you try this pattern, we’d love to hear from you. Leave your honest opinion and share any suggestions—your feedback helps inspire future patterns and keeps our crochet community thriving!