The Summer Stars Table Topper – Pattern is a beautiful and vibrant quilting design that brings the warmth and energy of summer right into your home.
Whether you’re preparing your space for seasonal gatherings or just looking to add a bright and cheerful handmade element to your decor, this pattern offers both functionality and artistic flair.
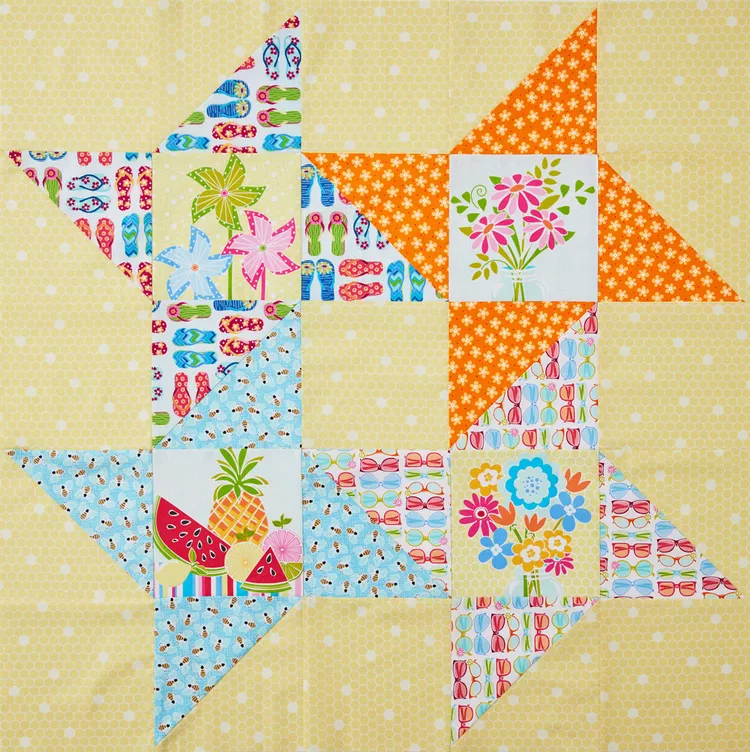
Using bold colors and star motifs, the Summer Stars Table Topper is a celebration of craftsmanship and seasonal style.
Crafted with simplicity and charm, this quilting project is suitable for both beginners and experienced quilters. The design focuses on traditional piecing techniques with a modern layout, making it an exciting yet approachable project. The Summer Stars Table Topper – Pattern is also an excellent opportunity to play with colorful fabrics and geometric shapes to create a dynamic tabletop centerpiece.
In this guide, we’ll explore everything you need to know to complete your very own Summer Stars Table Topper – Pattern. From choosing your fabrics and cutting pieces to assembling and finishing your table topper, you’ll find clear, step-by-step advice to help you complete this summer-inspired project. This article also includes SEO-optimized content, keeping in line with Google AdSense content policies, to provide a helpful and engaging experience for readers.
1. Choosing the Right Materials for Your Project
The success of your Summer Stars Table Topper – Pattern begins with your fabric and material selection. This pattern relies heavily on high-contrast colors and vibrant summer-themed prints to make the star motifs stand out. Think sunshine yellow, ocean blue, watermelon red, and citrus orange — the brighter, the better.
Start by selecting six to eight different cotton fabrics, including both prints and solids. A strong background fabric, preferably in a light neutral or white tone, helps the stars pop visually. Avoid fabrics that are too busy or have large-scale prints, as they may compete with the overall star design.
You’ll also need batting and backing fabric to complete the quilt sandwich. A light- to medium-weight cotton batting is ideal for a table topper, offering structure without too much bulk. Choose a backing fabric that complements your front design — something that won’t show stains easily but still looks coordinated.
Be sure to use high-quality cotton quilting fabric and thread. This ensures durability and gives your finished topper a polished look. Coordinating thread colors can either blend with your fabric for a subtle effect or stand out for a more decorative finish.
Before cutting, wash and press all your fabrics to reduce shrinkage and ensure accurate piecing. Pre-washing also prevents color bleeding, which is especially important when working with red and other saturated hues.
Lastly, gather your quilting tools: rotary cutter, self-healing mat, quilting ruler, pins, iron, and your sewing machine. Having everything on hand makes the process more seamless and enjoyable.
2. Cutting and Piecing the Summer Stars Design
Cutting your fabric correctly is one of the most critical steps when creating your Summer Stars Table Topper – Pattern. Accuracy ensures that the star points align properly and the finished topper lays flat and smooth on your table.
Begin by cutting your background fabric into squares and rectangles, based on the pattern instructions. Most designs call for 6.5” and 7” squares to form half-square triangles (HSTs), the building blocks of star motifs. Use a rotary cutter and quilting ruler to ensure sharp, clean cuts.
For the star points, cut your colored or patterned fabrics into matching squares. These will be paired with the background pieces to create the HSTs. For variety, choose different colors for each star to give your topper a vibrant, patchwork-style appearance.
Sewing the HSTs involves pairing one background square with one colored square, drawing a diagonal line, and sewing 1/4″ on each side of that line. Cut along the center, press open the triangles, and trim to size. Repeat this process to make all the units needed for your stars.
Next, lay out your pieces following the layout guide provided in your Summer Stars Table Topper – Pattern. Assemble the blocks into rows, then join the rows together, ensuring your seams are aligned. Use pins at intersections for accuracy and stability.
Take time to press your seams carefully. Pressing to one side or open depends on your personal preference, but the goal is to reduce bulk and make your blocks lie flat. Pressing also helps in aligning the points of your stars perfectly.
Finish this stage by sewing the completed star blocks together into the final square layout. You should begin to see the full star design take shape, with contrasting colors and crisp angles creating visual movement across your project.
3. Quilting Techniques to Enhance the Design
With the piecing complete, it’s time to quilt your Summer Stars Table Topper – Pattern, which is where your creativity can really shine. Quilting not only secures the layers but also adds texture and detail that enhances the overall aesthetic.
One popular method is to stitch in the ditch, which involves sewing directly along the seam lines of your blocks. This gives a subtle, structured effect that allows the star design to take center stage. It’s especially effective if you’re using bright fabrics and want to keep the focus on the colorwork.
Another option is to use free-motion quilting or decorative stitching to add swirls, loops, or even star-shaped designs in the negative space. This adds depth and a personal touch to your table topper, transforming it into a one-of-a-kind creation.
If you prefer a minimalist approach, simple diagonal or cross-hatch quilting lines also work well. These patterns are easy to mark with a fabric-safe pencil or chalk and give a crisp, modern finish. Use a walking foot on your sewing machine for even stitches and better fabric feed.
Before quilting, make a quilt sandwich by layering your quilt top, batting, and backing fabric. Use safety pins or spray baste to hold the layers together securely, preventing shifting during quilting. Smooth out any wrinkles to avoid puckering in the final piece.
Test your stitch settings on a scrap quilt sandwich before starting on your actual project. Check for even tension and thread color compatibility. If needed, adjust your stitch length to match the density of your quilting design.
Finally, once your quilting is complete, trim any excess batting and backing fabric, making sure your edges are square and clean. This sets you up for a smooth and accurate binding application in the next step.
4. Binding and Finishing Touches
Binding is the final step in completing your Summer Stars Table Topper – Pattern, and it gives your project a clean, finished look. Choose a binding fabric that either matches or complements your color scheme. Striped or polka dot bindings can add a playful touch, while solids offer a more traditional look.
Cut your binding strips 2.5” wide and piece them together to form one long strip. Fold it in half lengthwise with wrong sides together and press. This double-fold binding adds durability and frames your quilt beautifully.
Attach the binding to the front of your quilt using a 1/4” seam allowance. Start on one side, leaving a 6-8” tail unstitched for joining at the end. When you reach a corner, stop 1/4” from the edge, backstitch, and fold the binding to form a mitered corner before continuing down the next side.
Once all sides are sewn, join the two ends of the binding strip, trim any excess, and complete the final seam. Then, fold the binding over to the back of the quilt and hand-stitch it in place using a slip stitch for an invisible finish. Alternatively, machine-stitch the back for quicker results.
To add a personal touch, consider labeling your project with your name, date, or a short message using a fabric label or embroidered tag. This makes your work more meaningful, especially if you’re gifting the piece.
Your completed Summer Stars Table Topper – Pattern is now ready to shine! Place it on your dining table, outdoor patio, or coffee table for a burst of summer charm.
FAQ – Frequently Asked Questions
Q1: Is the Summer Stars Table Topper – Pattern beginner-friendly?
Yes, the pattern is designed with simple piecing techniques, making it accessible to quilters of all levels, including beginners.
Q2: What size is the finished table topper?
Most versions of the pattern result in a square topper approximately 36” x 36”, but this can vary based on your fabric choices and seam allowances.
Q3: Can I make this pattern using pre-cut fabric bundles like fat quarters?
Absolutely! Fat quarters are ideal for this pattern, especially when using multiple prints for the star blocks.
Q4: How long does it take to complete the Summer Stars Table Topper – Pattern?
Depending on your skill level and available time, it can take anywhere from one weekend to a few days to complete the entire project.
Q5: Do I need a specific sewing machine to make this project?
No special sewing machine is required. Any standard domestic sewing machine with a straight stitch function will work perfectly.
Q6: Can I resize the pattern for a larger quilt?
Yes! Simply scale up the block sizes or add more blocks to create a larger quilt version while maintaining the same design principles.
Conclusion
The Summer Stars Table Topper – Pattern is a delightful way to celebrate the warmth and brightness of summer through quilting. With clear steps for selecting fabrics, cutting, piecing, quilting, and binding, this guide has everything you need to bring your table topper to life.
Whether you’re a quilting veteran or just starting your journey, this project offers both creative satisfaction and practical use. The finished topper makes a perfect seasonal decor piece or a thoughtful handmade gift.
We’d love to hear your thoughts! Please leave a sincere opinion or suggestions in the comments. What did you enjoy most about this pattern? How did you personalize your Summer Stars Table Topper? Let us know!