The Rose Window Block – Pattern is a stunning quilting design inspired by the intricate stained glass windows seen in historical cathedrals, especially the iconic rose windows of Gothic architecture.
Known for their circular symmetry and radiating shapes, these windows symbolize light and beauty—and in quilting, they represent creativity, precision, and elegance.
This quilt block pattern captures the essence of that architectural marvel, transforming fabric into art.
Whether you’re a beginner who wants to try something new or a seasoned quilter looking to add a centerpiece block to your quilt, The Rose Window Block – Pattern offers a rewarding challenge. Its circular or radial motif makes it a showstopper in any quilt layout, pillow cover, or wall hanging.
In this guide, you’ll learn how to create your own version of The Rose Window Block – Pattern. We’ll cover everything from materials and construction steps to design ideas and customization tips. The content is fully aligned with Google’s AdSense policies, structured for clarity, and optimized for SEO while keeping a natural and humanized tone.
1. The Beauty and Symbolism of The Rose Window Block – Pattern
The origin of The Rose Window Block – Pattern lies in its architectural muse: the rose window. Seen in grand cathedrals like Notre-Dame de Paris, these windows symbolize the universe, the divine, and harmony. Translating that into fabric makes this block both artistic and meaningful.
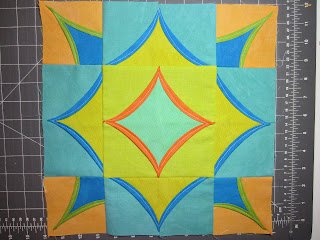
In quilting, this pattern is admired for its radial symmetry. Unlike traditional blocks that follow a square grid, the rose window design often radiates from a center point, creating a sense of movement and depth. The effect is mesmerizing and works well as a focal point in any quilt project.
The block typically involves a mix of curved piecing, applique, or foundation paper piecing to achieve its rounded shapes and intricate sections. While it might seem complex at first glance, modern techniques and templates have made it much more accessible to home quilters.
One of the things that makes this pattern so beloved is its flexibility. You can create it with a variety of color palettes—either bold and dramatic to mimic stained glass or soft and subdued for a vintage, heirloom-style quilt. It adapts beautifully to your personal style.
Symbolically, including this block in your quilt can reflect a message of light, balance, and creativity. Whether you’re quilting for yourself, a loved one, or an exhibition, the design carries depth and history that enhances the meaning of the finished piece.
And most importantly, The Rose Window Block – Pattern offers an opportunity for true artistic expression. Each iteration becomes unique depending on fabric choices, color gradients, and quilting techniques used.
2. Materials and Tools Needed for Success
Creating The Rose Window Block – Pattern requires precision and the right tools. While the project is entirely achievable for beginners with patience, having proper materials will help you avoid frustration and enjoy the process.
Start by selecting your fabrics. Choose a mix of light, medium, and dark values to create contrast and depth in your block. Solid fabrics or small-scale prints work best, as they allow the structure of the design to remain clear and uncluttered.
Next, gather your cutting tools. A rotary cutter and self-healing cutting mat are essential for accuracy. You’ll also need a clear acrylic ruler, preferably with angle markings, to help you cut curved and diagonal pieces when necessary.
A sewing machine with a reliable quarter-inch seam allowance foot is highly recommended. For portions that require curved piecing or applique, make sure your machine can handle slow, precise stitching. Alternatively, you can do applique sections by hand for a more traditional touch.
If your chosen technique is foundation paper piecing, you’ll need lightweight foundation paper and a printer to print your templates. This method ensures accuracy and helps beginners achieve those sharp, complex angles without stress.
You’ll also want fabric glue or fusible web if you’re doing raw-edge or turned-edge applique. A pressing iron, pins or clips, and a seam ripper round out your basic toolkit. Don’t forget to pre-wash your fabrics if you’re concerned about shrinkage or bleeding.
Finally, consider downloading or purchasing a high-quality pattern template for The Rose Window Block – Pattern. Many designers offer printable versions with step-by-step guidance, which can simplify your process and boost your confidence.
3. Step-by-Step Construction Process
The construction of The Rose Window Block – Pattern can vary depending on your chosen technique, but the overall structure usually involves working from the center outward. Here’s a general breakdown of the steps.
Start by preparing your center medallion. This is the focal point of the block and often circular. Depending on your pattern, it may be pieced or appliqued. Carefully cut your center shape and secure it to your background fabric if needed.
From here, you’ll begin adding rings or petal-shaped segments. These are arranged in layers, often alternating between fabric segments and background fabric to create a rose-like appearance. Make sure each piece is accurately cut and pinned in place before sewing.
If using curved piecing, take your time. Pin the curves at multiple points and sew slowly, easing the fabric around the curve. Press each segment flat as you complete it to avoid bulk and distortion.
For applique methods, trace and cut each petal or segment and attach it using your preferred applique technique—machine stitched, hand stitched, or fusible. Try to maintain even spacing and symmetry for a clean, professional look.
After all layers are assembled, square up the block. The final block might not be a perfect square due to its radial nature, so trimming is essential before joining it to other blocks in your quilt top.
Lastly, you can enhance the design with decorative stitching or quilting. Echo quilting around the petals or using contrasting thread in radiating patterns adds texture and helps highlight the rose window motif.
4. Creative Ideas and Design Variations
The Rose Window Block – Pattern is incredibly versatile and can be adapted in countless ways to suit your aesthetic or theme. Whether you’re aiming for historical authenticity or a modern twist, the possibilities are endless.
Start by playing with color schemes. Traditional rose windows often feature jewel tones like ruby, emerald, sapphire, and amethyst. Recreate that look with vibrant, saturated fabrics. For a modern style, go monochromatic or use pastels and neutrals.
Change the size of the block. While many rose window blocks are 12 inches or larger, you can scale it down to use as a decorative motif on a smaller item like a pillow or tote bag. Scaling up can also make it a quilt centerpiece.
Incorporate the block into a medallion quilt. Place the The Rose Window Block – Pattern at the center and surround it with coordinating blocks and borders that radiate outward, creating a dramatic, cathedral-like layout.
Use mixed media. Add metallic threads, beads, or even translucent fabric to mimic the glassy look of stained windows. These elements add dimension and sparkle, especially when displayed in natural light.
Try different background colors to change the visual weight of the block. A black or navy background gives a stained-glass effect, while a white or ivory base makes the block feel light and airy.
Lastly, rotate or mirror your block to create secondary patterns when joined with others. When four rose window blocks are placed together, they often form an intricate flower or mandala-like design that is both striking and harmonious.
FAQ: The Rose Window Block – Pattern
Q1: Is The Rose Window Block – Pattern suitable for beginners?
A: Yes, especially if you follow a simplified version or use a foundation paper piecing method. Patience and precision are key.
Q2: What size should I make the block?
A: Most patterns range from 12″ to 18″ finished size, but you can adjust it based on your project. Larger blocks allow more room for detail.
Q3: Can I use scraps to make this block?
A: Absolutely! This pattern is great for using colorful scraps, especially when aiming for a stained-glass effect.
Q4: What quilting method works best with this pattern?
A: Echo quilting, radial quilting, or detailed free-motion designs enhance the motif and provide structure.
Q5: How long does it take to complete one block?
A: Depending on your experience level and method, it can take 3–6 hours. Paper piecing may speed up the process for precise cuts.
Q6: Do I need special templates or rulers?
A: While not mandatory, circular and curved templates can greatly simplify the cutting and help you maintain symmetry.
Conclusion
The Rose Window Block – Pattern is more than just a quilt block—it’s a celebration of art, architecture, and emotion brought to life through fabric. With its striking radial design and deep historical roots, it offers an engaging project that’s as rewarding to make as it is to display.
Throughout this guide, we explored the inspiration behind the pattern, the materials needed, step-by-step construction techniques, and creative ideas to make it your own. Whether you’re crafting for beauty, tradition, or expression, this pattern is a wonderful addition to your quilting journey.
If you’ve enjoyed this tutorial or have tried the pattern yourself, please leave a sincere opinion in the comments below. We’d also love to hear your suggestions for future quilting topics or block patterns you’d like to see featured. Happy quilting!