The Simple Table Runner with Prairie Points – Pattern is an elegant and beginner-friendly sewing project that combines practicality with decorative charm.
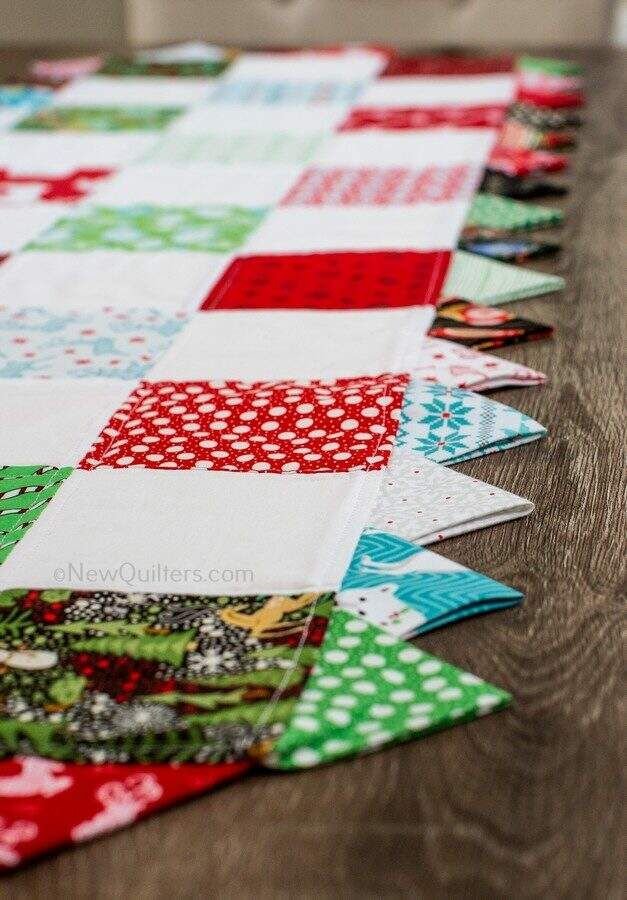
Ideal for adding a touch of color and texture to your dining or coffee table, this pattern uses classic quilting techniques with the addition of prairie points—folded triangle accents that create a beautiful and dimensional border.
Whether you’re dressing up a table for a holiday or looking for a handmade home decor upgrade, this pattern is a perfect weekend project.
One of the great advantages of this Simple Table Runner with Prairie Points – Pattern is its adaptability. It can be made in any color palette to match your home or the season. By switching up the fabrics and placement of the prairie points, each version you make can feel entirely unique, while the construction process remains straightforward and enjoyable.
In this comprehensive guide, you’ll learn what materials are needed, step-by-step instructions for making prairie points, how to construct and assemble the table runner, and ideas for customizing your creation. With a little time and creativity, you’ll be able to produce a table runner that’s not only functional but also a beautiful conversation piece in your home.
1. Materials and Tools for the Simple Table Runner with Prairie Points – Pattern
Before diving into the sewing process, it’s essential to gather all the necessary materials and tools to ensure a smooth experience when making your Simple Table Runner with Prairie Points – Pattern. Good preparation makes a big difference in the final result.
Start with your fabric. You’ll need three main pieces: the top fabric, backing fabric, and batting for the inside. Cotton fabrics work best due to their stability and easy handling. Choose fabrics that coordinate well—solids, prints, or themed fabrics depending on the occasion or style you’re aiming for.
Next, you’ll need fabric for the prairie points. These are typically made from 5″ or 6″ squares folded into triangles. Use contrasting or coordinating colors to make the points pop and add personality to your runner.
Basic quilting supplies will also be required. These include rotary cutters, a self-healing cutting mat, quilting rulers, and quality thread. A walking foot for your sewing machine is highly recommended for even stitching through multiple layers.
You’ll also want to have pins or clips to hold layers in place, a fabric marker or chalk for lining up points, and an iron for pressing seams and folds. Pressing is especially crucial when working with prairie points to maintain clean edges and sharp folds.
If you’re a beginner, consider printing out or keeping a visual reference of the Simple Table Runner with Prairie Points – Pattern. It will help you visualize each stage and ensure accuracy, especially when placing the prairie points before stitching.
Lastly, patience and creativity are your best tools. Prairie points add an extra step, but they’re worth the effort. This project is just detailed enough to be satisfying while still being accessible for those new to quilting or sewing.
2. Making and Attaching Prairie Points
One of the most exciting parts of the Simple Table Runner with Prairie Points – Pattern is creating and attaching the prairie points. These triangular embellishments add depth, texture, and charm to your finished runner.
Start by cutting your squares for the prairie points. Commonly, quilters use 5″ x 5″ squares, but you can adjust based on your desired point size. The number of squares will depend on the length of your table runner.
To make each prairie point, fold a fabric square diagonally in half to form a triangle. Press with an iron, then fold again to form a smaller triangle. Pressing is important to maintain the sharpness of the folds and to ensure consistent sizing.
Once you’ve made enough points, arrange them along one or both short ends of your table runner top. You can overlap them slightly for a layered effect, or space them evenly for a more uniform look. Pin them in place with the raw edges facing the edge of the runner.
When attaching the prairie points, you’ll sew them onto the top piece of the runner before layering with batting and backing. This way, the raw edges are enclosed in the final seam when the layers are sewn together.
It’s helpful to baste the prairie points with a 1/8″ seam before full assembly. This prevents shifting when quilting and ensures each point stays precisely in place. You can also trim or reposition them as needed before the final seam.
Once sewn in, the prairie points add a playful and dynamic element to your runner. They can point outward for a fringed effect or inward for a petal-like appearance—either way, they offer plenty of room for creativity and flair.
3. Assembling the Table Runner Layers
Once the prairie points are securely attached, it’s time to assemble the layers of your Simple Table Runner with Prairie Points – Pattern. This step is where your project really comes together, creating a durable and finished piece.
Lay your backing fabric right side down on a flat surface. Place your batting on top of the backing, smoothing out any wrinkles. Then, place the top fabric (with prairie points already attached) right side up. Align all layers neatly.
Use pins or quilting clips to secure the layers together. Pay special attention to the edges and corners to avoid shifting during sewing. If you’re adding quilting designs, mark them with a washable fabric pen.
You can choose to quilt your runner by hand or machine. Simple straight-line quilting works well and allows the fabric and prairie points to shine. For a more detailed design, consider free-motion quilting or echo quilting around the heart of the piece.
After quilting, trim the edges to square everything up. Be careful around the prairie points to ensure you don’t accidentally trim into the triangle shapes. Keep everything aligned and consistent.
Next, bind the table runner. You can use pre-made bias tape or make your own binding strips. Fold the binding over the raw edges and sew with a consistent 1/4″ seam. Miter the corners for a clean, professional finish.
Press the finished runner to smooth out any remaining wrinkles. The combination of the neat binding, layered fabrics, and the eye-catching prairie points gives your piece a polished and elegant look, ready for display or gifting.
4. Styling, Gifting, and Seasonal Variations
Once your Simple Table Runner with Prairie Points – Pattern is complete, the fun continues with how you use and share your creation. This handmade runner is both functional and decorative, making it perfect for many settings.
Use it as a centerpiece on your dining table, coffee table, or sideboard. It adds a warm, homemade touch that enhances any space. The prairie points create natural movement and texture, drawing the eye and softening hard surfaces.
This pattern is ideal for holiday themes. For Christmas, use red and green fabrics with metallic accents. For fall, try earthy tones like burnt orange, mustard, and deep browns. The prairie points can mimic leaves or tree shapes depending on your color choice.
If you’re making gifts, personalize the table runner with initials, embroidery, or even a small pocket on the back for a handwritten note. This adds sentimental value and turns a simple piece into a cherished keepsake.
You can also make a matching set. Create placemats or napkin rings using the same fabrics and prairie points to tie your decor together. This transforms your dining area into a coordinated and festive environment.
Social sharing is a great way to connect with the crafting community. Post photos of your finished runner using hashtags related to quilting or sewing. You might inspire others or even gain feedback and tips for future projects.
Whether used at home or given as a gift, the Simple Table Runner with Prairie Points – Pattern is a satisfying project that blends creativity with usability. It’s proof that sometimes, simple designs can have the biggest impact.
Frequently Asked Questions (FAQ)
1. Is the Simple Table Runner with Prairie Points – Pattern beginner-friendly?
Yes! The pattern is ideal for beginners. It uses basic sewing and quilting techniques, and the prairie points, while decorative, are easy to master with practice.
2. What size should my table runner be?
It depends on your table size, but a common finished size is about 14″ x 40″. You can easily adjust the length or width by changing fabric cuts or adding/removing prairie points.
3. Do I need special tools to make prairie points?
No special tools are required—just fabric squares, an iron, and basic sewing supplies. However, using a rotary cutter and quilting ruler helps with precise cuts and folds.
4. Can I make prairie points on all four sides of the runner?
Absolutely! Many makers choose to add them on just the short ends, but adding them around the entire perimeter can create a striking, scalloped effect.
5. How should I wash and care for the finished table runner?
Use cold water and gentle detergent, either by hand or on a delicate machine cycle. Lay flat to dry or tumble on low. Press if needed, avoiding direct heat on the prairie points.
6. Can I use different fabrics for each prairie point?
Yes! Using multiple fabric patterns adds variety and a scrappy, colorful look. It’s a great way to use up fabric scraps from other projects.
Conclusion
The Simple Table Runner with Prairie Points – Pattern is a perfect combination of ease, style, and handmade charm. This project not only helps you practice essential quilting skills but also results in a functional and beautiful item for your home. From material selection to prairie point placement and final assembly, each step offers creative freedom and satisfaction.
We hope this guide inspired
you to try your own version of this lovely project. If you’ve made a Simple Table Runner with Prairie Points, please leave a sincere opinion and share your suggestions below. Your feedback helps us and the sewing community grow, improve, and continue crafting with heart.