The Freedom Quilt – Pattern is more than just a crafting project—it’s a piece of art rich with historical significance and personal meaning.
Whether you’re a seasoned quilter or just beginning your journey, this pattern offers a way to connect with tradition while expressing your creativity.
Inspired by stories of resilience, hope, and unity, the Freedom Quilt continues to be a meaningful creation for homes, classrooms, and community spaces.
At its core, a Freedom Quilt – Pattern typically draws from designs that symbolize liberty and strength. These patterns often include traditional blocks such as the Log Cabin, Flying Geese, and Bear’s Paw, all of which are believed to have held symbolic messages during the era of the Underground Railroad. Today, these patterns serve as powerful storytelling tools that blend historical roots with modern quilting styles.
In this article, we’ll walk you through every aspect of creating your own Freedom Quilt – Pattern—from fabric selection and historical context to assembling blocks and finishing techniques. Whether you want to make a statement piece or pass down a family heirloom, you’ll find everything you need to start or expand your quilting journey.
1. The History Behind the Freedom Quilt
Understanding the story behind the Freedom Quilt – Pattern adds depth and emotional value to your creation. These quilts are rooted in African American history and folklore, specifically tied to the Underground Railroad—a network that helped enslaved people escape to freedom in the 19th century.
Quilts were said to be used as secret maps or codes during that time. Certain patterns were believed to communicate directions or signals, like “safe house ahead” or “travel at night.” While the historical accuracy of these stories has been debated, they continue to inspire and educate quilters today.
Patterns like the Monkey Wrench, Bow Tie, and Drunkard’s Path are often included in a Freedom Quilt – Pattern. Each block had symbolic meaning, giving the quilt an almost sacred narrative function. Whether these messages were truly used in real-life escapes or not, the symbolism is undeniably powerful.
Today, many quilters use these designs to pay tribute to the strength and bravery of those who fought for freedom. Making a Freedom Quilt allows crafters to participate in this legacy and share it with others through a tangible, visual medium.
You don’t need to follow historical rules strictly. Modern quilters often take inspiration from traditional symbols and infuse their own voice, using vibrant fabrics, diverse layouts, and meaningful embroidery to personalize their quilts.
By learning about and honoring the cultural background of the Freedom Quilt – Pattern, you add purpose to your project that goes beyond fabric and thread—it becomes a tribute to courage, resilience, and hope.
2. Choosing Materials and Colors
One of the first steps in making a Freedom Quilt – Pattern is selecting the right materials. The fabric you choose sets the tone for the entire quilt—whether traditional, modern, or something in between.
For an authentic, vintage-inspired look, many quilters choose cotton fabrics in earthy tones like rust, navy, tan, and burgundy. These colors were commonly available in the 19th century and lend an antique feel to the quilt. You might also explore reproduction fabrics that mimic historical prints.
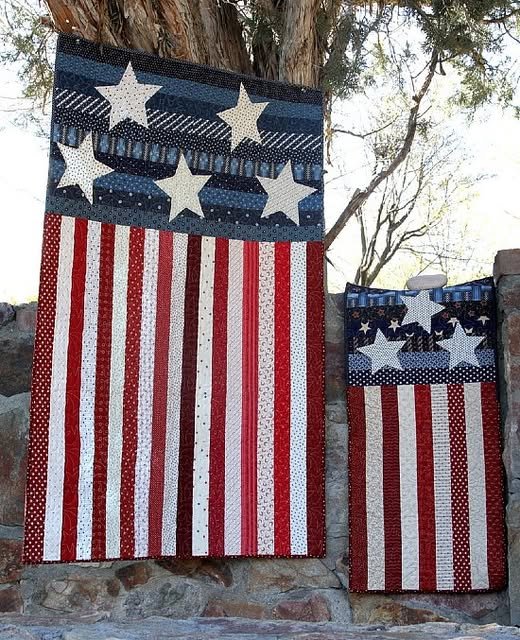
If you’re aiming for a more contemporary interpretation, don’t shy away from bright colors or bold prints. Colors like red, white, and blue often appear in patriotic versions of the Freedom Quilt – Pattern, while others might use symbolic color palettes representing unity or peace.
Quilters also often choose fabric with symbolic prints—stars, chains, feathers, or words like “liberty” and “justice.” These subtle details can amplify the message of your quilt without altering the traditional block structures.
For batting, lightweight cotton or cotton-poly blends are most commonly used. They provide breathability and a natural feel, which is important for both comfort and authenticity if your quilt will be displayed or used regularly.
Backing fabric can either match the theme or contrast with it. Solid backing fabric is ideal if you plan to add hand-stitched messages, names, or quotes to personalize your quilt. It can turn your quilt into an interactive family keepsake.
Finally, select high-quality thread and a rotary cutting set to ensure clean lines and secure seams. Proper materials make the construction smoother and more enjoyable while preserving your quilt’s durability for years to come.
3. Constructing the Quilt Blocks
Once your materials are ready, it’s time to bring the Freedom Quilt – Pattern to life block by block. This part of the process is where creativity and precision come together.
Start by choosing which traditional quilt blocks to include. Common choices for Freedom Quilts are the Log Cabin (symbolizing home), Flying Geese (suggesting a path or direction), and the Star block (representing hope or guidance). These are not only meaningful but also beginner-friendly in terms of construction.
Cut your fabric pieces carefully according to your chosen block patterns. Using a rotary cutter and ruler will help ensure accuracy, which is crucial when multiple blocks come together to form a quilt top.
Each block can be pieced separately before assembling the quilt top. You may choose to alternate different blocks, or repeat the same design with varied fabric colors for unity. Either way, maintaining consistent seam allowances will help keep your quilt square and aligned.
Once the blocks are assembled, lay them out on a flat surface to decide on the best arrangement. Play with balance—distribute colors evenly and check for harmony between the blocks. This layout phase helps you catch errors and visualize the final design.
Sew the blocks together into rows, then connect the rows. Press the seams open or to one side after each row to keep the quilt top smooth and professional-looking. A clean top will make quilting and binding much easier.
When the top is complete, layer it with batting and backing fabric. Baste the layers using pins or spray adhesive, then quilt through all three layers by hand or machine. You can follow the block seams or create custom quilting lines for added texture and depth.
4. Finishing Touches and Displaying Your Quilt
The final steps in completing your Freedom Quilt – Pattern are just as important as the earlier ones. Finishing properly ensures that your quilt will be both durable and beautiful for years to come.
Begin by trimming the edges of your quilt sandwich (top, batting, and backing) so they’re even. A rotary cutter and straight edge are essential here for clean lines. This step prepares the quilt for binding, which seals the edges and adds a polished look.
Choose a binding that complements your overall color scheme. You can make your own from matching fabric or use a contrasting color for a decorative frame. Fold it double and stitch it around the edges, either by machine or hand for a neater finish.
Adding a label to your quilt is a meaningful step. Include your name, the date, and a short message about the quilt’s inspiration. This gives future viewers context and allows the quilt to be appreciated as a historical or family artifact.
If your quilt is intended for display, consider hanging it on a quilt rack or wall using a hanging sleeve. You can also fold it over a couch or chair for everyday use while still showcasing its message.
Caring for your quilt is simple but important. Wash gently in cold water with mild detergent, and avoid harsh cycles. Air drying is preferred to preserve the quilt’s shape and stitching.
A finished Freedom Quilt – Pattern is more than a blanket—it’s a story, a piece of art, and often, a piece of history. It can become a treasured heirloom or a powerful teaching tool, depending on how you choose to share it.
FAQ – Freedom Quilt – Pattern
Q1: What is a Freedom Quilt?
A Freedom Quilt – Pattern is a quilt that often includes symbolic blocks historically associated with messages of escape, safety, or freedom during the Underground Railroad period.
Q2: Are Freedom Quilts based on true historical facts?
While some scholars question the literal use of quilts as signals, many believe they were symbolic storytelling tools. Today, they remain powerful cultural representations of resistance and hope.
Q3: Can beginners make a Freedom Quilt?
Yes. Many traditional blocks used in Freedom Quilts, like Log Cabin and Flying Geese, are beginner-friendly. You can start simple and build skill with each project.
Q4: What fabrics should I use?
Cotton is ideal for both traditional and modern quilts. You can choose reproduction prints for historical accuracy or colorful patterns for a modern twist.
Q5: How big should a Freedom Quilt be?
There’s no fixed size. It can be a lap quilt, a wall hanging, or a full-sized bed quilt. Choose a size based on its purpose—display, comfort, or storytelling.
Q6: How can I personalize my quilt?
Add labels, hand-stitched messages, symbolic fabrics, or family names. These touches turn your quilt into a personal legacy or meaningful gift.
Conclusion
Creating a Freedom Quilt – Pattern allows you to celebrate history, tell a story, and create something lasting and beautiful. From selecting fabrics and exploring block symbolism to piecing everything together with purpose, each step of the journey is deeply rewarding. Whether you’re preserving cultural heritage or expressing modern themes of unity and justice, your quilt becomes a powerful voice in fabric form.
We hope this guide has inspired you to begin your own Freedom Quilt. Please leave your honest opinion and share your suggestions—your feedback helps us continue to support crafters and creators like you. Let your quilt be a legacy of freedom, one stitch at a
time.