If you’ve ever found yourself with a growing stash of fat quarters and wondered what to make with them, the Fat Quarter Bag – Pattern is the perfect solution.
Designed to make the most of these popular precut fabrics, this project is as practical as it is beautiful.
With just a few fat quarters, you can create a stylish, functional bag perfect for everyday use or gifting.
A Fat Quarter Bag – Pattern is ideal for beginner and experienced sewists alike. These bags typically feature simple shapes, straightforward construction, and flexible designs that can be easily customized. Whether you’re aiming for a casual tote, a drawstring pouch, or a chic shoulder bag, this pattern type offers a variety of creative possibilities without the need for complicated techniques.
In this guide, we’ll cover everything you need to know to create your own fat quarter bag. From selecting the right fabrics and tools to sewing techniques and personalizing your creation, each step will bring you closer to a finished piece you’ll love. Let’s explore how the Fat Quarter Bag – Pattern can transform your scraps into something both useful and beautiful.
1. Choosing Fabric and Preparing Your Materials
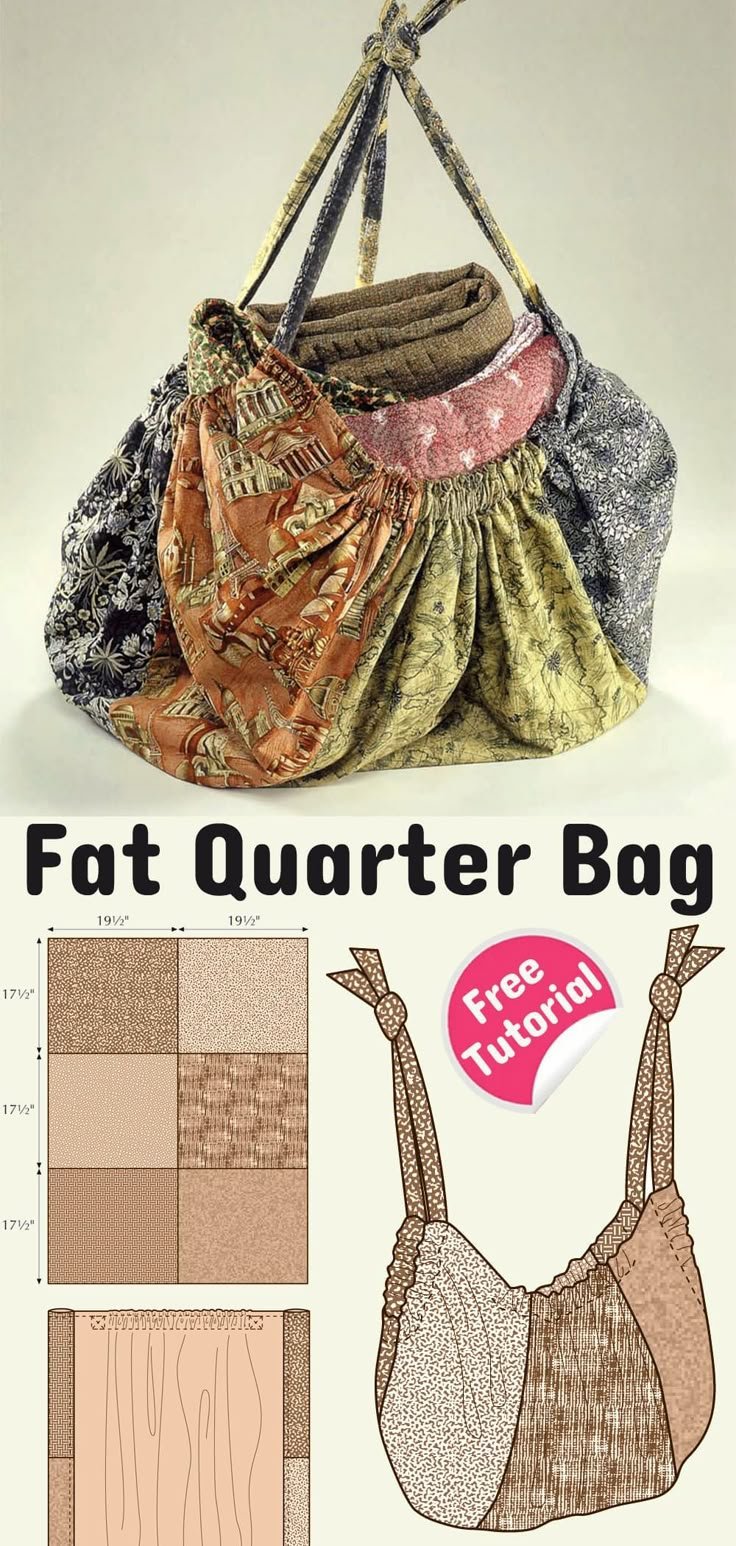
The success of your Fat Quarter Bag – Pattern begins with choosing the right fabric. A fat quarter is a pre-cut piece of fabric that typically measures 18″ x 22″, making it larger than a standard quarter yard but more versatile. These pieces are especially great for smaller sewing projects and allow for a variety of design combinations.
Start by selecting fat quarters in colors or patterns that complement one another. You might want two or three coordinating prints for the body, lining, and straps. Keep in mind the final use of the bag—whether it’s casual or formal—to guide your color palette and fabric type.
Cotton fabric is the most common choice for fat quarter projects because of its stability and ease of handling. However, you can also mix textures, such as adding linen for a rustic feel or denim for added durability. Make sure to prewash and press your fabric to prevent any shrinkage or distortion during sewing.
You’ll also need a few basic tools: fabric scissors or a rotary cutter, sewing pins or clips, a sewing machine, matching thread, and a ruler or quilting square for accurate measuring. Optional tools like fusible interfacing or batting can help add structure to the bag, especially if you want it to hold its shape.
If you’re creating a bag with pockets, closures, or straps, gather any necessary accessories like zippers, buttons, D-rings, or cord. Most Fat Quarter Bag – Pattern designs are simple enough to sew without these, but adding them can enhance function and visual interest.
Before cutting into your fabric, take time to lay out all your pieces and plan your cutting strategy. This ensures you make the most of every inch of your fat quarters and avoid running short later in the process.
2. Cutting and Constructing Your Bag
Once your materials are ready, it’s time to cut and piece together your Fat Quarter Bag – Pattern. The cutting stage requires care, especially since fat quarters are limited in size and can’t be replaced easily with standard yardage cuts.
Begin by cutting your main panels according to the bag size you’ve chosen. Many fat quarter bag patterns use two panels for the exterior and two for the lining. You may also need strips for the handles and pocket panels if you’re adding extra features.
If your bag includes interfacing or batting, cut these pieces next and fuse them to the wrong side of your fabric panels using a hot iron. This will help reinforce the structure of the bag and make it more durable for carrying heavier items.
Sew the exterior panels right sides together along the sides and bottom, leaving the top open. Do the same for the lining, but remember to leave a 3–4″ gap at the bottom seam of the lining for turning the bag right side out later.
For boxed corners, pinch each bottom corner of the bag, matching side and bottom seams to create a triangle. Measure about 1.5–2 inches from the tip of the triangle and sew a straight line across. This gives your bag more depth and a flat bottom.
Attach your straps or handles by pinning them to the exterior of the bag, ensuring they are evenly spaced and facing downward. Once they’re sewn in place, nest the lining inside the outer bag, right sides together, and stitch around the top opening.
Turn the bag right side out through the gap in the lining, then hand-stitch or machine-stitch the gap closed. Finally, topstitch around the top edge for a clean, professional finish and added durability.
3. Personalizing Your Fat Quarter Bag
Now that you’ve built the basic structure of your Fat Quarter Bag – Pattern, it’s time to make it uniquely yours. One of the joys of sewing is adding personal touches that reflect your taste and style.
Start with pockets. You can add an interior slip pocket to store your phone or keys, or an exterior pocket with a button flap for easy access. Cut the pocket piece slightly larger than needed, hem the edges, and sew it in place before assembling your lining.
Embroidery is another beautiful way to personalize your bag. Hand-embroidered initials, small florals, or abstract designs on one of the panels can give your bag a handmade, one-of-a-kind touch.
Try experimenting with different closures. Instead of leaving the bag open, add a magnetic snap, drawstring, zipper, or even a button loop. These small changes can make your bag more secure and suitable for different uses.
For a creative edge, consider using contrasting thread or decorative stitches around seams or hems. These tiny details can enhance the design without requiring advanced sewing skills.
Straps offer lots of room for customization too. You can make them padded, adjustable, or even repurpose old belts for a stylish upcycled look. A patterned fabric on the straps adds extra flair and contrast.
Finally, don’t forget labels or tags. You can sew in a label with your name or brand, making it feel like a boutique item. The Fat Quarter Bag – Pattern becomes not just a project, but a piece of art with your signature on it.
4. Uses and Gift Ideas for Your Finished Bag
Once you’ve completed your Fat Quarter Bag – Pattern, you’ll quickly find it’s one of the most useful accessories you can make. These bags are versatile, eco-friendly, and make fantastic gifts for nearly any occasion.
Use your bag as a reusable shopping tote. With its lightweight but sturdy construction, it’s perfect for groceries, farmers’ markets, or trips to the bookstore. It folds flat when not in use and replaces single-use plastic bags.
For parents or caregivers, a fat quarter bag makes an excellent diaper bag or toy tote. Add waterproof lining or multiple compartments to adapt it for busy days out with little ones.
It also works beautifully as a project bag. Whether you knit, crochet, or do embroidery, this bag is a stylish and practical way to store your ongoing works-in-progress and tools.
The bags are great for organizing at home. Hang them by the door for mail, use them in your closet for accessories, or keep one in the bathroom for cosmetics. The flexibility of the Fat Quarter Bag – Pattern means it fits into every room of your house.
Looking for handmade gift ideas? These bags are quick to make and can be tailored to the recipient’s favorite colors or hobbies. Add a monogram or fill the bag with themed items like art supplies, baking tools, or spa treats.
You can even start a small handmade business selling them at craft fairs or online. With creative combinations of fabric and personal touches, your fat quarter bags will stand out in any handmade marketplace.
FAQ – Fat Quarter Bag – Pattern
Q1: What is a fat quarter?
A fat quarter is a cut of fabric that measures approximately 18” x 22”. It’s a quarter-yard of fabric but cut in a rectangle instead of a long strip, offering more versatility for small projects.
Q2: How many fat quarters do I need to make a bag?
Most Fat Quarter Bag – Patterns require 2 to 3 fat quarters—one for the outer shell, one for the lining, and optionally one for straps or pockets.
Q3: Can beginners sew a fat quarter bag?
Yes! These bags are perfect for beginners. They involve basic straight-line sewing, and you can add complexity gradually as your skills grow.
Q4: Do I need interfacing or batting?
It’s optional, but interfacing or batting can give your bag more structure and durability, especially if you plan to carry heavier items.
Q5: What size are fat quarter bags?
Sizes vary, but most fat quarter bags are medium-sized totes or pouches. Finished dimensions are often around 12” x 14”, depending on how you cut your fabric.
Q6: Can I wash a fat quarter bag?
Yes, if made from cotton or washable fabric, these bags are usually machine washable. Just be sure to check your fabric and interfacing type first.
Conclusion
The Fat Quarter Bag – Pattern offers a perfect mix of creativity, practicality, and personal expression. With just a few pieces of fabric and basic sewing tools, you can craft a beautiful and versatile accessory that reflects your unique style. From fabric selection to the final stitch, every step of the process is a rewarding journey into handmade design.
Whether you’re making your bag for yourself, for gifts, or even for
sale, this project offers endless customization and satisfaction. With careful planning, a little patience, and a touch of creativity, your bag will be both beautiful and functional.
We’d love to hear your honest feedback and any suggestions you have! What did you love about the process? What would you like to learn next? Share your thoughts and help inspire fellow makers in the community.