If you’ve ever struggled to keep your belongings safe and organized while on the go, this DIY padded travel bag easily – pattern is the solution you’ve been looking for.
Creating your own padded travel bag not only ensures custom protection for your items, but also adds a personal touch to your travel essentials.
Whether you’re a beginner or a seasoned crafter, this project is fun, practical, and satisfying.
Making your own travel bag allows for full customization in terms of size, padding, compartments, fabric, and design. The beauty of using a DIY padded travel bag easily – pattern lies in its flexibility—you can tailor it to fit electronics, cosmetics, tools, or even crochet supplies. Plus, crafting something functional with your hands is incredibly rewarding.
In this guide, you’ll discover a beginner-friendly breakdown of materials, construction techniques, useful tips, and creative ways to personalize your padded bag. We’ll also answer the most frequently asked questions and help you avoid common pitfalls when following a DIY padded travel bag easily – pattern. Let’s dive into this hands-on and travel-friendly project!
1. Why Choose a DIY Padded Travel Bag?
Choosing to create your own DIY padded travel bag easily – pattern instead of buying one offers a number of advantages. First and foremost, it gives you complete control over how your bag is designed and used. From size to color to the number of compartments, every detail is up to you.
Store-bought bags often lack the personalized features that make them truly convenient. With DIY, you can design your bag to suit exactly what you need—whether it’s more space for toiletries, snug pockets for gadgets, or reinforced areas for delicate items.
Another great reason to go the DIY route is cost efficiency. Quality padded travel bags in stores can be quite expensive, especially those with durable fabrics and strong stitching. Making your own allows you to achieve the same, if not better, quality for a fraction of the price.
Sustainability is also a key factor. Using recycled or leftover fabric can turn your DIY project into an eco-friendly alternative to mass-produced bags. You’re not only saving money—you’re also reducing waste and making responsible fashion choices.
This type of project is a fantastic learning experience. It’s great for those who want to improve their sewing skills or learn about materials and construction methods. Whether it’s your first bag or your tenth, each one teaches you something new.
Finally, a handmade padded travel bag makes an excellent gift. Personalized, practical, and made with care, it’s a thoughtful option for birthdays, holidays, or anyone who loves to travel in style and comfort.
2. Materials Needed for DIY Padded Travel Bag
Before starting your DIY padded travel bag easily – pattern, gathering the right materials is essential for success. The good news is, most items are affordable and readily available in local craft stores or online.
First, choose your main fabric. Cotton, canvas, or nylon are popular options because they’re durable and easy to sew. Pick a pattern or color that suits your style, or go neutral for a minimalist look.
You’ll need padding or interfacing to provide structure and protection. Fusible fleece, foam stabilizer, or quilt batting all work well, depending on how soft or stiff you want the finished bag to be. Padding is what gives the bag its cushion and form.
For lining, choose a smooth, lightweight fabric like polyester or a cotton blend. This helps protect your items inside the bag and adds a clean, professional finish. Waterproof lining is a smart option if you’re using the bag for toiletries or tech gadgets.
Next, zippers are key. A strong, reliable zipper not only secures the bag but also adds style. Consider nylon coil zippers for smooth opening, and pick a length that suits your bag’s dimensions. If you’re adding multiple compartments, you’ll need more than one.
Other necessary items include thread, a sewing machine, fabric scissors, pins or clips, and a ruler or measuring tape. Optional extras like bias tape, D-rings, and velcro can enhance the bag’s functionality and appearance.
Don’t forget to download or draw your DIY padded travel bag easily – pattern. There are many free and paid patterns available online, or you can sketch one based on your needs. Make sure the pattern includes seam allowances and clear instructions before you begin cutting your fabric.
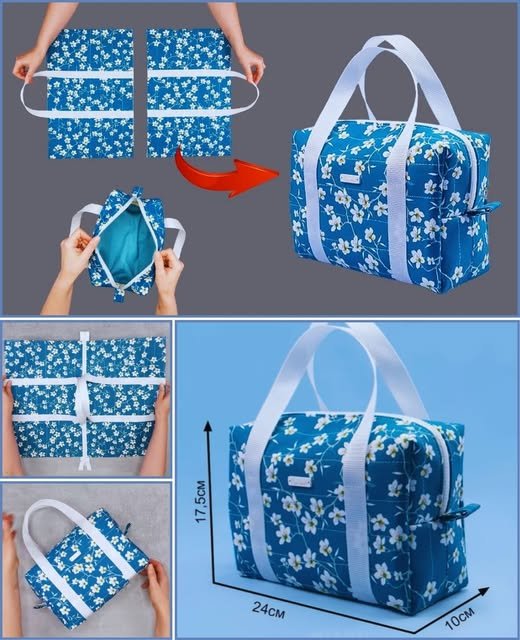
3. Step-by-Step Guide to Sewing Your Bag
Creating your DIY padded travel bag easily – pattern is straightforward if you follow a logical step-by-step process. Start with preparation and measuring. Lay out your pattern on the main fabric, padding, and lining, then cut each piece with precision.
Fuse or sew the padding to the main fabric. If you’re using fusible fleece, iron it on as per the instructions. This step gives your fabric the structure needed to keep its shape and protect the contents of the bag.
Next, attach the zipper. Sandwich it between the main fabric and the lining fabric with the right sides together, then sew along the edge. Turn it right side out and topstitch for a neat finish. Repeat the process if your bag has more than one compartment.
Sew the sides and bottom of the bag, leaving an opening to turn the bag right side out later. Clip the corners or curves to reduce bulk and allow for smoother seams. Reinforce any stress points like corners or zipper ends with backstitching.
Once the body of the bag is assembled, sew the lining separately and attach it to the inside of the bag. Make sure to close any gaps used for turning and press the entire bag for a crisp finish. At this stage, the structure of your travel bag should be fully visible.
Lastly, add any finishing touches. This can include a handle, interior pockets, or a name label. Your padded travel bag is now ready to use or gift. Congratulations on completing your handmade travel essential!
4. Customization and Creative Ideas
One of the best things about using a DIY padded travel bag easily – pattern is how endlessly customizable it is. Once you’ve mastered the basic version, you can start playing around with design features to make it uniquely yours.
Add extra interior or exterior pockets to store smaller items like chargers, makeup, or pens. Mesh pockets are especially useful for visibility and quick access. Use elastic bands or zippered pouches inside for even more organization.
Experiment with quilting. Quilting the outer fabric and padding adds texture and extra protection, as well as a unique handmade appearance. Choose geometric lines, free-motion designs, or traditional patterns like diamonds or waves.
Personalize the fabric. Use hand-printed, dyed, or embroidered fabric for a completely one-of-a-kind travel bag. You can also incorporate patches, initials, or applique to make your project stand out.
Adjust the size of the pattern to create matching sets. A large bag for clothes, a medium one for accessories, and a smaller one for tech gear make for a complete DIY travel set that’s both practical and stylish.
Use fun or seasonal fabrics for different occasions. Think tropical prints for summer travel, cozy flannels for winter getaways, or themed fabrics for holidays. Creating several bags allows you to travel in style all year round.
Finally, consider upcycling. Old jeans, curtains, or tablecloths can become durable and attractive bags. This approach supports sustainability and adds a story to your finished item—what better way to reduce waste while traveling smart?
FAQ: Frequently Asked Questions
Q1: Is this DIY padded travel bag project suitable for beginners?
Yes! With a simple DIY padded travel bag easily – pattern, beginners can create their first padded bag using basic sewing skills and tools.
Q2: What is the best fabric to use for durability?
Canvas or cotton duck is ideal for durability. For extra strength, pair it with a sturdy lining and foam interfacing.
Q3: Can I machine wash the padded travel bag?
If made with washable fabrics and padding, yes. Always prewash your fabric before sewing and check that your padding is also washable.
Q4: Where can I find the pattern for this project?
You can find many free and paid versions of the DIY padded travel bag easily – pattern on craft websites, sewing blogs, and online marketplaces like Etsy.
Q5: Can I make this bag without a sewing machine?
It’s possible, but not recommended for thick padding. A sewing machine ensures stronger seams and faster results.
Q6: How long does it take to complete the bag?
It depends on the complexity, but most people can finish a simple padded travel bag in 2 to 4 hours, including cutting and assembling.
Conclusion
Creating your own DIY padded travel bag easily – pattern is not only rewarding but also practical, sustainable, and creative. It offers the chance to build something useful with your own hands while tailoring every detail to your unique travel needs. With basic materials and a bit of sewing knowledge, you can produce a durable, stylish bag that stands out from store-bought versions.
In this article, we covered why DIY padded travel bags are worth making, what materials you need, how to construct one step by step, and ways to personalize your project. We also addressed common questions to help you feel confident in starting your own.
If this guide inspired you to try your hand at making your own travel bag, we’d love to hear from you! Share your thoughts, experiences, or suggestions in the comments below. Your feedback helps improve our content and inspires more DIY creators around the world.