If you’re looking for a creative and cozy DIY project that combines fashion, functionality, and a bit of nostalgia, the Rag Quilt Purse – Pattern is the perfect match.
This rustic and stylish bag brings the charm of quilted textures together with practical design, offering a delightful handmade accessory that stands out in a world of mass-produced fashion.
The Rag Quilt Purse – Pattern is ideal for quilters, sewing enthusiasts, and anyone who enjoys crafting projects with a homespun, shabby chic feel.
It’s not just fun to make—it’s also incredibly versatile, whether you’re heading to the market, carrying everyday essentials, or giving it as a thoughtful gift.
In this article, we’ll explore everything you need to know about creating your own Rag Quilt Purse – Pattern. From materials and assembly techniques to creative variations and best practices, this guide covers it all. Whether you’re a beginner or an experienced maker, you’ll find helpful insights and inspiration to start stitching your next favorite bag.
1. What Makes the Rag Quilt Purse – Pattern So Unique
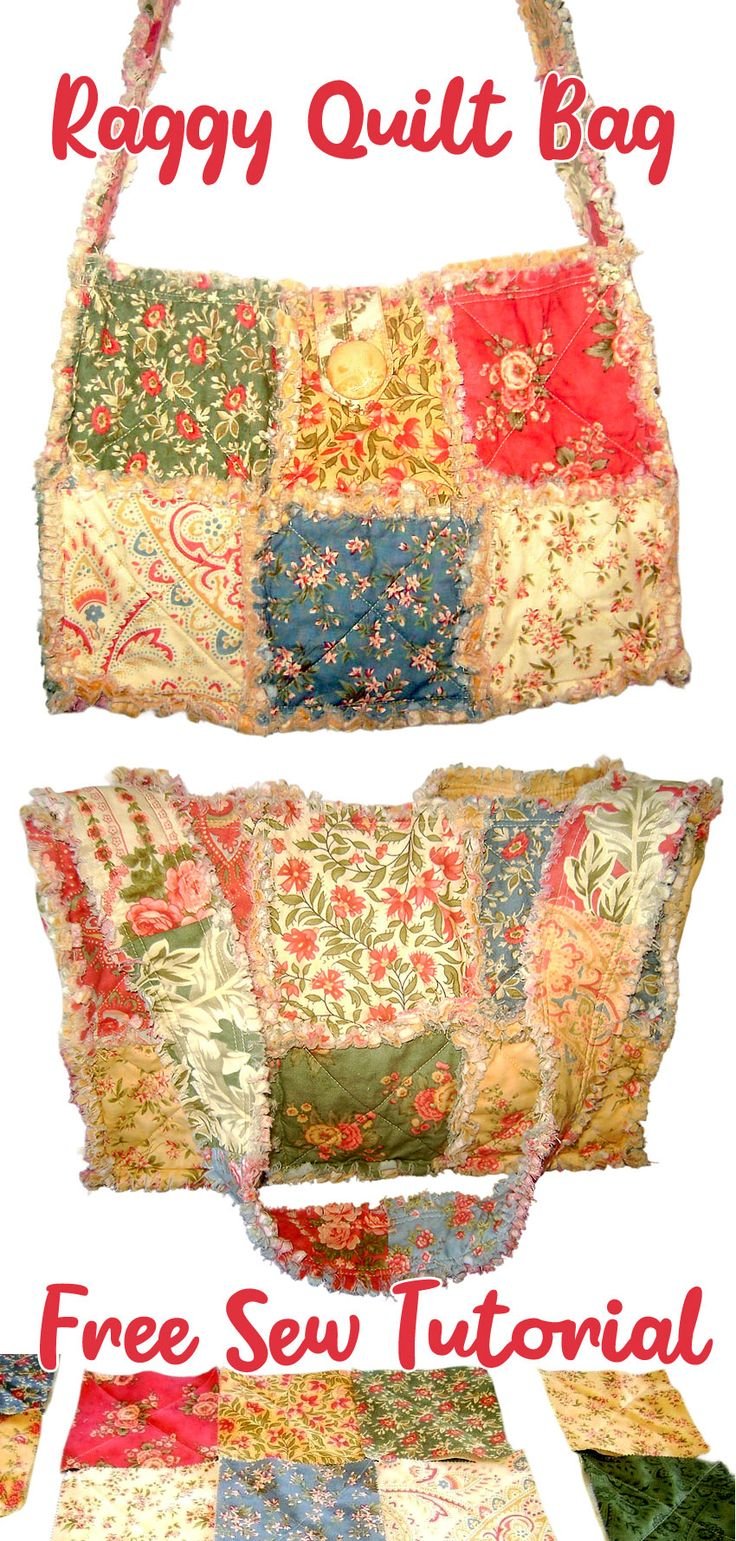
The Rag Quilt Purse – Pattern has gained popularity thanks to its charming texture, which is both eye-catching and comforting. It features layers of soft cotton or flannel that are sewn with exposed seams, then clipped and washed to create a “ragged” edge effect that gives it a distinctive, handmade look.
One of the most appealing aspects of this pattern is how approachable it is. Unlike traditional quilting, which often requires precise seams and detailed piecing, rag quilting is more forgiving. The exposed seam technique allows beginners to enjoy quilting without the pressure of perfect alignment.
The finished product is not only beautiful but also practical. The rag quilt purse is durable, washable, and spacious enough to carry all your daily items. Many crafters even add pockets, closures, and decorative buttons to increase functionality and style.
Another reason to love this pattern is the creative freedom it offers. You can use a mix of fabrics—solids, florals, plaids, or even upcycled materials—to create a truly one-of-a-kind bag. Each combination of fabrics and colors gives the bag a different personality.
The rag quilt aesthetic taps into the growing interest in handmade fashion and sustainability. With the rise of slow fashion, many people are choosing to make their own accessories from scratch, and this pattern fits perfectly into that trend.
Lastly, the Rag Quilt Purse – Pattern is a wonderful gift idea. Whether you’re sewing for a friend, a teacher, or a loved one, the bag’s softness and unique design make it a heartfelt present that shows you’ve put thought and time into something personal.
2. Materials and Tools Needed for a Rag Quilt Purse
Before diving into your Rag Quilt Purse – Pattern, it’s important to gather the right materials. Preparation is key to ensuring a smooth and enjoyable crafting experience.
Start with fabric—you’ll need at least three different types for the top layer, batting (or a middle layer), and backing. Flannel is the most popular choice for rag quilting because it frays well and becomes softer with each wash. You can mix and match colors or go for a monochromatic look.
Next, grab some batting or a soft, low-loft fabric like cotton fleece for the inner layer. This adds body to your bag and helps create that fluffy, quilted texture that rag quilts are known for. If you prefer a lighter bag, you can skip the batting and just use two layers of fabric.
A rotary cutter, cutting mat, and quilting ruler are essential for cutting accurate squares or rectangles. Most rag quilt purses use squares ranging from 5” to 8”, depending on the size of the bag you want.
You’ll also need thread—preferably a durable cotton or polyester blend—and fabric scissors for clipping the seams later. For added strength, use a thicker thread or even a contrasting color for decorative stitching.
One unique tool you’ll want is a good pair of spring-action scissors or snips. These are used to clip the exposed seam allowances, which helps create the frayed, ragged look after washing. This step is crucial and can be tough on your hands if your scissors aren’t sharp or comfortable.
Lastly, gather accessories like buttons, magnetic snaps, or zippers if you want closures. For straps, you can use pre-made leather or canvas handles, or sew your own using fabric or webbing. Lining the inside of the purse is optional but adds polish and structure.
3. How to Make a Rag Quilt Purse – Pattern Step-by-Step
Making a Rag Quilt Purse – Pattern is a rewarding process, especially once you see the soft, frayed edges form after washing. Here’s a simplified breakdown of the steps involved.
Start by cutting your fabric. You’ll need equal numbers of squares for the front, batting, and back layers. A typical layout might be 12 to 20 squares total, depending on the desired purse size. Stack them into “sandwiches”—top fabric, batting, and back fabric (right sides facing out).
Next, sew an “X” across each sandwich diagonally from corner to corner. This step secures the layers together and gives the squares their quilted look. It’s a great opportunity to use decorative stitching if you want to add some flair.
Once all squares are stitched, arrange them in the desired layout for the front, back, sides, and bottom of the purse. Sew the squares together using a ½” seam allowance, with the seam allowances facing out. This is what will become your “rag” fringe.
After assembling the panels, sew the sides together to form the bag shape. Attach the front and back panels, then add the side panels and bottom. Reinforce the corners by sewing over them twice if you plan to carry heavy items.
If you’re adding straps, sew them into the top seam at this stage. Make sure they’re secure by stitching an “X” or box where the strap meets the bag. You can also add a lining now if desired, but it’s not required for a traditional rag quilt finish.
Finally, the most satisfying step: clip all the exposed seams with your snips, making cuts every half inch without cutting into the stitching. Toss the bag into the washing machine and dryer to fray the seams. Once dry, your Rag Quilt Purse – Pattern will be soft, fluffy, and full of texture.
4. Design Variations and Personalization Ideas
The Rag Quilt Purse – Pattern is wonderfully customizable, and that’s part of what makes it so enjoyable. With a few tweaks, you can create a bag that reflects your personal style or matches any outfit or occasion.
Consider playing with fabric choices. You could use denim for a rugged, casual look or pastel flannel for something soft and sweet. You might even repurpose old shirts or baby blankets to give the purse a sentimental or sustainable twist.
To make your purse more structured, use interfacing on the inside panels or opt for thicker batting. This helps the bag stand upright and can make it feel more like a tote or handbag rather than a slouchy hobo style.
Add embellishments like appliqué, embroidery, or iron-on patches. Monogramming your bag or adding a meaningful quote makes it feel extra special. You can also sew decorative buttons or charms onto the seams for added texture and personality.
For a unique handle design, try braiding fabric strips or using crocheted cords. Some crafters like to incorporate wooden or bamboo handles to give the bag a vintage or boho aesthetic.
Think outside the box by making matching accessories. Use leftover squares to create a coordinating wallet, coin purse, or keychain. This is a great idea for gifting or selling as a set at craft fairs.
Lastly, play with shape and size. Instead of squares, try using rectangles to make a messenger-style bag or add extra rows for a larger tote. The pattern is flexible enough to adapt to almost any design you can imagine.
FAQ – Frequently Asked Questions
Q1: What type of fabric is best for a Rag Quilt Purse – Pattern?
Flannel is the most popular choice because it frays well and becomes softer over time. Cotton works too, especially if prewashed. Avoid synthetic blends, as they don’t fray as easily and may not hold the shape as well.
Q2: Do I need a sewing machine to make this bag?
While a sewing machine makes the process faster and easier, it is possible to make a rag quilt purse by hand if you’re patient and enjoy hand stitching.
Q3: How do I stop the seams from unraveling too much?
Proper seam clipping and washing will create a soft fringe without compromising the seams. Be careful not to cut into your stitch lines when snipping the seams.
Q4: Can I line the purse?
Yes, lining is optional but can add durability and a cleaner look inside. Use cotton or canvas and stitch it in before attaching the top edge of the bag.
Q5: Is the Rag Quilt Purse – Pattern good for beginners?
Definitely! It’s one of the most beginner-friendly quilting projects. The seams are exposed by design, and the block format makes it easy to manage.
Q6: Can I wash the purse in the machine?
Yes, the bag is machine-washable. In fact, washing is what creates the signature ragged edges. Use cold water and a gentle cycle, and tumble dry low.
Conclusion
The Rag Quilt Purse – Pattern is a delightful mix of creativity, comfort, and practicality. With just a few basic materials and tools, you can craft a unique accessory that reflects your personality or makes a perfect gift. Whether you’re new to quilting or an experienced maker, this pattern offers room for expression and experimentation.
Throughout this guide, we’ve covered materials, step-by-step instructions, design ideas, and common questions to help you feel confident in starting your rag quilt purse journey. We hope it’s inspired you to pick up your scissors and fabric and give this cozy creation a try.
If you enjoyed this article or have suggestions for future projects, please leave a sincere opinion in the comments. We’d love to hear about your experiences, see your finished bags, and connect with more creative minds like yours. Happy sewing! 🧵👜