Looking to make this stunning star shaped table topper – patchwork project – pattern a part of your home decor or quilting repertoire?
Whether you’re a seasoned quilter or just starting out, this charming and elegant table topper is the perfect project to showcase your skills and add a handmade touch to your table setting.
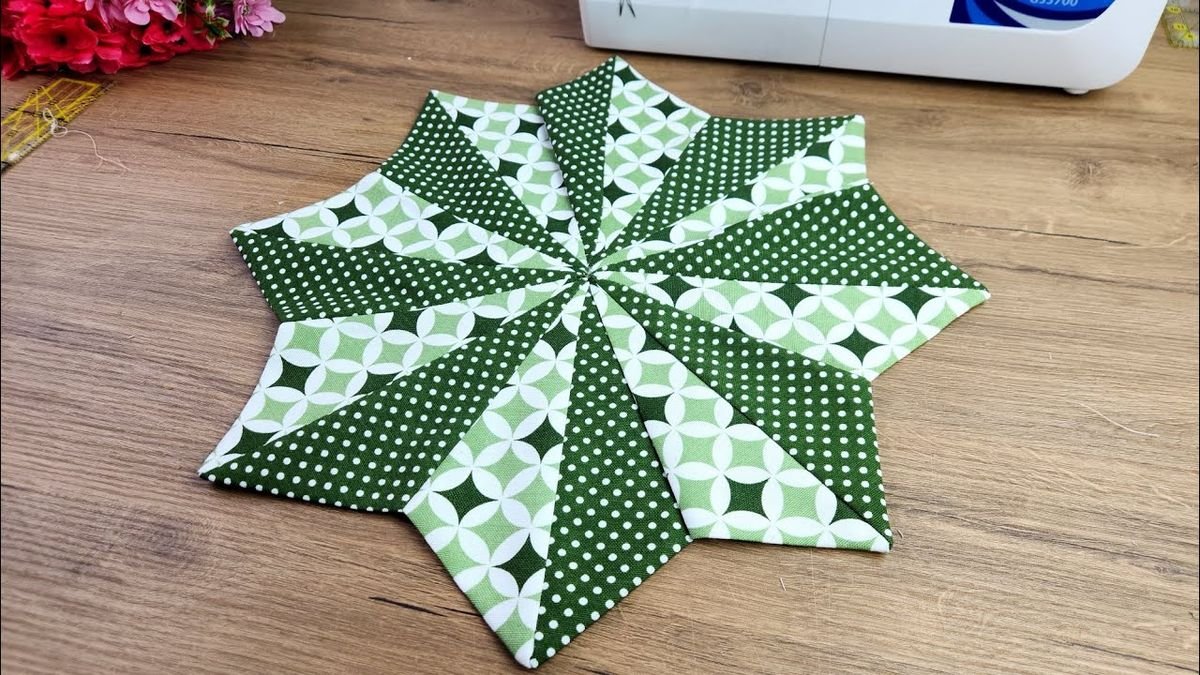
The star shape creates a captivating focal point, and the patchwork design gives you the freedom to play with colors, textures, and patterns.
Creating a star-shaped table topper is more than just a sewing task—it’s an opportunity to bring together creativity, geometry, and craftsmanship. It’s an ideal DIY home decor idea for holidays, special occasions, or everyday elegance. If you follow the pattern closely and take your time, the results will truly shine.
In this article, you’ll learn how to make this stunning star shaped table topper – patchwork project – pattern using beginner-friendly steps. We’ll walk you through materials, cutting techniques, piecing, and finishing, with SEO-optimized tips and clear explanations. Ready to dive into your next quilting masterpiece?
1. Materials Needed and Preparation
Before diving into your patchwork project, it’s important to prepare everything in advance. Proper planning and gathering the right tools will make your project smooth and enjoyable.
Start by selecting high-quality cotton fabrics in various prints and colors that will complement each other and your table. For a star-shaped topper, consider using contrasting colors for the star points and background to enhance the visual impact. Fat quarters or fabric scraps work great for patchwork and give you the flexibility to mix textures and tones.
You’ll also need a rotary cutter, self-healing cutting mat, acrylic quilting ruler, fabric scissors, pins or clips, a sewing machine with a ¼” foot, and coordinating thread. Don’t forget batting and a backing fabric to give your topper shape and softness.
Pre-wash and press all fabrics before cutting. This helps prevent shrinkage and allows for more precise piecing. Accuracy in cutting and measuring is crucial in a patchwork project like this to ensure the star lines up perfectly.
Use printable patterns or templates to cut the star points and center shapes. If working from a digital pattern, print at 100% scale and double-check dimensions before cutting into your fabric.
Mark seam allowances with a fabric-safe pen or chalk. This will guide you as you sew and keep everything aligned correctly. Also, take time to lay out your pieces before stitching to visualize how your star shaped table topper will look.
2. Cutting and Assembling the Patchwork Pieces
Precision in cutting is the foundation of a successful patchwork project. Even small errors can throw off the symmetry of the star, so take your time during this step.
Begin by cutting triangles or diamond shapes, depending on your pattern. Typically, the star consists of 8 diamonds joined at the center, surrounded by background pieces that create the hexagonal or circular border.
Arrange your pieces in the correct order before sewing. Use a design board or clear workspace to layout the sections of your star shaped table topper. This helps you spot any color balance issues or alignment problems early on.
Join the diamonds first by sewing them in pairs, then combining those pairs into halves, and finally forming the full star. Be careful to press seams in the right direction—open or to the side—depending on bulk and preference.
To avoid puckering at the center where all diamonds meet, consider using a pinwheel pressing technique or gently pressing the seams open at that point. This helps keep the centerpiece flat and crisp.
Once the center star is complete, sew on the background pieces. These could be triangles, trapezoids, or other shapes that convert the star into a circular or hexagonal form. Your pattern should provide exact shapes and measurements.
Press everything thoroughly. A well-pressed piece is easier to quilt and gives a polished look to your patchwork project. Consider using a pressing spray to set seams and flatten bulk.
3. Quilting and Finishing Techniques
With your star topper assembled, it’s time to add the finishing touches that give your piece dimension, stability, and a professional appearance.
First, create a quilt sandwich: place the backing fabric (right side down), batting, and your star shaped table topper top (right side up). Smooth out all layers and baste them using pins, basting spray, or hand basting stitches.
Choose a quilting design that enhances your patchwork project. Straight-line quilting works beautifully and is beginner-friendly. You can quilt along the seams (stitch in the ditch) or add echo quilting around the star for more emphasis.
Use a walking foot on your machine to help move all layers evenly. Take your time quilting to avoid puckers and ensure consistent stitch length. Backstitch at the beginning and end of each line to secure your work.
After quilting, trim the excess batting and backing fabric. Make sure the edges are even and follow the shape of your pattern—whether it’s circular, hexagonal, or slightly scalloped.
Bind the edges using double-fold bias tape or make your own binding. If your table topper has points or angles, take extra care to neatly miter corners or curves. Hand stitching the binding to the back will give it a clean finish.
Press the entire topper again and admire your work! Your star shaped table topper is now ready to use or gift.
4. Customizing Your Star Shaped Table Topper
One of the best parts of this patchwork project is how easily it can be customized. Whether you want a holiday-specific version or something that complements your year-round decor, the possibilities are endless.
Try using seasonal fabrics—red, green, and gold for Christmas; orange, brown, and cream for autumn; pastels for spring. The same pattern can look completely different depending on your fabric choices.
Add embellishments like hand embroidery, beading, or applique to personalize your star shaped table topper. These details can give it an heirloom quality and elevate your project from functional to artistic.
You can also experiment with different sizes. Scale the pattern up for a large centerpiece or shrink it down for placemats or coasters. The geometric nature of the design makes it versatile for many uses.
Try alternative layouts. Instead of a single star, create multiple stars and join them together for a quilted runner or wall hanging. The modular nature of patchwork makes this easy to adapt.
Involve kids or beginner quilters by letting them choose fabrics or help with pressing. It’s a fun way to introduce others to sewing and share your passion for quilting.
Finally, label your finished piece with your name, date, and any message you’d like. This turns your patchwork project into a meaningful keepsake or gift.
FAQ – Frequently Asked Questions
Q1: Is this star shaped table topper suitable for beginners?
Yes, it’s a manageable project for beginners, especially with a clear pattern. Basic sewing and cutting skills are enough to get started.
Q2: What size should the table topper be?
Sizes vary, but a common finished size is around 20–24 inches across. You can adjust the pattern scale based on your table size.
Q3: Do I need a sewing machine to make this?
While a sewing machine is recommended for durability and speed, you can sew the topper by hand using small, consistent stitches.
Q4: What kind of fabric is best for this patchwork project?
100% cotton quilting fabric is ideal. It’s durable, easy to work with, and available in a wide range of prints and colors.
Q5: Can I wash the table topper?
Yes, but use cold water and gentle detergent. It’s best to air dry or tumble dry on low to prevent shrinkage.
Q6: Where can I find the pattern?
You can find printable patterns online or in quilting books. Some are free, while others are available for purchase with step-by-step instructions.
Conclusion
In this guide, we explored how to make this stunning star shaped table topper – patchwork project – pattern, from materials and cutting to quilting and customizing. Whether you’re sewing for yourself, gifting, or preparing for a seasonal event, this project brings creativity and handmade charm to your table.
We hope you enjoyed this detailed tutorial. If you tried this patchwork project, please leave your honest opinion and suggestions below. We’d love to hear how it turned out for you and how you made it your own!