If you’re searching for a beginner-friendly yet elegant way to elevate your crochet or fabric projects, the Super Easy Crochet Edge Step-by-Step – Pattern is the perfect solution.
This simple but charming technique allows you to add a decorative finish to items like blankets, towels, handkerchiefs, baby clothes, and even garments. Best of all, it’s a relaxing and quick project that delivers beautiful results with minimal effort.
The beauty of the Super Easy Crochet Edge Step-by-Step – Pattern lies in its versatility. Whether you’re working on cotton, linen, fleece, or crochet fabric, this edge adds a polished and handmade look that feels both professional and personal.
It’s also an ideal starting point for those who are just getting into crochet, offering a chance to master foundational stitches in a practical way.This pattern doesn’t require complex stitches or techniques. Most edges use basic stitches such as single crochet, double crochet, or chains, arranged in a repeating pattern.
With just a bit of practice, you’ll be able to complete a beautiful edging in no time. In the following sections, we’ll walk through everything you need—from materials to instructions, creative applications, and frequently asked questions—using SEO best practices to guide you every step of the way.
1. Why Use the Super Easy Crochet Edge Step-by-Step – Pattern
The Super Easy Crochet Edge Step-by-Step – Pattern is more than just a border; it’s a way to give your project a complete, decorative, and tidy finish. Many crafters use it to transform simple items into thoughtful gifts or heirloom-quality keepsakes.
One major advantage of this pattern is that it’s ideal for beginners. If you know how to make a chain and a single crochet, you already have the skills to get started. This makes it a wonderful project for new crocheters who want instant gratification while practicing their stitch control.
The pattern is also highly adaptable. Whether you’re edging a rectangular baby blanket or a round doily, the stitch repeat can be easily adjusted to fit any shape. This flexibility is one of the reasons why it’s such a beloved go-to technique in the crochet world.
It’s also incredibly time-efficient. Unlike more complex edgings that require hours of concentration and precision, this Super Easy Crochet Edge Step-by-Step – Pattern can be done in short bursts—perfect for busy people or those who want a quick win.
Crafters also appreciate how the edge adds structure and strength to fabric. It helps prevent fraying and curling, especially when used on raw fabric edges or crochet pieces that need a little more weight or definition.
Finally, the edge can be customized in color and size. Use contrasting yarn for a bold outline or a matching tone for subtle elegance. Add beads or picots for extra flair, or keep it clean and simple for a minimalist look—the choice is yours.
2. Tools and Materials You’ll Need
To get started with the Super Easy Crochet Edge Step-by-Step – Pattern, you’ll need just a few basic crochet tools. This makes it an affordable and accessible project that doesn’t require any special equipment.
First, choose your yarn. For most edging projects, a lightweight yarn or crochet thread is ideal. Cotton is especially popular because it holds its shape well and offers excellent stitch definition. Make sure the yarn weight matches your project—for example, finer yarns for baby clothes and thicker yarns for blankets.
Next, select the appropriate crochet hook size. The label on your yarn will typically recommend a hook, but for edgings, you may want to go one size smaller for tighter, neater stitches. Steel crochet hooks are great when working with thin threads and delicate fabrics.
You’ll also need a tapestry needle for weaving in ends, a pair of sharp scissors, and pins or clips to hold your fabric or base in place. If you’re crocheting onto fabric (like a towel or a handkerchief), an awl or sharp needle will help you pre-punch holes along the edge to guide your stitches.
Some crocheters also use a ruler or measuring tape to ensure that the holes or stitches are evenly spaced. This helps keep your edge uniform and professional-looking, especially on longer items like scarves or table runners.
If you’re working on a pre-crocheted project, like adding a border to a baby blanket, make sure the last row of your main project has evenly spaced stitches to support the edge. You might need to add or decrease a few stitches to make the edging line up smoothly.
Lastly, have your printed or digital copy of the Super Easy Crochet Edge Step-by-Step – Pattern nearby. Choose a quiet space with good lighting so you can see your stitches clearly. Having a well-organized workspace makes the entire process more enjoyable.
3. Step-by-Step Guide to Creating the Edge
Now that your materials are ready, it’s time to begin working on the Super Easy Crochet Edge Step-by-Step – Pattern. Below is a simplified version that uses a chain and single crochet combo, perfect for most beginners.
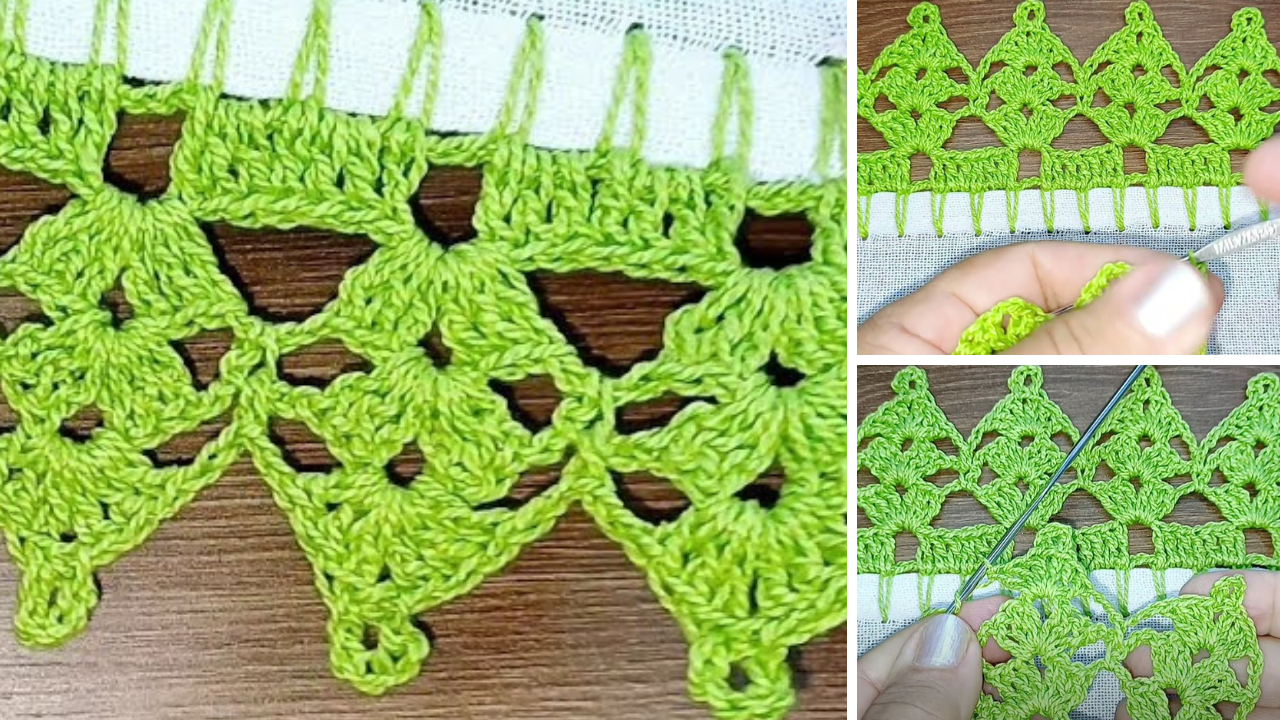
Step one is to prepare your edge. If you’re working with fabric, poke evenly spaced holes along the edge using a sharp needle or awl. This will be where you insert your hook. If you’re working on a crochet piece, ensure the final row is neat and evenly stitched.
Start your edge by attaching the yarn to the corner or beginning stitch with a slip stitch. Then, chain three to five stitches depending on how long you want your loops to be. For a simple scalloped look, chain three is usually enough.
Insert your hook into the next hole or stitch, make a single crochet to anchor your loop. Repeat this process—chain three, single crochet into the next space—until you’ve edged the entire side. Turn the corner by placing two or three single crochets in the same stitch to round it off smoothly.
You can adjust the number of chains to make the edge tighter or looser depending on your style. Some variations include adding double crochet stitches for a more open lacy look or creating mini shells by chaining five and making three double crochets into the same stitch.
Once you reach the end, slip stitch into the beginning stitch, fasten off, and weave in your yarn ends with a tapestry needle. Block your project if necessary to smooth out the edges and bring out the stitch detail.
This basic version of the Super Easy Crochet Edge Step-by-Step – Pattern can be adapted into many styles. Once you’re comfortable, try mixing stitches, adding color changes, or including picots or shell stitches to create new looks.
4. Creative Uses for Your Crochet Edge
There are countless ways to use the Super Easy Crochet Edge Step-by-Step – Pattern to enhance your projects. One of the most popular applications is edging baby blankets. The soft texture and custom colors make it a perfect addition for gifts or nursery decor.
You can also use the pattern on household linens like towels, tablecloths, napkins, or pillowcases. The crochet edge adds a handmade touch that makes ordinary items feel luxurious and unique. This is a great way to impress guests or add charm to your home.
Crocheters love using this edge on garments as well. Try adding a border to a hand-knit or store-bought cardigan, a summer shawl, or even the hem of a handmade skirt. The edge acts like trim, adding personality and visual interest to your outfit.
Don’t overlook accessories! Add this edging to crochet bags, pouches, or headbands for a finished look. Even bookmarks or coasters can benefit from a touch of decorative edging to help them stand out.
If you enjoy seasonal crafts, consider using the Super Easy Crochet Edge Step-by-Step – Pattern for holiday decorations. Edged tree skirts, ornaments, or festive towels are great projects to sell at craft fairs or give as gifts.
Finally, use this pattern as part of your upcycling projects. Add an edge to repurpose old fabric scraps, worn towels, or garments and give them new life. Not only does it reduce waste, but it also adds your signature handmade touch.
FAQ – Super Easy Crochet Edge Step-by-Step – Pattern
Q1: What type of projects can I use this edging on?
You can use the Super Easy Crochet Edge Step-by-Step – Pattern on blankets, garments, towels, pillowcases, scarves, and more. It’s a versatile finishing technique for almost any crochet or fabric project.
Q2: Do I need to pre-punch holes in fabric?
Yes, if you’re edging fabric like towels or napkins, it’s best to pre-punch holes using an awl or sharp needle to guide your crochet hook. This ensures your stitches are evenly spaced and easier to work.
Q3: How do I turn corners when working the edge?
To round a corner, place two or three single crochets in the same stitch or hole to create a smooth curve. This keeps the edging from bunching or pulling tight at the corners.
Q4: Can I use different stitches with this pattern?
Absolutely. While the basic pattern uses chains and single crochets, you can experiment with double crochets, shells, picots, and more to customize the look.
Q5: Is this pattern suitable for beginners?
Yes! The Super Easy Crochet Edge Step-by-Step – Pattern is beginner-friendly and an excellent way to build confidence in your crochet skills while creating a beautiful finished piece.
Q6: Should I block my project after adding the edge?
Blocking is optional but recommended for some projects. It helps flatten the edge, smooth out the stitches, and improve the overall look of the piece.
Conclusion
The Super Easy Crochet Edge Step-by-Step – Pattern is a simple yet impactful technique that every crocheter should have in their toolbox. Whether you’re enhancing a handmade blanket, personalizing a towel, or adding elegance to a piece of clothing, this pattern gives your work a finished, polished look.
explored the benefits, tools, step-by-step instructions, and creative ideas to help you make the most of this versatile edging technique. Now it’s your turn—try it out and see how it transforms your projects!
Have you tried this edge? Let us know your thoughts in the comments below. We’d love to hear your experience, suggestions, and ideas for future crochet tutorials. Your feedback helps make this community stronger and more inspiring for everyone.