Creating your own quilt bag – pattern is a rewarding way to combine your love for sewing, quilting, and creative fashion. A quilt bag is more than just a storage item; it’s a handmade accessory that showcases your style and personality. With a custom pattern, you can craft a bag that’s both practical and beautiful.
Whether you’re a beginner quilter or an experienced sewist, designing and sewing your own quilt bag – pattern can be both fun and functional.
It allows you to use scrap fabrics, experiment with color combinations, and express your creativity while crafting something you can carry every day. Plus, it makes a fantastic handmade gift.
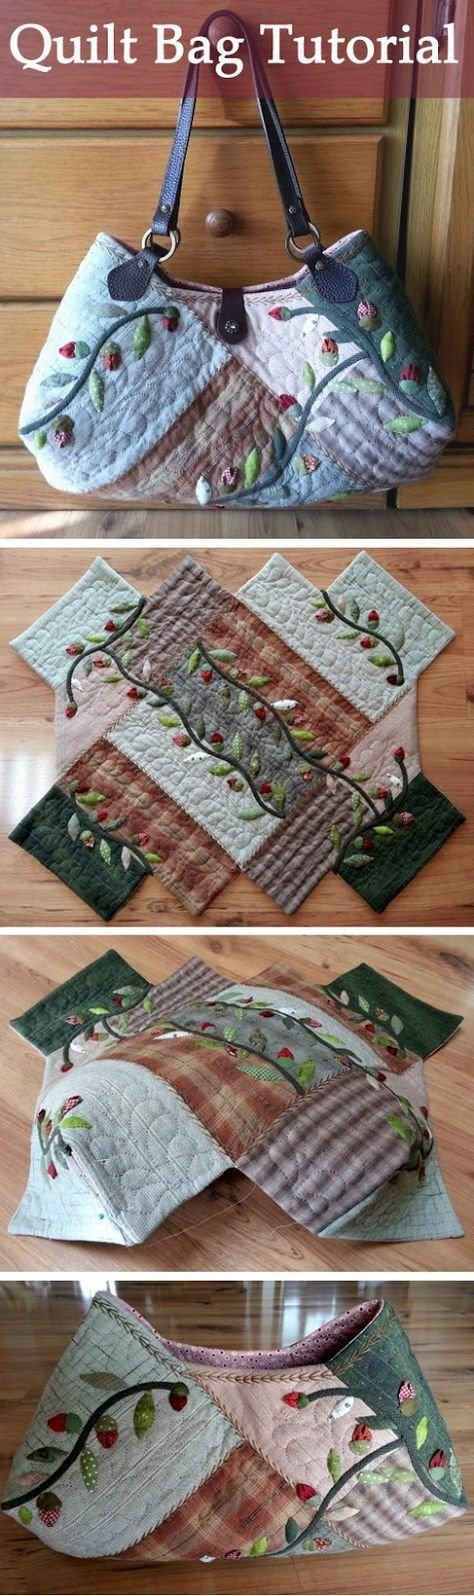
In this guide, we’ll walk you through everything you need to know—from gathering materials and designing your pattern, to sewing and finishing your bag. The techniques and tips shared here are ideal for creating a strong, durable, and attractive quilt bag that stands out. Let’s dive into the art of quilting with purpose and passion.
1. Choosing Materials for Your Quilt Bag – Pattern
The success of your quilt bag – pattern begins with choosing the right materials. From fabrics to thread, every element plays a role in the durability and appearance of your finished bag.
Cotton fabric is the most popular choice for quilt bags because it is easy to work with and comes in endless prints and colors. Choose a mix of solid colors and printed fabrics for visual interest and contrast.
You’ll need batting to give your quilt bag structure and softness. Cotton or polyester batting works well. Fusible fleece is also an option if you want added stiffness without too much bulk.
For the lining, use a sturdy cotton or even canvas. This ensures the inside of your quilt bag is smooth and durable enough to handle daily use. Avoid slippery fabrics that are hard to sew.
Strong thread is essential. Polyester thread offers good strength and elasticity. Choose a thread color that blends with your fabric or adds a nice contrasting touch depending on your style.
Additional supplies like interfacing, zippers, magnetic snaps, or leather handles can enhance the functionality and design of your bag. Choose your accessories based on your desired final look.
Always prewash your fabrics before starting. This prevents shrinkage and color bleeding after your bag is finished, ensuring it retains its shape and color over time.
2. Designing and Cutting Your Quilt Bag – Pattern
Now that you have your materials, it’s time to start working on your quilt bag – pattern design. This part is where your creativity comes into play, and planning ahead can save you a lot of time during construction.
Decide on the style and size of your quilt bag. Do you want a tote, a crossbody, a bucket bag, or a pouch? Sketch your design and take note of the dimensions and pocket placements you want.
Next, draw out your quilt bag – pattern pieces on paper or use a pattern template. Make sure to include seam allowances (usually ¼ inch or ½ inch) in your measurements for accurate cutting.
Cut out your fabric pieces: quilt top panels, lining, batting, and any interfacing. If you are working with a patchwork design, piece your fabric scraps together before cutting to size.
Use pins or fabric clips to hold layers together as you prep for quilting. Make sure your batting is centered and smooth to avoid any bunching while stitching.
Quilt your bag panels using straight lines, diagonal grids, or free-motion quilting if you’re feeling adventurous. This adds texture and strength to your bag design.
After quilting, trim your panels to the final size before moving on to construction. Clean and even edges make assembly easier and give your quilt bag a polished, professional look.
3. Sewing and Assembling Your Quilt Bag
With your quilted panels ready, it’s time to assemble the pieces of your quilt bag – pattern. This step transforms your flat fabric into a structured, usable accessory.
Start by sewing any exterior pockets onto your quilted panels. You can add slip pockets or zippered ones depending on your needs. Topstitch them securely for a clean finish.
Join the quilted panels by sewing the sides and bottom of your bag, right sides facing. Make sure to align corners carefully and press your seams as you go for a neat result.
For added structure, consider boxing the corners of your quilt bag. To do this, flatten each corner and sew a horizontal line across, then trim the excess. This creates a flat base.
Sew your lining pieces together in the same way as your outer panels, but leave a small opening at the bottom for turning the bag right-side out later.
If your bag includes a zipper, attach it before sewing the lining and outer bag together. Alternatively, use a magnetic snap or drawstring closure for simpler styles.
Once everything is assembled, turn your bag right-side out through the lining opening, stitch the opening closed, and press your finished quilt bag for a crisp and tidy look.
4. Personalizing and Caring for Your Quilt Bag
Personalizing your quilt bag – pattern makes your creation one-of-a-kind. Whether through color, embellishments, or custom shapes, adding unique details brings your bag to life.
Add decorative stitching or embroidery to the outside of your bag. Initials, floral patterns, or simple motifs can enhance your design and showcase your handwork.
Consider attaching leather or faux leather handles for a professional finish. You can also use sewn fabric straps, rope, or webbing depending on your bag’s style.
Sew labels, buttons, tassels, or beads to add flair. These small details can give your quilt bag a fun, artistic personality.
Make your bag reversible by using two quilted panels with equally beautiful fabrics. This gives you two looks in one and makes the most of your fabric choices.
To care for your quilt bag, spot clean as needed and avoid machine washing if you’ve used interfacing, leather, or metal hardware. Hand washing with mild detergent is safest.
Store your quilt bag in a dry place when not in use, and consider stuffing it with soft fabric or tissue paper to help it keep its shape over time.
FAQ – Frequently Asked Questions
Q1: What is a quilt bag used for?
A quilt bag can be used as a tote, purse, grocery bag, or even a project bag for crafts. Its padded structure makes it ideal for carrying delicate or heavy items.
Q2: Do I need a sewing machine to make a quilt bag?
While a sewing machine speeds up the process, you can make a quilt bag by hand if you have the patience. However, quilting and strong seams are easier with a machine.
Q3: Can beginners make a quilt bag – pattern?
Yes! A basic quilt bag – pattern is beginner-friendly. Start with a simple design, like a small tote, and gradually try more advanced techniques as your skills grow.
Q4: How do I choose colors for my quilt bag?
Pick colors that match your wardrobe or season. Complementary colors and high-contrast patterns work well. Using a color wheel can help guide your decisions.
Q5: What type of batting is best for a quilt bag?
Medium-weight cotton batting is a great choice. If you want extra structure, consider fusible fleece or interfacing in addition to batting.
Q6: Can I sell bags made from this quilt bag – pattern?
Yes, handmade quilt bags are popular at craft fairs and online marketplaces. Just be sure your design is original or that you have permission to sell bags made from a purchased pattern.
Conclusion
Designing and sewing your own quilt bag – pattern is a satisfying and useful craft that combines creativity with functionality. From selecting your materials and quilting the panels to stitching the final seam, every step offers a chance to personalize and perfect your creation.
With this guide, you’ve learned how to plan your quilt bag, choose fabrics, cut and assemble pieces, add unique details, and care for your handmade accessory. Whether you’re crafting for fun or profit, your quilt bag will be a product of your own skill and imagination.
We’d love to hear from you! Share your honest opinion in the comments and let us know how your quilt bag turned out. Suggestions for improving future tutorials are always welcome. Happy quilting!