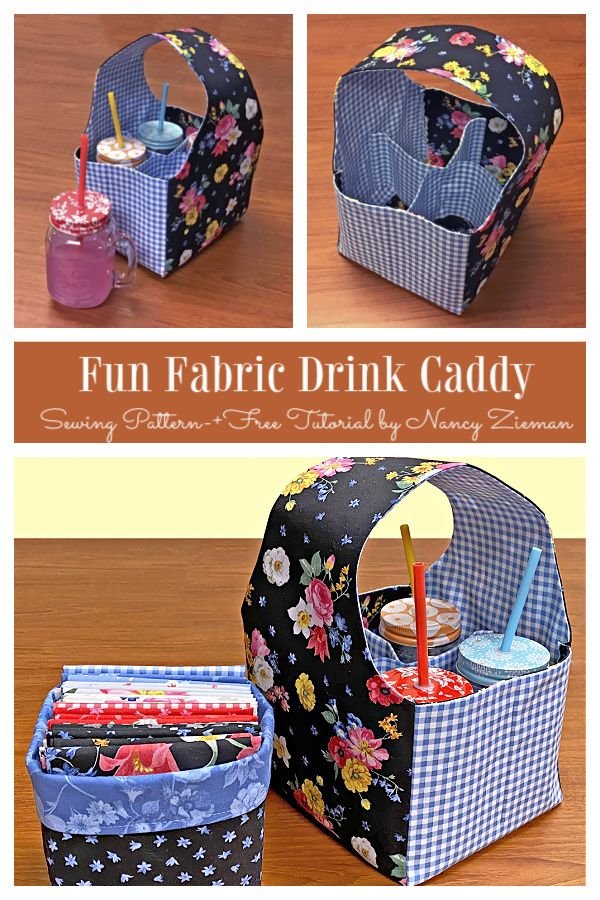
If you’re someone who enjoys picnics, backyard gatherings, or crafting unique home accessories, then this DIY Fun Fabric Drink Caddy – Pattern is a project you’ll love. It’s a creative way to carry drinks safely and stylishly, whether you’re headed to the park, the beach, or simply organizing your kitchen.
With just some fabric, basic tools, and a little sewing knowledge, you can design a practical, colorful, and fun drink caddy.What makes the DIY Fun Fabric Drink Caddy – Pattern especially exciting is its customizability.
You can choose fabrics that match your style, add personalized pockets, and even scale the size to hold anything from baby bottles to soda cans. The pattern is versatile and easy enough for beginners to try, while also offering room for advanced crafters to showcase their creativity.
In this article, we’ll guide you step-by-step through the process of making your own fabric drink caddy. We’ll explore material selection, pattern setup, sewing techniques, and styling ideas. Whether you’re sewing for yourself, a gift, or even your small business, this DIY Fun Fabric Drink Caddy – Pattern is the perfect place to start. Let’s get into the details and start crafting something both useful and beautiful.
1. Why Make a DIY Fun Fabric Drink Caddy?
Creating a DIY Fun Fabric Drink Caddy – Pattern is more than just a craft project—it’s a way to make everyday life a little more organized and a lot more enjoyable. Instead of juggling multiple bottles or cans, a fabric drink caddy allows you to transport beverages safely and hands-free.
One big advantage of making your own caddy is the ability to customize it. Want it to match your camping gear? Choose earth-tone fabrics. Making it for a child’s party? Use bright prints or character themes. The options are endless when you control the pattern.
Another reason to create a DIY Fun Fabric Drink Caddy – Pattern is sustainability. Instead of using disposable bags or plastic carriers, a fabric version is washable, reusable, and long-lasting. It’s an eco-friendly alternative that reduces waste and saves money in the long run.
It’s also incredibly functional. With built-in dividers, handles, and compartments, this caddy ensures drinks don’t tip over or leak. You can even add insulated lining to keep beverages cold during hot days.
This project is ideal for gifting. Imagine arriving at a housewarming party or summer BBQ with a handmade drink caddy filled with refreshments—unique, thoughtful, and highly appreciated.
Lastly, it’s fun and satisfying. Crafting something with your hands, especially a project with such practical use, gives a great sense of accomplishment. With a DIY Fun Fabric Drink Caddy – Pattern, you’re not just sewing—you’re solving a daily problem in a stylish way.
2. Materials and Tools Needed
Before diving into your DIY Fun Fabric Drink Caddy – Pattern, let’s talk about what materials you’ll need. The beauty of this project is that it requires basic supplies you may already have in your sewing space.
First, choose your fabric. Cotton or canvas is ideal because it’s durable and easy to sew. You can use one solid color or mix multiple patterns for a bold look. If you want your caddy to be water-resistant, consider oilcloth or a laminated cotton for the interior lining.
Next, you’ll need interfacing or batting to give your drink caddy structure. This helps the caddy hold its shape when filled. Fusible interfacing works well because it bonds directly to the fabric and adds stiffness without bulk.
For insulation (optional), thermal batting like Insul-Bright can be added to keep drinks cool. This is perfect for summer outings or picnics where you want beverages to stay refreshing.
Handles are essential, and you have a few options. You can sew fabric handles from scratch, use cotton webbing, or even repurpose old bag straps. Just make sure they’re strong enough to support the weight of your full drink caddy.
You’ll also need basic sewing supplies: thread, scissors, measuring tape, pins, a sewing machine, and possibly a rotary cutter and mat for clean edges. If you plan to use snaps or Velcro for closures, have those ready as well.
Lastly, don’t forget to download or sketch out your DIY Fun Fabric Drink Caddy – Pattern before starting. This will guide your cutting and assembly process and help you stay organized as you sew.
3. How to Sew a DIY Fun Fabric Drink Caddy – Step-by-Step
With your materials ready, it’s time to put your DIY Fun Fabric Drink Caddy – Pattern to use. This step-by-step guide walks you through the process from cutting to finishing, making it easy for even beginner sewists.
Start by cutting your fabric pieces according to your pattern. You’ll typically need pieces for the outer shell, inner lining, dividers, and straps. If using interfacing or insulation, cut those to match as well.
Fuse the interfacing to your outer fabric pieces. This adds firmness to the structure of the caddy. If using batting or insulation, baste it to the lining fabric using a zigzag stitch to keep it in place.
Next, assemble the inner pockets or dividers. Fold and topstitch the pocket edges, then attach them to the interior panel. These compartments will keep bottles or cans separated and upright.
Sew the exterior shell by joining the side panels and base. Do the same for the lining, leaving a small gap at the bottom for turning the caddy right-side-out later.
Attach the handles to the outer shell, securing them with a box stitch for extra strength. Make sure they’re evenly placed so the caddy stays balanced when carried.
Finally, place the lining and exterior right sides together and sew around the top edge. Turn the piece right-side-out through the gap in the lining, sew the gap closed, and topstitch around the top edge for a clean, professional finish.
4. Styling Ideas and Custom Variations
Once your DIY Fun Fabric Drink Caddy – Pattern is complete, the real fun begins—personalizing it to match your style or purpose. This is where your creativity can shine.
Try adding appliqué or embroidery to personalize your caddy. Stitch a monogram or fun quote to the front. This adds a touch of charm and makes your project feel truly one-of-a-kind.
Change the layout of the compartments to fit your needs. For example, add a larger section for snacks, napkins, or condiments. If you’re crafting for kids, make compartments that can fit sippy cups or juice boxes.
Use seasonal fabrics to make holiday or event-themed drink caddies. Imagine red, white, and blue for the Fourth of July, or festive patterns for Christmas parties. It’s a quick project, so making multiple versions is totally doable.
Add extra storage by including side pockets or zipper pouches. These can hold small items like bottle openers, corkscrews, straws, or wet wipes—great for on-the-go convenience.
Play around with contrast linings or decorative topstitching to make your caddy pop. A bright interior fabric can be a fun surprise each time someone reaches in.
Finally, if you’re crafting as a gift or for sale, attach a care label or usage tag. Include instructions like “Machine Washable” or “Do Not Microwave,” and don’t forget to add your handmade branding.
FAQ – DIY Fun Fabric Drink Caddy – Pattern
Q1: What size should my fabric drink caddy be?
Most patterns are designed to hold four to six standard cans or bottles. You can scale the dimensions up or down depending on your needs.
Q2: Can I wash my fabric drink caddy?
Yes! If you use cotton or canvas and avoid materials like cardboard for structure, your caddy should be fully washable. Use a gentle cycle and air dry for best results.
Q3: Is this project suitable for beginners?
Absolutely. The DIY Fun Fabric Drink Caddy – Pattern involves basic straight-line sewing, making it a great entry project for beginners looking to improve their skills.
Q4: What type of fabric is best for a drink caddy?
Cotton and canvas are best for durability and structure. You can also use laminated or waterproof fabric for the lining to prevent leaks.
Q5: Can I use this pattern for other purposes?
Definitely! This caddy can also serve as an organizer for toiletries, art supplies, gardening tools, or even baby bottles. The pattern is highly adaptable.
Q6: How long does it take to complete a drink caddy?
Most people can finish a caddy in 2–3 hours, depending on skill level and complexity. It’s a quick project with big rewards.
Conclusion
The DIY Fun Fabric Drink Caddy – Pattern is a simple yet incredibly functional sewing project that combines creativity with everyday practicality. You’ve learned how to choose the right materials, follow a step-by-step process, and personalize your design with unique styling touches.
Whether you’re heading out for a picnic, organizing your home, or creating thoughtful handmade gifts, this drink caddy is a project that keeps on giving. It’s customizable, eco-friendly, and a joy to make.
If you’ve tried
this project or plan to, we’d love to hear from you! Please leave a sincere opinion below and share any tips, ideas, or questions you have. Your feedback helps this community of makers grow even stronger. Happy crafting!