If you’ve ever struggled to keep your crafting or sewing supplies neatly organized and easy to transport, you’re not alone.
That’s why This Bag is Great for Sewing Supplies and More – Quilting Digest – Pattern has gained so much attention among quilters, crafters, and sewing enthusiasts. It’s more than just a stylish bag—it’s a practical storage solution that you can sew yourself.
Whether you’re heading to a quilting class, organizing your sewing room, or just need a way to keep your tools together at home, this versatile bag is the perfect project. Not only is it functional, but it’s also fun to make and easy to personalize with your favorite fabrics and quilting techniques.
In this article, we’ll explore everything you need to know about the This Bag is Great for Sewing Supplies and More – Quilting Digest – Pattern. From materials and sewing tips to creative ideas for customization, you’ll be equipped to make your very own version of this handy organizer. Let’s dive into the details and start stitching!
1. Why This Bag Pattern Is a Must-Try for Crafters
There are dozens of reasons why This Bag is Great for Sewing Supplies and More – Quilting Digest – Pattern has become a favorite among DIYers and quilters. It’s not just a beautiful project—it’s a smart solution for creative minds.
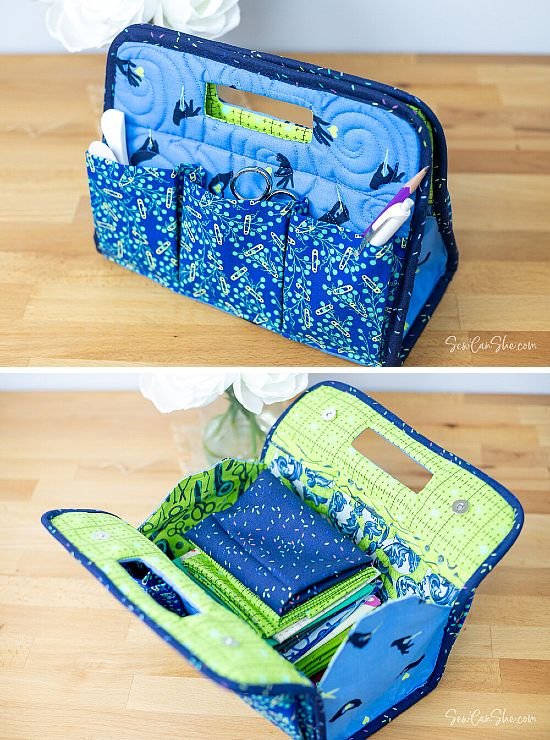
First, the bag offers ample space for organizing tools. With multiple pockets and compartments, you can store scissors, thread, fabric scraps, rulers, and more without the usual clutter.
Second, it’s a great way to showcase your quilting skills. You can incorporate quilt-as-you-go panels, patchwork techniques, or machine embroidery. The bag becomes both functional and artistic.
Third, the pattern is accessible for confident beginners and rewarding for experts. While you’ll need some basic sewing and quilting knowledge, the instructions are usually clear and adaptable for different skill levels.
Fourth, this project is a perfect opportunity for stash-busting. You can use leftover fabric from previous quilts or scrap pieces to create a vibrant, multi-textured design.
Fifth, the finished bag makes for an excellent handmade gift. Whether you’re giving it to a fellow crafter or a creative family member, the personalized touch makes it extra special.
Lastly, the versatility of the bag is unmatched. It can double as a makeup case, art supply bag, or even a lunch tote. With some adjustments, This Bag is Great for Sewing Supplies and More – Quilting Digest – Pattern can be adapted for almost any need.
2. What You’ll Need to Get Started
Before diving into the construction of your bag, it’s important to gather the right supplies. The This Bag is Great for Sewing Supplies and More – Quilting Digest – Pattern is detailed but manageable with the proper tools.
Start with high-quality quilting cotton. Choose coordinating prints or solids, or even fussy-cut designs for added personality. You’ll need fabric for the outer shell, lining, and pockets.
You’ll also want to have fusible fleece or batting. This gives the bag structure and a soft, padded feel—ideal for protecting delicate tools like rotary cutters or measuring tapes.
For closures, consider zippers, Velcro, magnetic snaps, or even decorative buttons. These keep everything secure, especially if the bag will be transported regularly.
Next, gather your basic sewing tools: sewing machine, thread, rotary cutter, cutting mat, quilting ruler, and pins or clips. A walking foot can also be helpful when sewing through layers.
Don’t forget interfacing, especially for pockets or panels that need extra stiffness. This helps the bag maintain its shape and durability through everyday use.
Lastly, if your pattern includes handles or straps, you may need cotton webbing, D-rings, or extra fabric for making reinforced handles. Follow the pattern for exact measurements and quantities.
3. Step-by-Step Tips for Sewing the Perfect Bag
Once you have your materials ready, it’s time to bring the This Bag is Great for Sewing Supplies and More – Quilting Digest – Pattern to life. This section covers essential tips to make your sewing process smoother and more enjoyable.
Start by cutting all your fabric pieces accurately. Double-check dimensions and label your pieces to avoid confusion later. Use a rotary cutter and ruler for clean, precise lines.
If you’re using a quilt-as-you-go method, begin by layering your batting and backing, then adding quilted strips or blocks. This technique adds texture and allows for beautiful designs on your bag panels.
Pay special attention to seam allowances. Consistent seams are essential for a professional-looking finish. If your pattern calls for 1/4″ seams, use a quilting foot or marking guide to stay accurate.
When sewing pockets, take time to press folds, edges, and hems carefully. Well-pressed pieces make sewing easier and the final bag more polished. Add topstitching for durability and style.
Assemble the bag by attaching pockets, panels, and straps in the correct order. Follow the pattern carefully and don’t skip interfacing or stabilizer steps—they’re crucial for structure.
Finish the project by adding your closure mechanism and sewing the lining. Turn the bag right side out, press all edges neatly, and topstitch around openings for a clean look.
4. Creative Ways to Personalize Your Bag
One of the best aspects of the This Bag is Great for Sewing Supplies and More – Quilting Digest – Pattern is how easy it is to customize. Your bag can be as unique as your creative vision.
Use your favorite color palettes or themed fabrics. Think floral prints for spring, holiday patterns for festive gifts, or modern geometrics for a sleek, minimalist look.
Add embroidered initials or names to personalize the bag for yourself or a loved one. Hand embroidery or machine stitching adds a charming, handmade touch.
Incorporate patchwork or pieced panels on the outside. Not only does this make use of scraps, but it also turns your bag into a miniature quilt that showcases your skills.
Experiment with contrast lining or fun prints on the inside of the bag. It’s a little surprise every time you open it—and it adds personality to the overall design.
Sew in extra compartments or zipper pouches. You can tailor the interior layout based on your specific needs—whether it’s sewing supplies, knitting tools, or even school items.
Don’t forget to embellish with buttons, labels, charms, or lace trims. These final details can elevate your bag from practical to absolutely beautiful.
FAQ – This Bag is Great for Sewing Supplies and More – Quilting Digest – Pattern
Q1: Is this bag pattern suitable for beginners?
Yes, confident beginners can tackle this pattern, especially if they’ve made a few sewing projects before. The instructions are generally detailed and supportive.
Q2: What’s the best fabric to use for this bag?
Quilting cotton is ideal for both exterior and lining. It’s durable, easy to work with, and comes in endless prints and colors.
Q3: Can I use this bag for other things besides sewing supplies?
Absolutely! The design is versatile. It works great as a makeup bag, craft supply tote, lunch bag, or even as a travel organizer.
Q4: How do I make the bag more structured?
Use interfacing, fusible fleece, or foam stabilizers. These materials help the bag hold its shape and protect the contents inside.
Q5: Can I sell bags made from this pattern?
If the pattern is from Quilting Digest, check the copyright or usage guidelines. Some patterns allow for small-scale selling; others may be for personal use only.
Q6: How long does it take to complete this project?
Depending on your sewing experience and customization choices, it may take anywhere from 4 to 8 hours, including cutting, sewing, and finishing.
Conclusion
This Bag is Great for Sewing Supplies and More – Quilting Digest – Pattern is a practical and stylish project that every crafter should try. It offers structure, space, and creativity all in one compact and convenient design. From organizing tools to expressing your personal style, it’s more than just a bag—it’s a handmade helper.
In this article, you’ve learned why this bag pattern is so popular, what tools and materials you need, how to sew it with ease, and how to customize it to fit your personality or purpose. We also covered common FAQs to help you avoid mistakes and feel more confident at every stage.
If you decide to give this pattern a try, we’d love to hear from you! Drop a sincere comment or suggestion below—tell us how your bag turned out, what fabrics you used, or what tips you’d give to others. Let’s keep sharing, sewing, and inspiring one another—one stitch at a time! 🧵👜✨