The Ponytail Headband Crochet – Pattern is one of the most practical and stylish crochet projects you can make—especially for those who love wearing their hair up but still want to keep their ears warm or add flair to their look.
This pattern has gained massive popularity among crocheters of all skill levels because of its usefulness, speed to make, and customization potential.
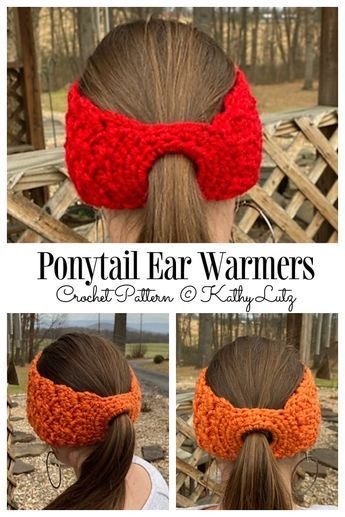
If you’ve ever struggled with hats or headbands that don’t fit quite right over a ponytail, this pattern solves the problem in a beautiful and functional way. It leaves an opening at the back or top, allowing you to pull your ponytail through while still enjoying the snug fit and warmth of a crocheted accessory. With just a bit of yarn and time, you can create a unique and useful item.
In this detailed guide, you’ll learn everything there is to know about making your own Ponytail Headband Crochet – Pattern. We’ll explore how to get started, the tools and stitches you need, ways to personalize it, and even some helpful tips to ensure your project turns out just right. Whether you’re crocheting for yourself, for gifts, or to sell, this pattern is a wonderful addition to your collection.
1. What Is a Ponytail Headband Crochet – Pattern and Why It’s Popular
The Ponytail Headband Crochet – Pattern is designed specifically for those who like to keep their hair tied back but still want to wear a headband. What makes it stand out from regular headbands is the intentional gap or space that accommodates a ponytail, making it ideal for runners, hikers, or anyone on the go.
Crocheters love this pattern because it’s fast and beginner-friendly. With basic stitches like single crochet, half-double crochet, or even front-post stitches, you can finish a headband in under an hour. It’s a great project to use leftover yarn and perfect for quick handmade gifts.
Beyond being functional, the design is incredibly versatile. You can make it narrow or wide, add buttons, change the color scheme, or even add texture with ribbing or cables. The Ponytail Headband Crochet – Pattern gives you creative control without sacrificing simplicity.
Another reason this pattern is so popular is its practicality across seasons. While often used in colder months, lighter versions using cotton or bamboo yarns make it wearable in spring and summer. With a breathable design, it’s both stylish and comfortable all year long.
Crochet entrepreneurs also benefit from this pattern. Because it’s quick to make and appeals to a wide audience, it’s a great item to include in craft fair booths or online shops. Custom color requests and personalized sizing make each piece special.
Lastly, the Ponytail Headband Crochet – Pattern supports sustainability. By using scrap yarn or repurposing old yarn from previous projects, you reduce waste and promote a more eco-conscious craft lifestyle.
2. Materials, Stitches, and Tools You’ll Need
To make a Ponytail Headband Crochet – Pattern, you don’t need a massive toolkit. Most of the materials required are likely already in your crochet bag, which makes this pattern budget-friendly and beginner-accessible.
Start with your yarn choice. Worsted weight or medium-weight yarn is typically best for headbands, providing the right balance between stretch and warmth. Acrylic yarns work well for durability, while wool or blends offer additional warmth and softness.
Next, choose a crochet hook that matches your yarn’s label. Usually, a 5.0 mm (H/8) hook is ideal for medium-weight yarn. However, going up or down a size can help you achieve the desired tension and flexibility depending on your personal style.
You’ll also need a yarn needle for weaving in ends and, if your pattern includes buttons or embellishments, a small pair of scissors and measuring tape to ensure accuracy. Optional tools include stitch markers to keep track of rows or pattern changes.
As for stitches, most Ponytail Headband Crochet – Patterns use basic techniques. Common ones include the single crochet (sc), half-double crochet (hdc), and slip stitch (sl st). These make the band sturdy yet flexible. More advanced versions may include puff stitches or front-post/back-post double crochet (fpdc/bpdc) for added texture.
Many patterns work in rows, while some are crocheted in the round. Depending on your chosen design, you’ll either leave an opening for the ponytail at the top or in the back with a button closure. Both styles serve the same purpose—comfort and convenience.
Lastly, blocking may be required for certain yarns or intricate stitch patterns. While not mandatory, it gives your finished project a polished look and ensures the headband lies flat and fits snugly around the head.
3. How to Crochet a Ponytail Headband Step by Step
Ready to dive into your project? The Ponytail Headband Crochet – Pattern generally starts with a foundation chain that matches the circumference of your head, minus some inches for stretch. Always check your gauge to ensure an ideal fit.
Once you’ve created the foundation chain, join it with a slip stitch if you’re working in the round, or turn and work back across if you’re doing flat rows. The first few rows often establish the texture—some patterns begin with ribbing or even seed stitch.
Continue crocheting rows until the headband reaches the desired width. This typically ranges from 3″ to 5″, depending on how much coverage you want. Thinner bands are better for warmer climates or sporty use, while thicker ones provide more warmth in winter.
When you reach the top or back, it’s time to create the ponytail opening. Some designs split the band and add a button or tie closure, while others taper off and leave a circular hole at the crown. Choose the version that best fits your style.
Once the main body is done, finish off your headband by weaving in all loose ends and reinforcing the seam if needed. For added detail, you can sew on decorative buttons, crocheted flowers, or personalized labels.
Before wearing or gifting your creation, try it on to ensure a snug but comfortable fit. Make adjustments as needed, especially if you’re using stretchy yarns. Proper finishing gives your Ponytail Headband Crochet – Pattern a store-bought appearance with handmade charm.
4. Personalization Ideas and Selling Tips
One of the biggest advantages of the Ponytail Headband Crochet – Pattern is how customizable it is. With just a few tweaks, you can create a completely different look and feel every time you make one.
Start by choosing color schemes that reflect the season or personality of the wearer. Pastels work beautifully for spring, bold brights for summer, and deep earthy tones for fall and winter. Variegated or self-striping yarns also add interest with minimal effort.
Add embellishments like wooden buttons, metal clasps, or fabric linings for a unique, high-end look. Some crafters even embroider small patterns or initials on the band for a personalized touch. These small details can elevate your headband into a premium item.
Another idea is to vary the texture using different stitches. Shell stitch, basket weave, or even bobble patterns can make your headband stand out. You can also alternate stitches every few rows to create a striped or ribbed effect.
If you’re selling your crochet items, consider offering custom sizing and color combos. Market your Ponytail Headband Crochet – Pattern as a gym accessory, yoga wear, or outdoor running gear. Highlight its ponytail-friendly design in your product descriptions for better visibility online.
Packaging also matters. Use eco-friendly wraps or handmade tags to make your product more appealing. A well-presented item feels more like a gift—even when it’s self-purchased—and increases the perceived value.
Finally, consider bundling your headbands with matching items, like fingerless gloves or scarves, to boost sales. A coordinated set not only looks beautiful but also makes your shop or booth look more cohesive and professional.
Frequently Asked Questions (FAQ)
Q1: What is a Ponytail Headband Crochet – Pattern?
It is a crochet pattern designed to create a headband with an opening for a ponytail. The design offers comfort, warmth, and convenience for people who wear their hair up.
Q2: Is this pattern beginner-friendly?
Yes! Many Ponytail Headband Crochet – Patterns use basic stitches and simple construction methods, making it a great project for beginners.
Q3: What type of yarn is best?
Medium-weight yarn (like worsted weight) is ideal. It provides the right mix of warmth and flexibility. Acrylic, wool, or blends work well depending on the season and use.
Q4: How do I size the headband correctly?
Measure the head circumference and subtract 1–2 inches to account for stretch. Adjust your starting chain accordingly and always check your gauge.
Q5: Can I sell items made from this pattern?
Absolutely! Just be sure to check the copyright or license terms of the pattern you use. Many designers allow selling finished items with credit.
Q6: How long does it take to make one?
Most ponytail headbands can be completed in under an hour, especially with basic stitches and minimal shaping. Great for quick gifts or stocking up your shop.
Conclusion
The Ponytail Headband Crochet – Pattern offers the perfect combination of style, comfort, and practicality. Whether you’re looking to stay warm while keeping your hair up, create quick handmade gifts, or build your own small crochet business, this pattern delivers on
all fronts.
From understanding the pattern basics to selecting the right materials, mastering the stitches, and exploring personalization ideas, this guide has given you everything you need to get started.
We’d love to hear your thoughts! Leave a sincere opinion and any suggestions you might have to help us improve future guides. Happy crocheting! 🧶