If you’ve ever fumbled through your bag trying to tell one key from another, the Crochet Key Cover – Pattern is the solution you didn’t know you needed. These small, charming crochet projects are not only functional, but also fun and quick to make.
Perfect for gifting or personal use, they add a creative touch to an everyday object—and help you stay organized too.Using a Crochet Key Cover – Pattern gives your keys a unique personality while protecting them from scratches.
These covers also prevent noise and help you identify keys quickly by color or shape. Whether you’re a beginner or an experienced crocheter, this is a practical project that can be customized in endless ways.
In this article, you’ll find a complete guide to creating your own Crochet Key Cover from start to finish. We’ll cover the materials needed, step-by-step instructions, creative ideas for customization, and tips to make your key covers durable and beautiful. You’ll also find a handy FAQ section at the end to help answer common questions related to Crochet Key Cover – Patterns.
1. Materials Needed for a Crochet Key Cover
Before you dive into your Crochet Key Cover – Pattern, it’s important to gather the right tools and materials. One of the great things about this project is that it requires very little yarn and minimal supplies.
Start with leftover yarn—this is the perfect stash-busting project. Use cotton or acrylic yarn in medium weight (worsted or DK) for durability and color variety. Choose bright or contrasting colors to help identify keys more easily.
You’ll need a small crochet hook, usually between 2.5 mm to 3.5 mm, depending on the yarn weight and how tight you want the stitches. Tighter stitches help keep the key cover snug and more protective.
Basic tools like a yarn needle (for weaving in ends), scissors, and a stitch marker (optional) are also helpful. You won’t need much fiberfill or stuffing unless you’re creating a more decorative or 3D design.
If you’re planning to embellish the key cover, consider using buttons, beads, or embroidery floss. These extras add personality and make your keys even easier to identify.
Don’t forget the key itself! Measure the top of the key to ensure your pattern fits snugly. Most key covers work best for standard house or car keys with rectangular tops.
Lastly, consider using snap buttons or elastic loops if you want your key cover to be removable. Otherwise, it can be stitched closed for a more permanent fit.
2. Step-by-Step Crochet Instructions
Let’s get started on your first Crochet Key Cover – Pattern. This project is typically worked in the round, making it seamless and easy to finish quickly—perfect for last-minute gifts or craft fair stock.
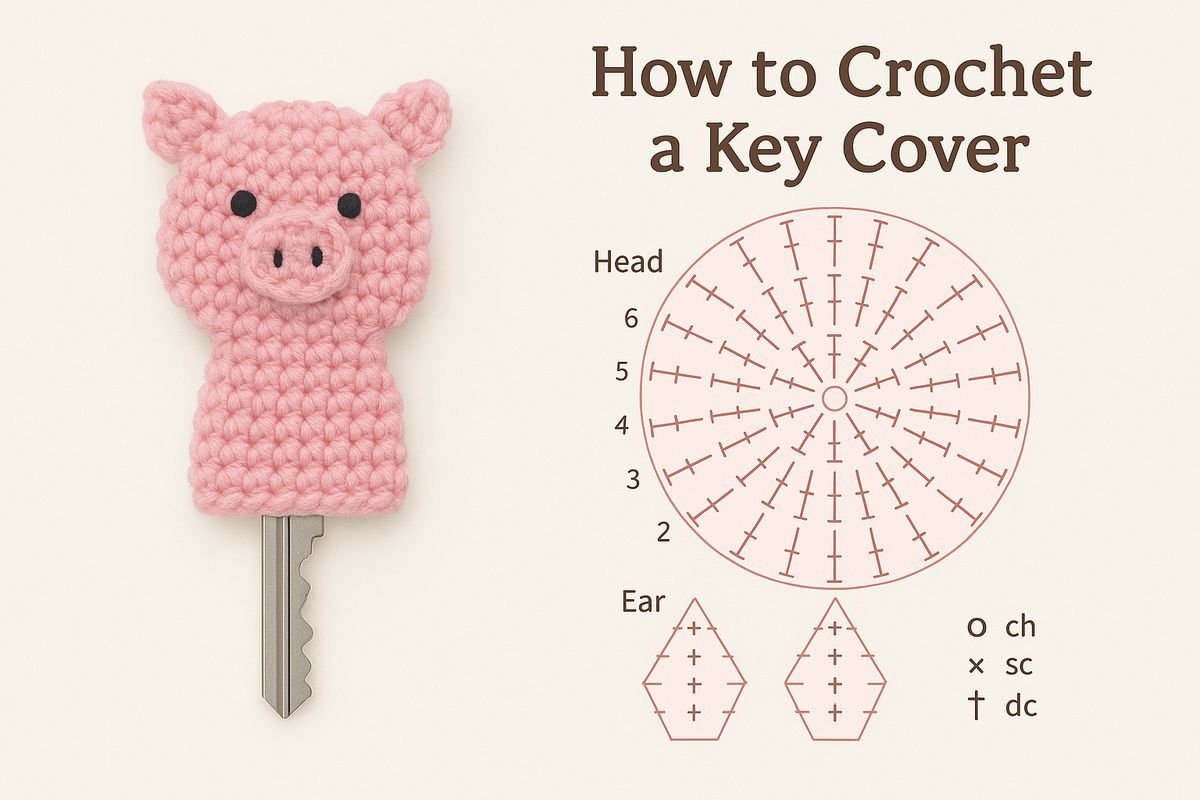
Begin by making a magic ring and working a small number of single crochet (sc) stitches into it—usually 6 to 8. This will be the center of the cover. Pull the ring tight to close the gap.
In the next few rounds, increase evenly to create a flat circle that matches the size of your key’s top. Keep your increases balanced to prevent warping the shape. This round section will serve as the top of the cover.
Once you reach the right width, stop increasing and begin working even rounds to form the sides. This creates a snug “pocket” for your key to slip into. You can adjust the height depending on the key’s size.
If you’d like to leave a space at the bottom for the key blade to stick out, simply stop crocheting once you’ve reached the right length. You can also decrease slightly at the base to hug the key better.
Finish off by sewing the cover onto the key or adding a loop to secure it around the neck of the key. Make sure your stitches are tight and secure—this will keep the cover from slipping off during use.
You can repeat the process in different colors or styles. Once you’ve made one Crochet Key Cover, you’ll likely want to make more for friends, family, or to sell at craft markets.
3. Customization and Creative Designs
What makes a Crochet Key Cover – Pattern so enjoyable is the endless opportunity to personalize each one. They’re small enough to experiment with, but big enough to make a visual impact.
Start with color coding your keys. Use different yarn colors for your house, garage, office, or mailbox keys. This makes them instantly identifiable without any additional markings.
Add embellishments such as embroidered initials, crocheted flowers, or animal faces. These cute touches turn an ordinary key into a mini piece of art—and a conversation starter.
For themed covers, consider holidays or pop culture. A pumpkin for Halloween, a heart for Valentine’s Day, or a cat face for pet lovers are fun ideas. These designs are great for seasonal markets or gifts.
Try out different stitch textures like puff stitch, bobble stitch, or surface crochet. These stitches add dimension and can make your key cover stand out even more.
You can also incorporate practical elements, like attaching a small loop for a carabiner or keychain, or even adding a small pocket to tuck a tiny note or emergency cash.
Lastly, if you’re selling these or making them as gifts, consider packaging them in a cute, eco-friendly way. A simple tag or label adds a professional touch and makes the presentation special.
4. Tips for Beginners and Best Practices
If this is your first time trying a Crochet Key Cover – Pattern, don’t worry. It’s a great beginner-friendly project that helps you practice small rounds, shaping, and finishing techniques.
Start with a simple, two-color version. This helps you focus on learning the construction without getting overwhelmed by complicated designs or extra steps.
Use stitch markers when working in the round. It’s easy to lose track of where a round begins, especially on small projects. Markers help you stay consistent with your stitch count.
Always check the fit of your cover as you go. Keys come in slightly different shapes and sizes, so hold your cover against the key often and adjust stitch counts if needed.
When weaving in ends, do it securely. Because key covers are handled often, the yarn ends must be snug to avoid unraveling over time. Use a tapestry needle to weave into multiple directions for better hold.
Try not to use slippery yarns like silk or bamboo blends unless combined with a sturdier fiber. These can stretch out or slide off the key over time.
Lastly, have fun! This is a creative and practical project, but also a chance to play with colors and shapes. Don’t stress if the first one isn’t perfect—each attempt improves your skill.
FAQ: Crochet Key Cover – Pattern
Q1: What size crochet hook should I use for key covers?
A hook between 2.5 mm and 3.5 mm is ideal. The goal is to keep the stitches tight so the key cover stays snug on the key.
Q2: Can I use leftover yarn?
Absolutely! These are perfect stash-busting projects. Even small yarn scraps can make a full key cover.
Q3: Do crochet key covers fit all keys?
Most patterns are designed for standard keys, but you can easily adjust stitch counts or shape to fit car keys, padlock keys, or novelty keys.
Q4: Are crochet key covers washable?
Yes. Use machine-washable yarns like cotton or acrylic, and they can be hand-washed or put in a laundry bag on a gentle cycle.
Q5: How do I keep the key cover from slipping off?
Make sure your stitches are tight, and the fit is snug. You can also sew the cover onto the key or use elastic loops to secure it.
Q6: Can I sell key covers made from these patterns?
Yes! As long as you’re using original or public domain patterns, you’re free to sell the finished products. Just be sure to check licensing if you’re using a purchased pattern.
Conclusion
The Crochet Key Cover – Pattern is a simple yet satisfying project that adds creativity and function to your daily life. We’ve explored the materials needed, detailed crochet instructions, styling tips, and common questions—all designed to help you confidently create your own key covers. Whether you’re making one for yourself, your family, or your craft shop, this is a fun way to put your crochet skills to good use.
We’d love to hear from you! Leave a sincere opinion or suggestion below to help us improve and inspire others in the crochet community. And if you make your own crochet key cover, don’t forget to share your results!