If you’ve ever loved the charm of traditional crochet squares, then Granny Squares in the Shape of Sunbeams – Pattern is a must-try design that brings fresh energy to a timeless favorite. This pattern is not only visually stunning but also packed with warmth and creativity, making it a perfect addition to your crochet projects. Inspired by the beauty of sun rays breaking through the clouds, these squares combine vintage techniques with modern flair.
The Granny Squares in the Shape of Sunbeams – Pattern introduces a vibrant, radiating motif that mimics the golden beams of sunlight. Whether you choose bright yellows and oranges, or a more subtle palette of pastels or neutrals, this pattern captures light and life in each stitch. It’s perfect for blankets, throws, pillow covers, scarves, bags, and even garments—adding a playful yet elegant touch to your crochet work.
This pattern is beginner-friendly but offers enough complexity to keep experienced crocheters engaged. From learning how to shape the “rays” to exploring color transitions and textured stitches, this project invites you to grow your skills while making something beautiful. Let’s dive into the magic behind Granny Squares in the Shape of Sunbeams – Pattern and see how you can bring this sunny style into your handmade creations.
1. What Makes Granny Squares in the Shape of Sunbeams So Unique
At first glance, the Granny Squares in the Shape of Sunbeams – Pattern may seem like just another crochet square, but it carries several unique characteristics that set it apart from traditional granny designs. The pattern radiates outward from the center, creating the illusion of sunlight spilling from the core—a design that’s both artistic and deeply symbolic.
Unlike standard square patterns, these sunbeam granny squares rely heavily on color placement and directional stitching. You’ll often find raised stitches, front post double crochets, and elongated treble crochets used to form the “rays,” which provide both texture and visual movement across the surface of the square.
One of the most striking features of this pattern is its use of contrasting color bursts. Starting from a circular or flower-like center, each ray is often stitched in alternating shades to emphasize the beam effect. This allows crocheters to experiment with a range of color palettes, from warm sunrise tones to bold rainbow bursts.
In terms of construction, the square is built in rounds—much like traditional granny squares—but with strategic increases and special stitches that create a more dynamic appearance. The result is a square that maintains its form but feels alive and glowing.
Another advantage of this pattern is its modularity. Just like traditional grannies, the sunbeam squares can be joined to form larger pieces. Whether you’re making a baby blanket or a statement wall hanging, the squares come together seamlessly while keeping their individual charm.
The Granny Squares in the Shape of Sunbeams – Pattern is also an ideal way to use up scrap yarn. The small color segments required for the beams mean you can make each square a little different, giving your project an eclectic and personalized feel.
2. Materials and Tools for the Perfect Sunbeam Square
To start your own Granny Squares in the Shape of Sunbeams – Pattern, you’ll want to gather a few key tools and materials. Most are common crochet essentials, but the beauty of this project lies in the freedom to choose vibrant, creative combinations.
The first thing to consider is yarn choice. Worsted weight cotton or acrylic yarn is highly recommended, especially for beginners. Cotton provides a nice definition for each ray, while acrylic is budget-friendly and easy to care for. Use colors that create strong contrast for the best sunbeam effect.
Your crochet hook size should match your yarn. A 4.0 mm (G) to 5.5 mm (I) hook is standard for worsted weight yarn. Check the yarn label for recommendations, and consider going one size smaller if you prefer a tighter square with firmer structure.
Keep your stitch markers handy. This pattern involves increasing in precise places to shape the rays, and markers will help you keep track of your progress—especially if you’re crocheting in the round.
You’ll also need a tapestry needle for weaving in ends, and scissors for quick snipping. Given the multiple color changes involved in the pattern, secure and tidy finishing becomes a big part of the overall look.
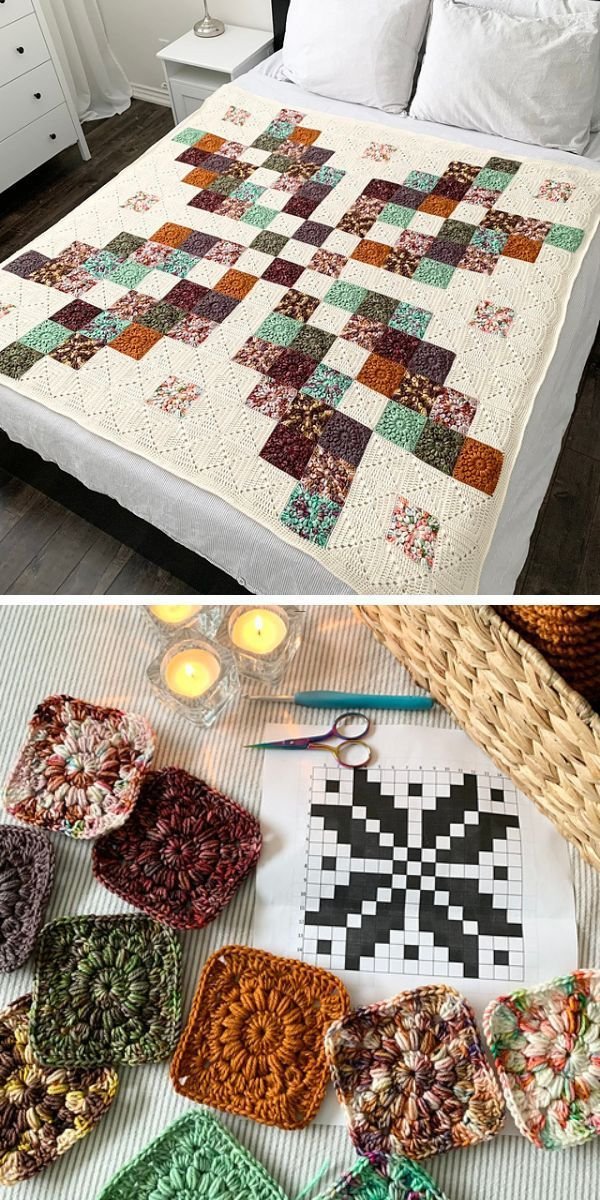
A printed or digital copy of the Granny Squares in the Shape of Sunbeams – Pattern is helpful, especially for following along with charts or round-by-round instructions. Many versions include photos or diagrams to clarify the positioning of each stitch.
Lastly, don’t underestimate the importance of blocking. After finishing your squares, lightly blocking them will help the stitches settle and enhance the sharp lines of the sunbeams, making your project look polished and professional.
3. Step-by-Step Breakdown of the Pattern
The Granny Squares in the Shape of Sunbeams – Pattern begins at the center and works outward in structured rounds. Each round introduces new techniques to help shape the rays while preserving the overall square format.
Start with a magic ring or chain loop. This forms the tight center of your square, which is usually a small flower or circular motif. Use your lightest or brightest color for this section to simulate the sun’s core.
As you move to the next rounds, begin to form the sunbeams using front post and extended stitches. These longer stitches pull up over previous rounds to create raised rays. Alternate the placement of regular and raised stitches to make the rays stand out clearly.
In the next few rounds, you’ll increase strategically in the corners to begin forming the square shape. This transition from round to square is a key part of the design. Using shell stitches or corner chains will help anchor the shape while allowing the beam pattern to continue uninterrupted.
Color changes usually occur every 1–2 rounds to create visual contrast between rays and background. Be sure to carry or weave in yarn tails neatly, especially if you plan to make several squares and join them together later.
Continue building out the square, with each round adding to the complexity of the sunbeam effect. Some patterns include a picot edging or textured border to finish the square and emphasize the radiating lines.
Once your square reaches the desired size (typically 6 to 8 inches), block the square flat, pinning down the corners and gently steaming if needed. This ensures uniformity across all squares if you plan to join them into a blanket or other project.
4. Creative Uses for Sunbeam Granny Squares
Once you’ve mastered the Granny Squares in the Shape of Sunbeams – Pattern, you can unleash your creativity in how you use them. These sunny motifs are not just decorative—they’re highly versatile and can brighten up almost any crochet project.
One of the most common uses is in blankets and throws. By joining multiple sunbeam squares, you can create a radiant quilt-like afghan that feels both cozy and energetic. Use a joining method like the whip stitch or join-as-you-go for smooth connections.
Cushion covers are another perfect project. A few well-placed sunbeam squares stitched together can turn a plain pillow into a statement piece for your sofa or bed. Consider using matching or contrasting yarn to frame the edges.
Feeling bold? Use your sunbeam squares to make wearables like cardigans, vests, or bags. The geometric design adds a trendy, boho vibe that works beautifully with modern fashion. Combine squares with solid panels or mesh for a lightweight look.
If you’re short on time, make a wall hanging. A single large square or a row of smaller ones can be mounted on a wooden dowel to create an uplifting piece of art for any room.
Use mini versions of the square to craft coasters or pot holders. These smaller items are great for practicing the pattern and make thoughtful handmade gifts for friends and family.
Lastly, think seasonally—create a sunbeam baby blanket for a spring birth, or a summer-themed table runner using warm yellows and oranges. With the right color palette, the possibilities are endless.
FAQ – Granny Squares in the Shape of Sunbeams – Pattern
Q1: Is this pattern beginner-friendly?
A: Yes! While it includes some intermediate stitches, the pattern is approachable for beginners who know basic crochet and are eager to learn.
Q2: What’s the best yarn for the sunbeam effect?
A: Use high-contrast colors in worsted weight cotton or acrylic yarn. Bright yellows, oranges, or even metallic threads can enhance the sunbeam look.
Q3: How long does one square take to make?
A: On average, each square takes about 30–45 minutes, depending on your speed and experience with special stitches.
Q4: How do I keep the square from curling?
A: Blocking helps a lot. Also, make sure your tension is even and you’re not skipping increases in the corners.
Q5: Can I make a blanket entirely from these squares?
A: Absolutely! They join beautifully and make for a dynamic, textured blanket. You can alternate colors or use the same palette throughout.
**Q6: How do I
carry yarn when changing colors?**
A: You can either cut and weave in the ends or carry yarn along the back for short color transitions. Secure tails well to avoid unraveling.
Conclusion
The Granny Squares in the Shape of Sunbeams – Pattern is more than a crochet technique—it’s an expression of light, joy, and artistry. With its radiant design and adaptability to countless projects, this pattern invites creativity while offering structure for both new and experienced crocheters. From yarn selection to joining methods, each step brings an opportunity to make something truly unique.
We hope this guide has given you a strong foundation to start working on your own sunbeam-inspired granny squares. If you’ve tried this pattern or have ideas to share, we would love to hear from you. Leave your honest feedback, suggestions, or questions in the comments—your input helps grow a supportive community of makers.
Happy crocheting, and may your projects always shine bright!