The Ribbon Box Quilt – Pattern is a visually captivating design that has captured the attention of quilters around the world. With its dimensional effect and vibrant layout, it brings movement and elegance to any quilt. Whether you are a beginner or an experienced crafter, this pattern offers both simplicity and complexity in just the right balance, making it a fantastic addition to your quilting repertoire.
In the world of modern quilting, the Ribbon Box Quilt – Pattern stands out not just for its aesthetic appeal, but also for its versatility. You can adapt this design using a wide range of fabric collections, from bold solids to floral prints, and it will still maintain its structured, ribbon-like flow. Plus, its construction lends itself to customization, so you can truly make each quilt your own.
This article will walk you through everything you need to know about the Ribbon Box Quilt – Pattern, from choosing fabrics to piecing tips, layout strategies, and quilting ideas. Whether you’re sewing for a gift, a gallery, or just for the joy of it, this guide has you covered.
1. Understanding the Ribbon Box Quilt – Pattern
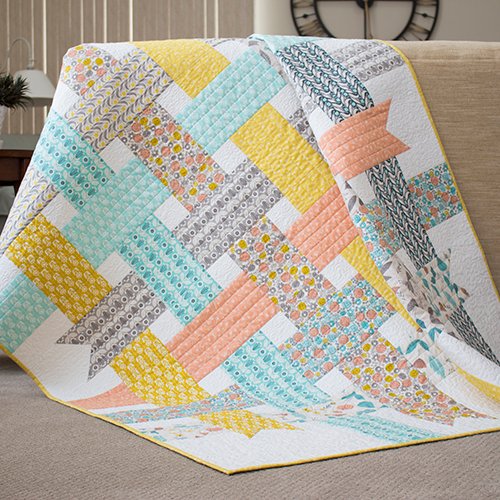
The Ribbon Box Quilt – Pattern creates an illusion of layered ribbons or boxes that appear to pop off the fabric. It’s typically pieced together using basic squares, rectangles, and half-square triangles (HSTs), yet the layout creates a visually intricate design.
One of the best things about this pattern is its beginner-friendly nature. While it may look complex, the blocks are built with standard techniques, so it’s a manageable project for those just stepping into the quilting world. At the same time, seasoned quilters will enjoy experimenting with color placement and negative space.
A good Ribbon Box Quilt – Pattern starts with proper fabric selection. Typically, a combination of light, medium, and dark tones is used to create the 3D ribbon effect. The contrast between the values plays a huge role in creating depth in the final piece.
This pattern is especially popular in modern quilting communities due to its clean lines and dynamic appearance. When combined with bright, high-contrast fabrics, the result is eye-catching and contemporary, suitable for both wall art and functional quilts.
To add more visual interest, many quilters opt for ombre fabrics or batiks. These types of materials enhance the illusion of movement, making the quilt appear to shift and flow as you look at it.
Finally, consider the layout of the quilt blocks. Slight changes in the arrangement can dramatically alter the look of your finished Ribbon Box Quilt – Pattern, offering endless room for creativity.
2. Fabric Selection and Cutting Tips
Fabric choice can make or break a Ribbon Box Quilt – Pattern. Start by selecting a palette that includes at least three distinct value ranges—light, medium, and dark. This will ensure the ribbon effect is maintained throughout the quilt.
Choose fabrics that offer strong contrast when placed next to each other. Solids, tone-on-tones, or prints with minimal visual noise work best to emphasize the sharp lines of the design.
When purchasing fabric, make sure to buy slightly more than what the pattern calls for. This gives you some wiggle room for mistakes or changes in design midway through the project.
Pre-washing your fabric is highly recommended. It prevents shrinkage and color bleeding, especially when mixing dark and light colors in the same quilt.
Use a rotary cutter, acrylic ruler, and self-healing mat for precise cuts. Precision is key in maintaining the symmetry and alignment needed for the Ribbon Box design.
Label your fabric pieces as you cut them. Since the Ribbon Box Quilt – Pattern uses multiple pieces of varying sizes, staying organized will save you time and prevent confusion during assembly.
3. Assembling the Quilt Top
Once your pieces are cut, it’s time to start assembling the quilt top. Begin by laying out your blocks on a design wall or floor to get a sense of the final layout. This visual planning step is essential for the Ribbon Box Quilt – Pattern.
Sew pieces together in rows, double-checking alignment before each seam. Use a consistent 1/4-inch seam allowance for all pieces to ensure uniform block sizes.
Press your seams carefully, either open or to one side, based on what works best for you. A well-pressed seam helps the quilt lay flat and makes quilting easier later.
Pay attention to directional prints. If your fabric includes a pattern with a distinct direction, align them consistently to maintain a cohesive look.
As you piece together more rows, periodically square up your blocks. This prevents the quilt from becoming warped or misaligned as you go.
Once the top is assembled, give it a final press and check for any areas that may need re-sewing. A clean, well-assembled top is essential before layering and quilting.
4. Quilting and Finishing Techniques
Now that your quilt top is complete, it’s time to quilt! The quilting stage can either emphasize or soften the visual impact of your Ribbon Box Quilt – Pattern.
Straight-line quilting is a popular choice. Stitching “in the ditch” (along the seams) can accentuate the ribbon effect and add clean structure to the quilt.
For a more artistic finish, try free-motion quilting in the negative space around the ribbon boxes. Swirls, loops, or geometric designs can add depth and personality to the piece.
Choosing the right thread color is also important. Neutral tones like gray or beige work well, but don’t be afraid to use a contrasting thread for a bold look.
Use high-quality batting that matches the use of the quilt. For example, cotton or bamboo batting is ideal for lightweight, breathable quilts, while wool adds warmth and loft.
After quilting, trim the edges square and bind your quilt with a coordinating fabric. Binding can be used as another design element—opt for a bold color to frame the quilt or a subtle shade to let the design shine.
Finally, label your quilt. Whether it’s for gifting or showcasing, a custom label with the quilt’s name, maker, and date adds a meaningful finishing touch.
FAQ – Ribbon Box Quilt – Pattern
Q1: Is the Ribbon Box Quilt suitable for beginners?
Yes! While the design looks complex, it uses basic quilting techniques like half-square triangles and simple piecing. Beginners can complete this pattern with some patience and careful planning.
Q2: How many fabrics do I need for the Ribbon Box Quilt – Pattern?
You’ll typically need at least three fabrics in varying values—light, medium, and dark. However, many quilters use up to six or more fabrics for added dimension and variety.
Q3: What size is the finished Ribbon Box Quilt?
Sizes vary depending on the pattern, but a common layout yields a lap or throw-size quilt. Adjust the number of blocks for twin, queen, or king sizes.
Q4: Can I use pre-cuts for this pattern?
Yes! Fat quarters and jelly rolls can be adapted for the Ribbon Box Quilt. Just make sure your cuts match the block size requirements of the pattern.
Q5: How do I get the ribbon effect to look 3D?
The 3D effect comes from fabric placement and value contrast. Use darker fabrics for the “shadow” sides and lighter ones for highlights to mimic light and depth.
Q6: What’s the best way to press seams for this quilt?
Pressing seams open is great for reducing bulk and achieving a flat quilt top. However, pressing to one side can help with nesting seams and easier alignment—experiment to see what works best for you.
Conclusion
The Ribbon Box Quilt – Pattern is a creative, modern design that delivers stunning results with relatively simple construction. Whether you’re just starting or looking to add a fresh project to your quilting lineup, this pattern offers the perfect mix of structure and freedom. From choosing fabrics and cutting accurately to piecing and quilting, each step provides an opportunity to personalize and perfect your technique.
We hope this guide gave you the clarity and inspiration to try the Ribbon Box Quilt – Pattern for your next project. If you’ve made this quilt—or plan to—we’d love to hear your thoughts! Feel free to leave a sincere opinion or share your suggestions in the comments. Happy quilting!